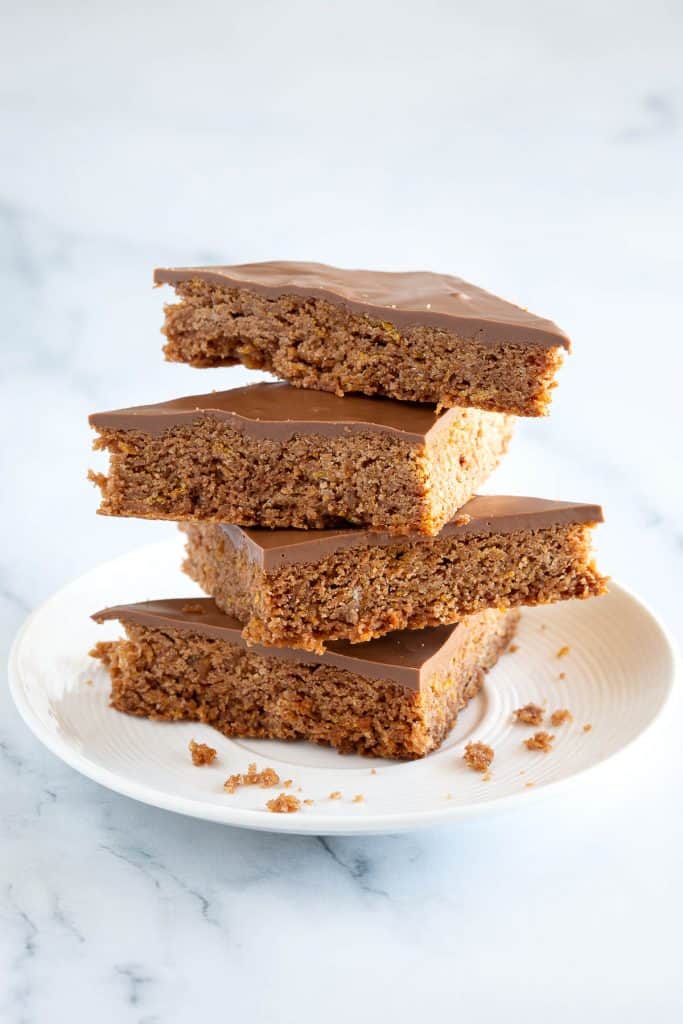
Caramelised crunchy snack heaven! Aussie Crunch is actually a British recipe for a decadent chocolate coconut slice with crushed cornflakes. Super quick prep, easy to batch and freeze!
Why We Love This
Just like chester squares, chocolate concrete or Scottish tablet, this is a classic retro treat guaranteed to bring a hit of nostalgia.
The flavour in this Aussie crunch is like a combination between honey joys and chocolate crackles. It reminds us of being kids and eating all the sweet things from school fetes or going to our grandma’s and gorging on scones or coffee scroll biscuits.
We love the quick prep of 5 minutes to get this in the oven. That’s more time to chill with a cup of tea while it bakes away! We also love the creamy chocolate topping that offsets against the crunchy base so well!
Related: Speculoos Spread / Weetbix Cake / Hedgehog Slice
What is Aussie Crunch?
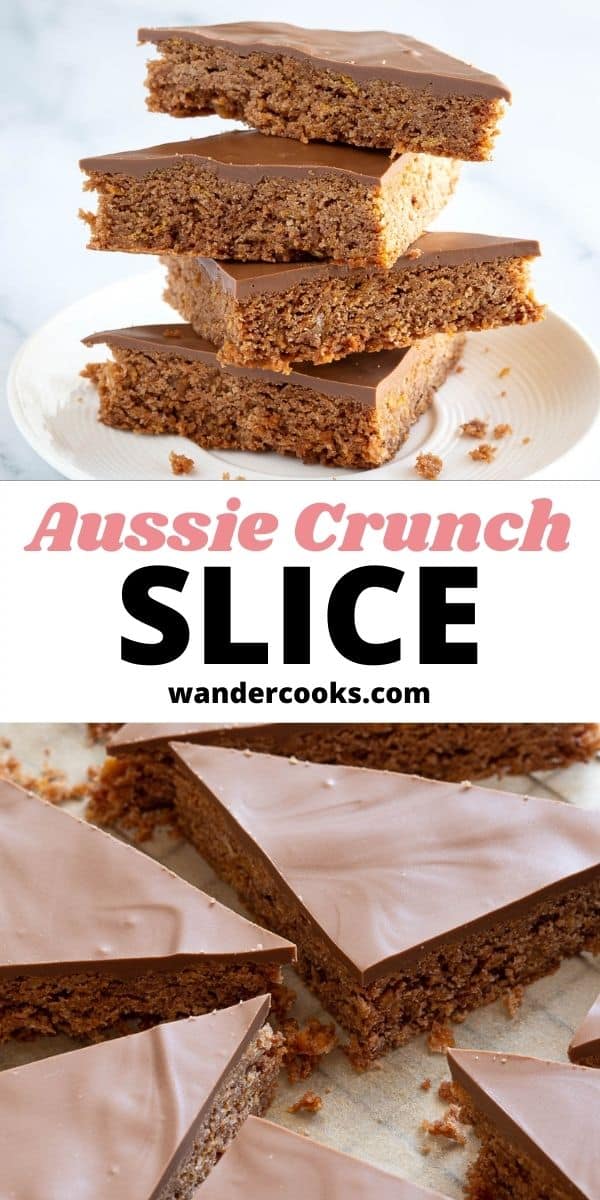
Aussie Crunch, also known as Australian Crunchies or Ozzy Crunch, is a chocolate coconut slice topped with creamy Cadbury chocolate. It’s similar in essence to weetbix slice, with a few different ingredients that set it apart.
Melted butter and golden syrup bind together the crushed cornflakes and coconut for the ultimate crispy yet slightly chewy chocolate slice.
Crazily enough, Aussie crunch is not an Australian recipe, but actually from Northwest England. It’s especially popular in the Bolton area, served anywhere from the school canteen to bakeries and sandwich shops.
If anyone does know how it came by the name of Aussie Crunch – pop it in the comments below. We’re curious, and through all the research, we couldn’t really find a definitive answer.
Aussie crunch is not to be confused with chocolate concrete which is sometimes called chocolate crunch. Chocolate concrete is a drier cake, almost like a brownie and a biscuit, and often served with custard.
What You’ll Need
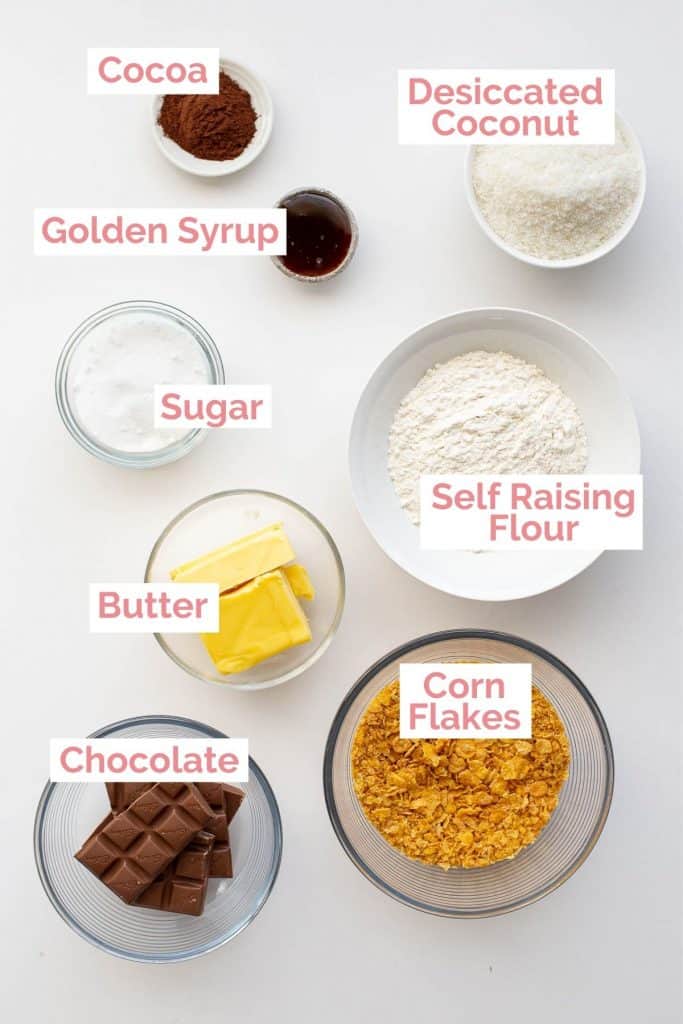
Only 8 super easy baking ingredients are needed for this recipe, with plenty of substitutions available to make them with what you have in the pantry.
- Butter – We used salted butter, but you can also use unsalted or margarine.
- Self Raising Flour – If you don’t have self raising flour, sub with all purpose flour along with 1 tsp of baking powder and ½ tsp of baking soda.
- Golden Syrup – This gives the slice a real caramelised taste along with the butter. You can also use honey, treacle, brown sugar or molasses as alternatives.
- Caster Sugar – Any white sugar will work, or you can also use brown sugar.
- Cornflakes – Crushed cornflakes make up the traditional crunchy base, but you can easily swap them for rice bubbles or weetbix.
Wandercook’s Tips
- Storage – Keep them in the fridge in an airtight container for up to a week. You can also cut them up into bite size pieces and freeze them. Perfect for snacks or lunch boxes just when you need it most!
- Crushing Cornflakes – Use the back of a spoon to crush your cornflakes in a bowl. Or pop them in a bag and crush them up by hand.
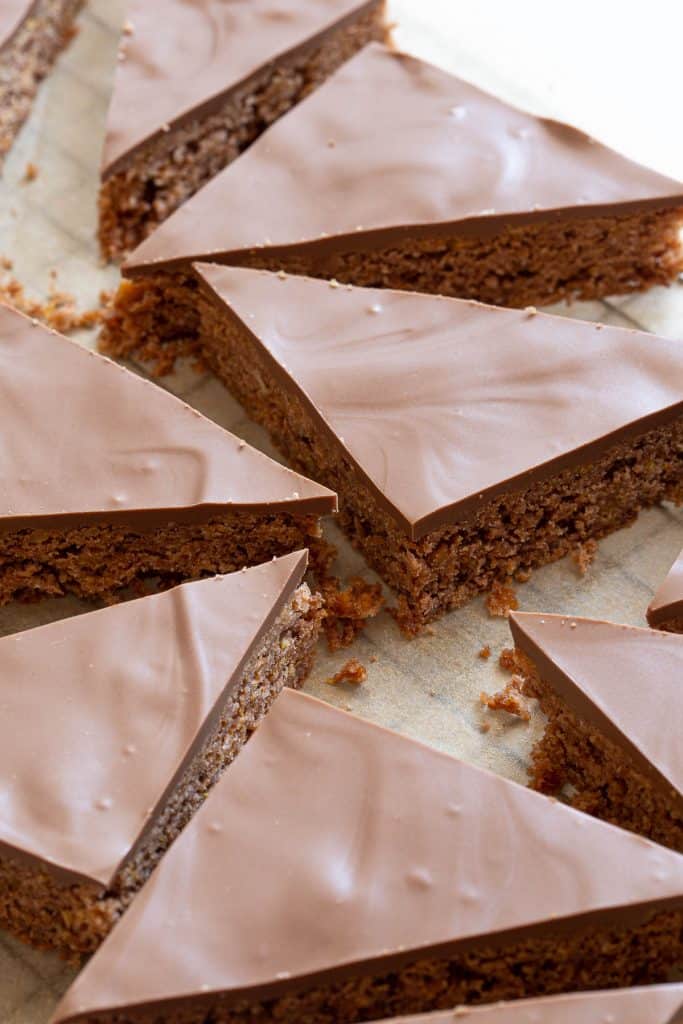
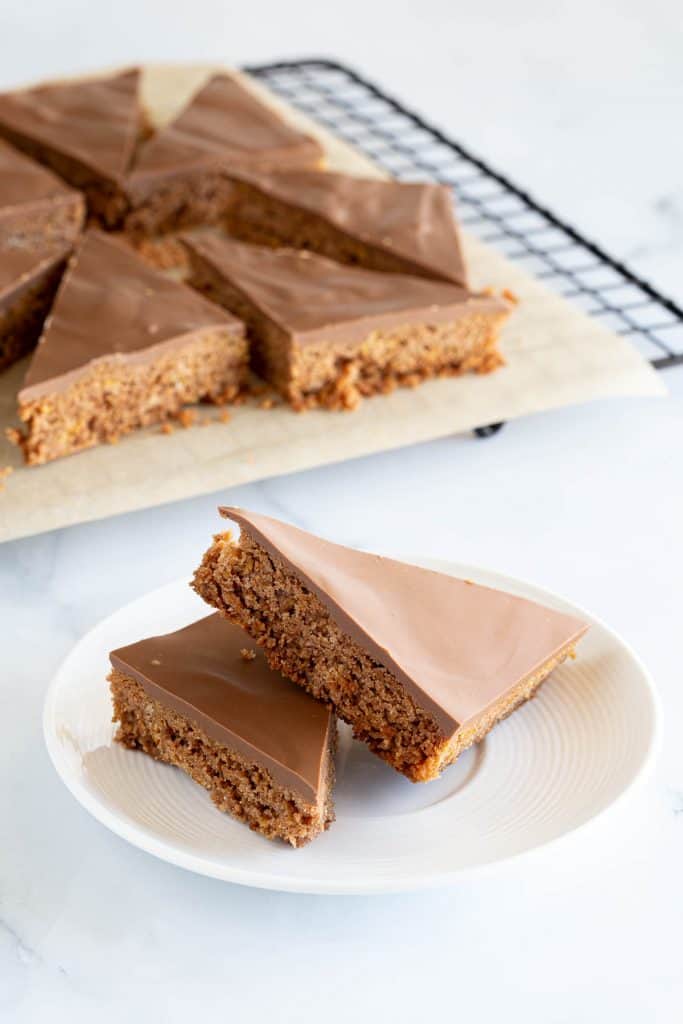
- Triangles – We’ve been told these MUST be cut into triangles, but we won’t tell anyone if you decide to leave them as squares or long slices!
- Low Heat – Low heat is key, as it helps to melt and bind everything together without burning it.
FAQs
Yes, you can easily double or triple the recipe if needed. We recommend cooking in a few separate baking trays so the slices aren’t too thick. Once cooked, cut them into portions first, then seal in an airtight container and pop in the freezer.
The origin of Aussie crunch seems to have originated in England, and not Australia.
More treats from around the world to satisfy that sweet tooth:
★ Did you make this recipe? Please leave a comment and a star rating below!

Equipment
Ingredients
For the slice base:
- 200 g butter salted
- ½ cup caster sugar / superfine sugar 100g
- 2 tbsp golden syrup
- 1 cup desiccated coconut heaped or 80g
- 3 cups cornflakes crushed, 90g
- 1 cup self raising flour heaped or 150g
- 1.5 tbsp cocoa powder
For the chocolate top:
- 1 block Cadbury milk chocolate 180g
Instructions
- Pre-heat your oven to 180°C / 360°F.
- Pop a large saucepan on low heat. Add in the butter and melt first. Then pop in your sugar, golden syrup, coconut, cocoa and self-raising flour. Mix well until combined, then add in the crushed cornflakes last and mix again. Finally, pour into a slice tray or glass baking tray 20 x 30 cm / 8 x 12 inches.200 g butter, ½ cup caster sugar / superfine sugar, 2 tbsp golden syrup, 1 cup desiccated coconut, 1 cup self raising flour, 1.5 tbsp cocoa powder, 3 cups cornflakes
- Using the back of a spoon or spatula, press firmly and flatten (especially into the corners) then pop in the oven and bake for around 25 minutes.
- Remove from the oven and allow to cool.
- Once cooled, break up the chocolate in a bowl and melt in 30 second intervals in the microwave, stirring between each session. Once completely melted, layer with a spatula on top of the slice and place in the fridge to set.1 block Cadbury milk chocolate
- Allow to set for a minimum of 15 minutes, before removing and slicing into squares, triangles or slices, ready to eat straight away or pack for a lunch snack.
Video

Recipe Notes
- Storage – Keep them in the fridge in an airtight container for up to a week. You can also cut them up into bite size pieces and freeze them. Perfect for snacks or lunch boxes just when you need it most!
- Crushing Cornflakes – Use the back of a spoon to crush your cornflakes in a bowl. Or pop them in a bag and crush them up by hand, then pour them in a bowl ready to mix.
- Triangles – We’ve been told these MUST be cut into triangles, but we won’t tell anyone if you decide to leave them as squares or long slices!
- Ingredients Notes:
- Butter – We used salted butter, but you can also use unsalted or margarine.
- Self Raising Flour – If you don’t have self raising flour, sub with all purpose flour along with 1 tsp of baking powder and ½ tsp of baking soda.
- Golden Syrup – This gives the slice a real caramelised taste along with the butter. You can also use honey, brown sugar or molasses as alternatives.
- Caster Sugar – Any white sugar will work, or you can also use brown sugar.
- Cornflakes – Crushed cornflakes make up the traditional crunchy base, but you can easily swap them for rice bubbles and weetbix.
Nutrition


26 Comments
Rebecca
08/10/2023 at 2:46 pmI was so excited to find your recipe! I lived in the south of England as a kid and remembered these from school and always wanted to make them for my kids now but could never find a recipe. I was starting to think I’d imagined them! But no!! Your recipe is exactly as I remember them and soooooo good! Now I can introduce the not-actually-Australian, English deliciousness to America! Thank you!
Wandercooks
10/10/2023 at 5:34 pmOh wow, that is such a cool story and so glad you found our recipe! Thanks for sharing with us and happy baking! 😀
Samantha Kitchen
26/07/2023 at 1:40 amI’m from Bolton, it was there that my friend’s mum first introduced them to schools (thank you June!). She still makes them for us to this today and this recipe looks true to the original, I’m going to make them and will find out if they taste the same. Just one question – why is self-raising flour needed as there is no rise?
Wandercooks
26/07/2023 at 9:30 amHey Samantha! Wow, that is so cool you know the origin person for introducing them to schools, how amazing. We like using self raising to make them just a touch lighter. You’ll have to let us know how they taste!
Dianne
09/07/2023 at 3:26 pmMy mother made these as a staple for the biscuit tin back in the 50’s & 60’s. Iced the top with a cocoa & icing sugar icing then sprinkled with coconut. Always a winner. Reading this recipe has reminded me it is time to make a batch again. It’s been a long time.
Wandercooks
12/07/2023 at 3:28 pmOh wow, what great memories to have and recreate at home. We’ll have to try the cocoa and icing sugar topping next time to see the difference. 😀
Sophia
26/06/2023 at 7:50 amHi, are all the ingredients added whilst the pan is still on the hob on low heat?
Wandercooks
26/06/2023 at 8:49 amHey Sophia, yes, all the ingredients listed in step 2 of the recipe card in the order named. 🙂 Happy baking!
Carol
17/10/2022 at 6:17 pmI first made this from a really old good housekeeping cookery book, which I still have but is in a bad (falling to bits) state.
Brought back good memories
Wandercooks
18/10/2022 at 12:14 pmGreat that you could re-create those memories. 🙂
AliceK
14/10/2022 at 11:01 amThese were great! My family adored them. The cornflakes make them deliciously crunchy, and they are rich and buttery. One tip – instead of waiting for the crunch to cool before topping with melted chocolate, I just sprinkled the chocolate (I used chocolate chips) on the hot crunch mixture as soon as it came out if the oven. Wait 2-3 minutes, then spread the melted chocolate over the surface. No extra bowl to wash!
Wandercooks
18/10/2022 at 12:13 pmThat’s such as good trick Alice, thanks for sharing. Glad to hear you all enjoyed it so much too! 🙂
Hayley
08/04/2022 at 10:40 pmAmazing so good even with out chocolate on the top 👍
Wandercooks
11/04/2022 at 4:01 pmGood to know Hayley! 😀
Bec
11/10/2021 at 12:07 amThese were great! I’m actually from Bolton and used to have these all the time at school! I’ve still no idea why they’re called Aussie Crunch though 😂 Thanks for the recipe – I’ll definitely be making them again 🙂
Wandercooks
11/10/2021 at 1:46 pmThat’s so awesome Bec, so cool you got to grow up with these – we would’ve LOVED them as kids!
Kath
04/03/2021 at 9:53 amI love making this recipe. My old boss introduced it to me. He used to occasionally put mint icing in between the corn flake /coconut base and chocolate. Delicious either way (my old boss is a chef and baker)
Wandercooks
04/03/2021 at 3:59 pmHey Kath, thanks for letting us know! Oh that is quite the decadent idea to pop in a layer of mint icing. We’d definitely be keen to give that a go with the next batch. We’ll have to pop it in the notes for others to try!
Gina
28/07/2021 at 3:07 amHello there ! can someone confirm the cornflake quantity please – 3 cups is not equal to 90 grams – I am not used to work out the quantities in cups .. thank you , Gina
Wandercooks
28/07/2021 at 7:37 amHey Gina, it should be roughly 90g, the cup amount listed is before crushing the cornflakes. Whichever method you prefer (cups or grams) it will work out fine, it doesn’t have to be exact for this recipe. Enjoy! 🙂
Sylvie
09/12/2020 at 8:18 amSuch a delicious mix of smooth, crunchy and decadent. Right up my alley! They look seriously good and addictive too!
Wandercooks
09/12/2020 at 11:18 amIt really is a good mix. I wish we had them growing up!
Sarah
08/12/2020 at 11:44 pmGosh that looks delicious, how have I never heard of this? I lived in England to for several years. Looks like a great easy no bake dessert 🙂
Wandercooks
09/12/2020 at 9:17 amThanks Sarah! Fascinating hey! I think it really is most popular around the Bolton area. Now you’ll just have to make it to test it out hahaha
Heather
17/04/2023 at 8:24 pmThese are delicious but I omitted the coconut!!
Wandercooks
18/04/2023 at 2:20 pmOh that’s good to know it still worked without the coconut. Cheers for letting us know!