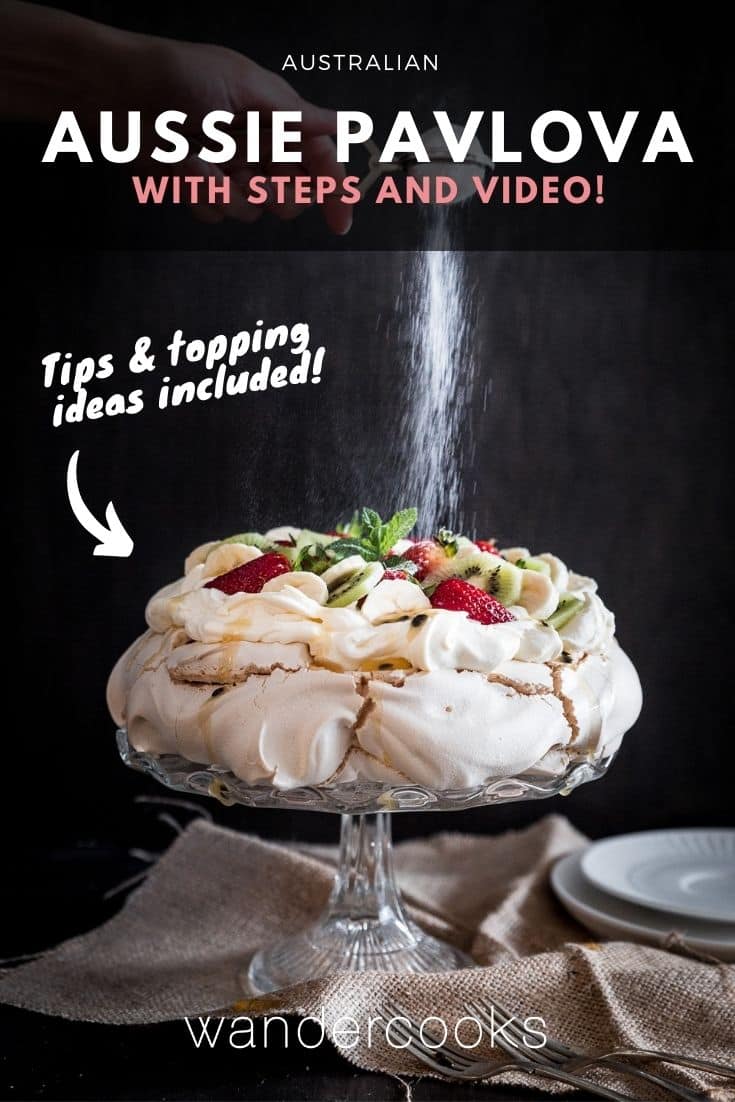
This EASY Australian Pavlova recipe is all about that crunchy, chewy meringue shell and soft, pillowy marshmallow centre. Have the meringue base in the oven in just 15 minutes! Includes recipe video, step-by-step instructions and creative topping ideas.
Why We Love This
Pavlova reminds us of backyard BBQ’s spent with friends under the summer sun. Just like custard trifle and ice cream pudding, it’s a beloved dish at Christmas time in Australia. Especially good after a heavy roast lunch, it’s the perfect light and fluffy dessert that leaves you feeling light and not sick from an overabundance of sugar.
To this day we’re not sure whether the crunchy outer shell or melty marshmallow centre is our favourite part of this dessert. Maybe it’s both!
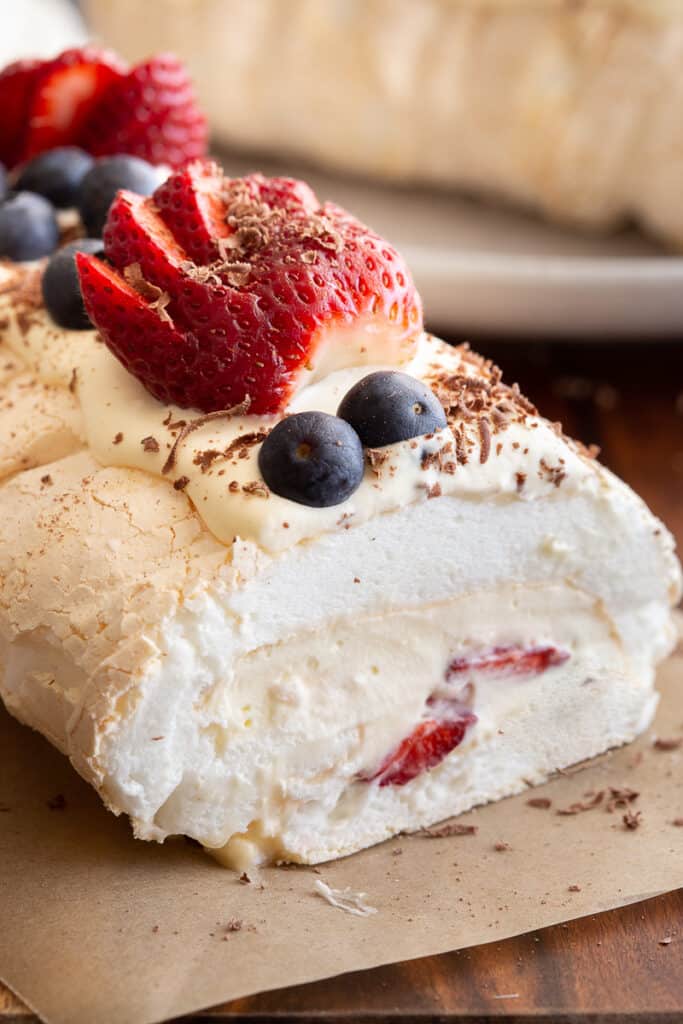
What about you? What’s your favourite way to eat pavlova? Looking for more pavlova ideas? Try our pavlova roll (meringue roulade) or eton mess!
What is Pavlova?
Pavlova is a classic dessert recipe that is always served for family events or celebrations – big or small. Whether it’s a humble BBQ dinner, a birthday, Christmas, New Years Eve celebrations or even Australia Day. It’s super popular because it’s so easy to make and always looks impressive!
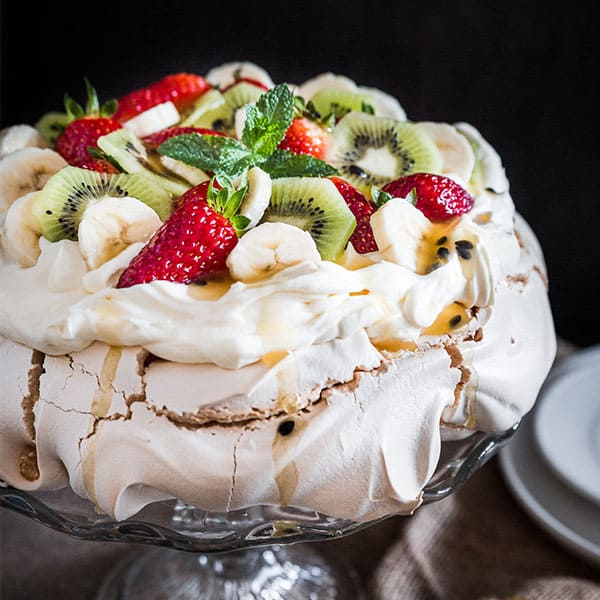
Pavlova is traditionally made from a base of meringue topped with whipped cream and fruit – although these days there’s lots of creative ways you can make it. Another super popular variation is to make it into a meringue roulade aka pavlova roll. See below for more ideas!
Where Does It Come From?
There’s been huge debate over whether this simple sweet dessert of meringue, cream and fruit has Australian, New Zealand or even American origins.
But to anyone who’s pondering this, we’ve got only one thing to say: Just eat it already! When pavlova tastes this good, we’ll share ownership with anybody.
No matter which origin story you subscribe to, today we’re sharing the Australian “version” handed down from our Mums and Grandmas. This is the pavlova style we grew up with, that just gets better and easier with every repetition!
Where We Learned This Recipe
Pavlova sparks so many happy feels and memories of family celebrations for us. Like that time Laura’s Aunty made the biggest pavlova she’d ever seen for Grandma’s birthday. Or those days Sarah spent inside with Mum, beating the eggs and sugar and licking the beaters afterwards.
Growing up with pavlova on both sides of the families meant we just had to share both the recipe and our love for this special dessert.
Pavlova vs Eton Mess
Eton Mess is basically a super quick 5 minute version of pavlova, made into individual portions rather than a full size dessert. It’s like a cheat-mode version, using pre-made mini meringue nests topped with sweet cream and fruit.
If you’re short on time and need a super quick dessert – or even just a mini pavlova to celebrate with friends – then our Eton Mess has you covered. You can also use your homemade mixture to make mini meringues or nests – they’ll taste much better than store-bought meringue, so it’s worth the extra effort.
What You’ll Need
The meringue shell is a super simple blend of eggs, sugar and vanilla essence, with a little vinegar and corn starch added to make it both fluffy AND crispy. A few quick notes on these ingredients:
- Eggs – For best results, make sure to use room-temperature eggs. We use chicken eggs for this recipe, but duck eggs are absolutely fabulous if you can get your hands on them!
- Sugar – We recommend caster sugar, aka super fine sugar. It dissolves into the egg whites more quickly and will give you that smooth texture you’re looking for.
- Vinegar – The acid in vinegar helps the egg whites become fluffy and hold onto all that air that’s beaten in. Regular white vinegar (or white wine vinegar) is the best choice, but you can substitute with apple cider vinegar, cream of tartar, or even lemon juice in a pinch. We don’t recommend strong dark vinegars like balsamic or malt as they’re more likely to add a strong flavour to the meringue.
How to make Pavlova:
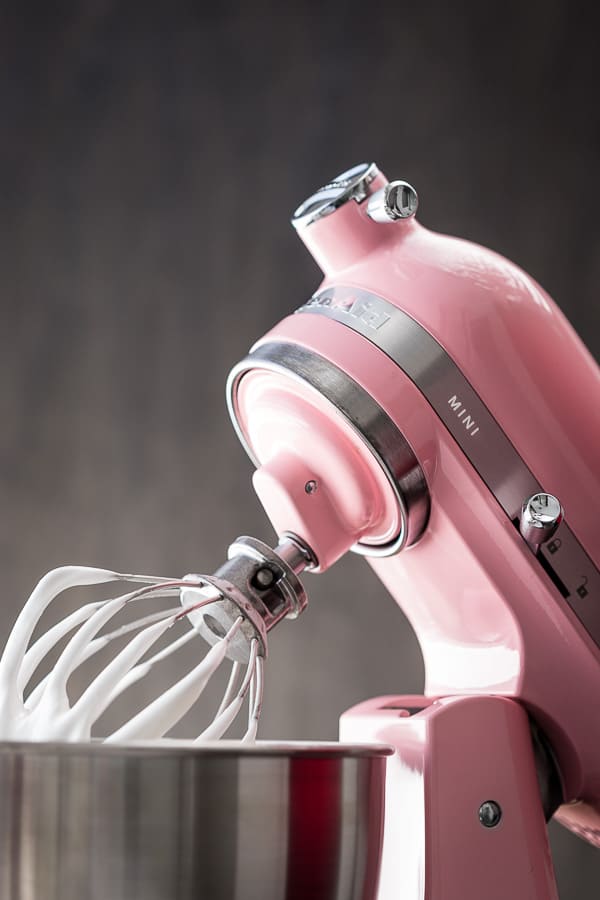
This is the EASY method to make pavlova which we’ve called 2-4-6-8, due to the speed settings used to get that glossy meringue mixture we’re looking for! You can make it in a Kitchenaid Mixer, a regular stand mixer, or a mixing bowl with a hand mixer and gradually increase the speed settings to get it just right.

1. 2. 3.
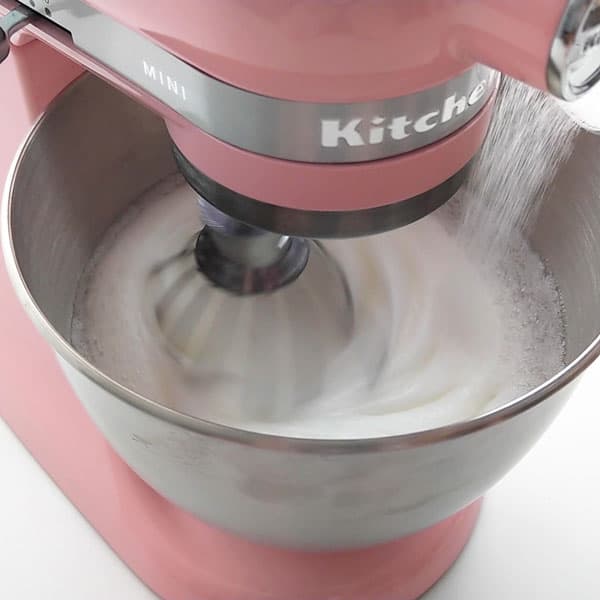
- Pop your egg whites into the mixing bowl and attach the whisk to the stand mixer (or use a hand mixer). Start by whipping them on Speed 2 then move through to Speed 4 after a couple of minutes.
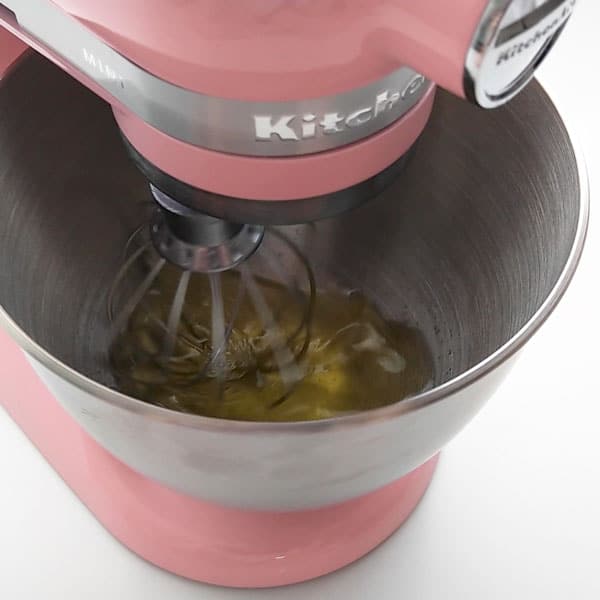
- When the egg whites turn into bubbly soft peaks, up the speed to 6 and add the caster sugar and cornflour, then increase to Speed 8 for 10 – 12 minutes until you’ve got yourself a luxuriously smooth, glossy meringue mixture.
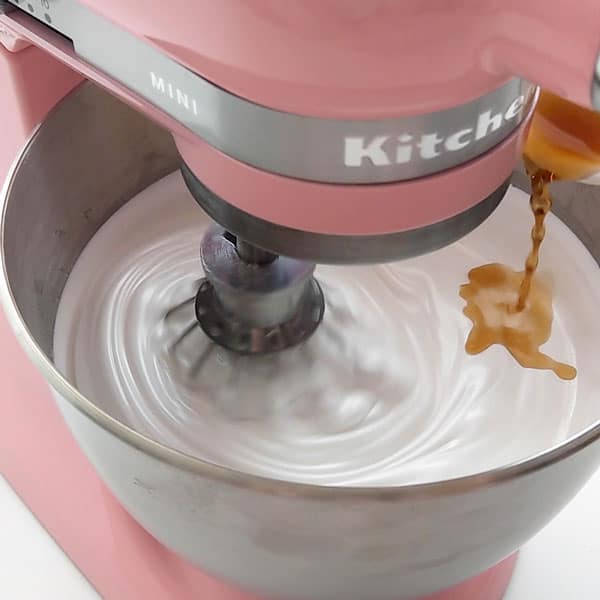
- Now bring the speed down to 4 and pour in the vinegar and vanilla essence. You might need to scrape down the meringue from the sides of the bowl every now and again with a spatula to make sure it mixes through. Let it mix for 1 minute then switch off your mixer.
4. 5. 6.
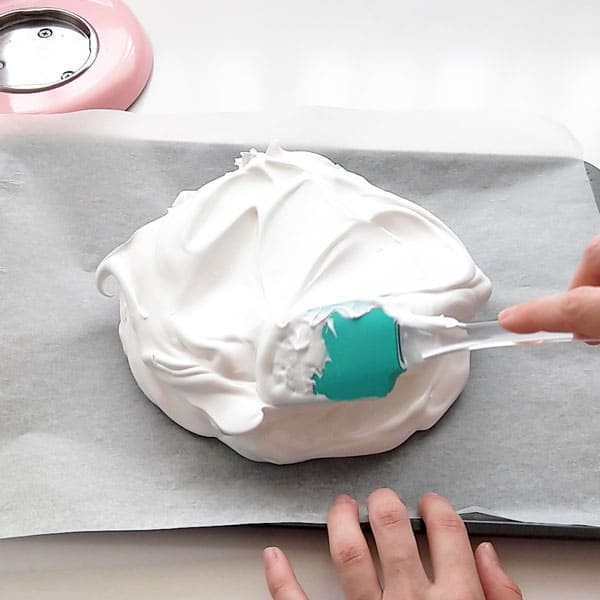

- Scoop out the glossy meringue mixture onto a lined baking tray and form a flat circle shape. Smooth it out or get creative with decorative patterns, twists or twirls. Pop in the oven and bake for an hour to an hour and a half until the meringue sets into a crunchy, crispy outside with a soft golden glow. When the outside is firm and dry, and cracks start to appear on the top, you’re ready to go. Switch off the oven and allow the pavlova to cool in the oven with the door slightly open.
- While the pavlova is cooling, pour your cream into your cleaned mixing bowl and pop in the freezer for 10-15 minutes. When your pavlova is cool, place the bowl back on the stand mixer (or grab your hand mixer) and whip the cream on Speed 6 – 8. Add in the sugar and vanilla essence and continue to whip until the cream thickens and holds a nice shape.
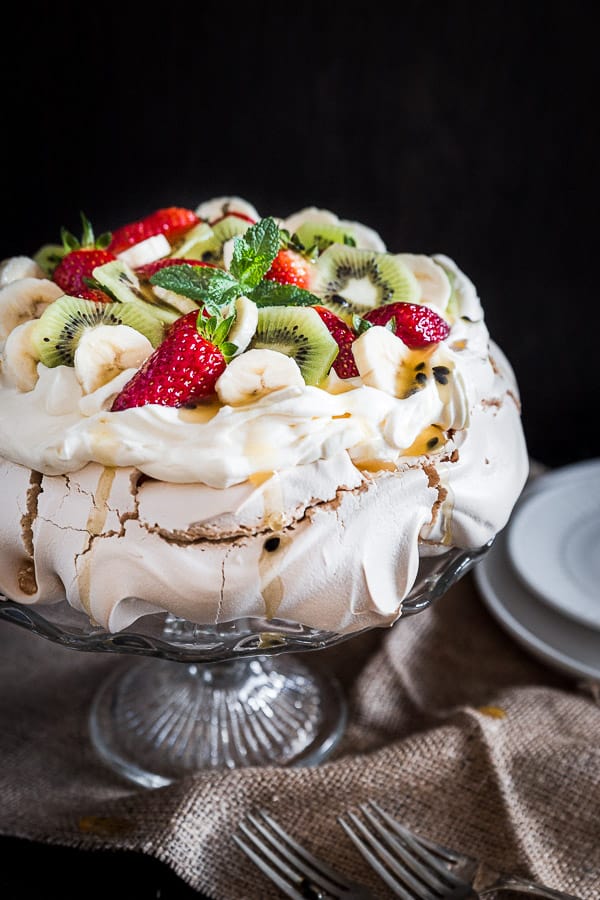
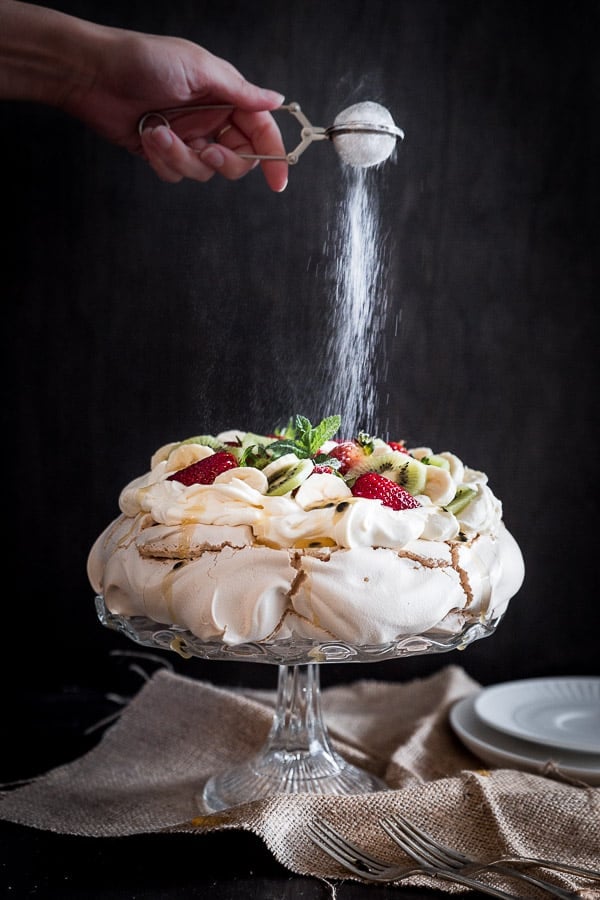
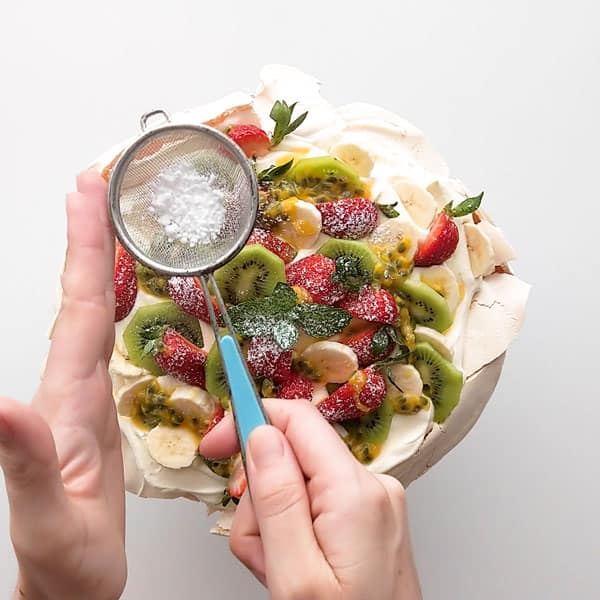
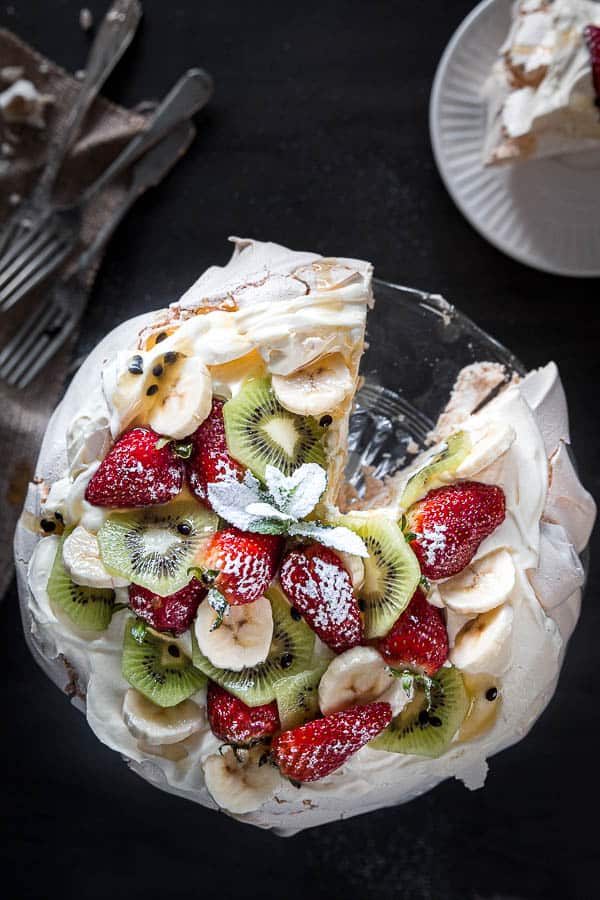
- Top your cooled pavlova with whipped cream and sliced fruit, and dust with icing sugar.
Pavlova Topping Ideas
While the magic is happening as you bake your pavlova in the oven, you’ll have plenty of time to plan your toppings. Here are a few of our favourite topping combinations to get you started!
- Classic: strawberries + kiwifruit + passionfruit + cream + icing sugar
- Mandy’s Favourite (thanks to Sarah’s Wandermum): banana + kiwifruit + passionfruit + cream
- Berry Elegant: strawberries + raspberries + blackberries + blueberries + cream
- Choc Top: nutella + strawberries + cream
- Fruity Goodness: blueberries + mango + passionfruit
Also, whatever you do, don’t skimp out on that whipped cream. Slather a nice thick layer over the top of your pavlova, and make yourself a nice base for your fruit and extra decadence for your plate.
Wandercook’s Tips
- Always use room-temperature eggs – cold eggs can cause your meringue mixture to be too runny.
- Don’t be tempted to add the sugar into the egg whites too quickly. If added too soon, this can make the meringue runny.
- Give the egg whites and sugar plenty of time to combine fully. If you don’t, it can lead to a gritty texture and may cause the pavlova to crack or collapse.
- Cooking the pavlova on the lowest rack in the oven can help to stop it cracking.
- One of our readers suggested humidity can have an effect when cooking meringues! For best results, try avoiding super humid days/environments if possible.
- Leftover egg yolks? Use them to make Italian almond crescent cookies.
FAQs
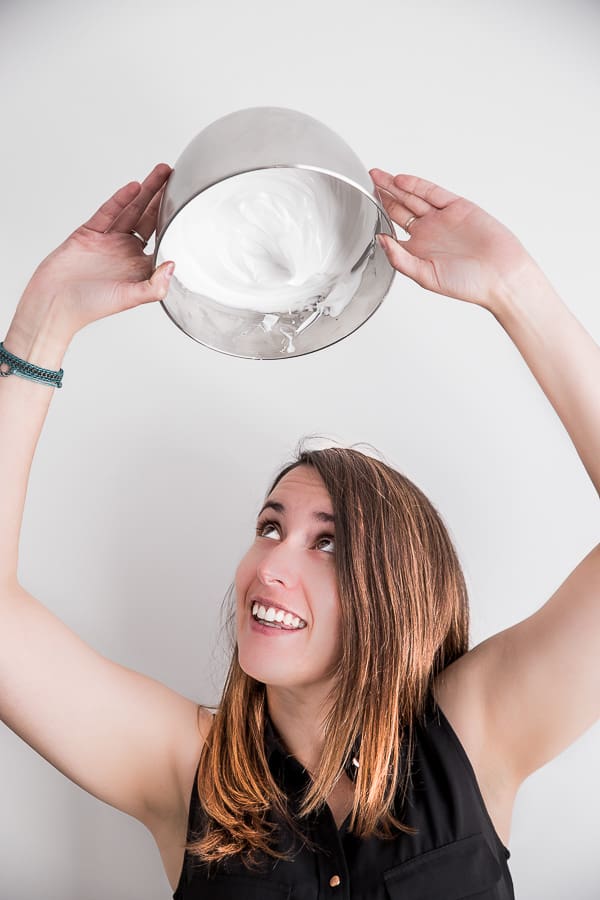
You’ll know when it’s ready, because your meringue mixture should stay firmly stuck in the bowl, even if you tip it upside down. Testing this theory over your head is, of course, completely optional!
Our general rule is at least an hour or two, or even overnight if you want to play it safe. Once the oven is cool, the pavlova should be too, so it’s all good to take it out.
If you take the Pavlova out the oven too soon while it’s still warm this will cause it to sink, collapse and shrink from the cold air.
To help the oven cool down quicker, we open it just a crack so the hot air can escape faster without allowing the cold air to come in too quickly.
If you’re worried, leave the pavlova in the oven overnight with the door shut then top it first thing in the morning.
Don’t worry though, pav is such a forgiving recipe – even if the meringue cracks or sinks in the middle, once it’s covered in whipped cream and toppings no one will ever know. And no matter what it ends up looking like, it always tastes amazing!
Yes! You can make pavlova in advance, even up to a few days. Just store in an airtight container or wrapped in a clean tea towel. Keep the meringue base separate from toppings to keep it crisp, crunchy and fresh for when you serve it up.
It’s always best to store leftovers in the fridge, especially due to the whipped cream topping. While the shell will be softer and won’t stay as crispy, it’ll still be delicious the next day!
Variations & Substitutes
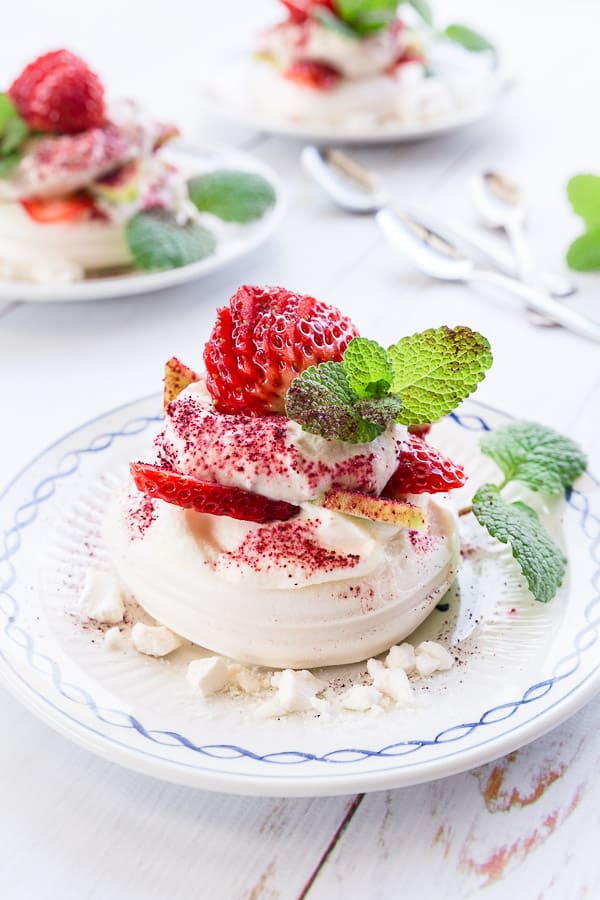
- Make Mini Pavlovas (aka Eton Mess) – Portion out the mixture into separate circles as big or as small as you like. Once cooked, top with a simple topping of whipped cream, strawberries and a sprig or two of mint leaves.
- Crush it! – Deliberately crack the pavlova into pieces, then add to a bowl and top with whipped cream and fruit. For bonus points, serve in glass for a stunning visual effect.
- Play with Shapes – Make it as a square, a wreath (perfect for Christmas!), or a love heart. Make thinner layers of pavlova, then once cooked, layer them up into stacks with the toppings as ‘fillings’ in the middle.
Want more delicious desserts? Try these:
★ Did you make this recipe? Please leave a comment and a star rating below!
Equipment
Ingredients
For the Pavlova Meringue
- 6 egg whites
- 390 g caster sugar / superfine sugar
- 1 tsp cornstarch / cornflour heaped
- 1 tsp vinegar
- 1 tsp vanilla essence
For the Whipped Cream
Optional Toppings
- 1 punnet strawberries sliced
- 1 kiwi fruit sliced
- 1 banana sliced
- 1 passionfruit pulp extracted
- 1 tbsp icing sugar / powdered sugar to sprinkle
Instructions
For the pavlova meringue:
- First up, preheat your oven to 150˚ Celsius and line your tray with baking paper.
- Pop your egg whites into the mixing bowl and attach the whisk to the stand mixer (or use a hand mixer). Start by whipping them on Speed 2 then move through to Speed 4 after a couple of minutes.6 egg whites
- When the egg whites turn into bubbly soft peaks, up the speed to 6 and add the caster sugar and cornstarch, then increase to Speed 8 for 10 – 12 minutes until you’ve got yourself a luxuriously smooth, glossy meringue mixture.390 g caster sugar / superfine sugar, 1 tsp cornstarch / cornflour
- Now bring the speed down to 4 and pour in the vinegar and vanilla essence. You might need to scrape down the meringue from the sides of the bowl every now and again with a spatula to make sure it mixes through. Let it mix for 1 minute then switch off your mixer.1 tsp vinegar, 1 tsp vanilla essence
- Scoop out the glossy meringue mixture onto a lined baking tray and form a flat circle shape. Smooth it out or get creative with decorative patterns, twists or twirls. Pop in the oven and bake for an hour to an hour and a half until the meringue sets into a crunchy, crispy outside with a soft golden glow. When the outside is firm and dry, and cracks start to appear on the top, you’re ready to go. Switch off the oven and allow the pavlova to cool in the oven with the door slightly open.
For the whipped cream:
- While the pavlova is cooling, pour your cream into your cleaned mixing bowl and pop in the freezer for 10-15 minutes. When your pavlova is cool, place the bowl back on the stand mixer (or grab your hand mixer) and whip the cream on Speed 6 – 8. Add in the caster sugar and vanilla essence and continue to whip until the cream thickens and holds a nice shape.400 g thickened cream / heavy cream, 75 g caster sugar / superfine sugar, 1 tsp vanilla essence
To assemble:
- Top your cooled pavlova with whipped cream and sliced fruit such as strawberries, kiwi fruit, banana and passionfruit, and sprinkle with icing sugar.1 punnet strawberries, 1 kiwi fruit, 1 banana, 1 passionfruit, 1 tbsp icing sugar / powdered sugar
Video

Recipe Notes
- Eggs – For best results, make sure to use room-temperature eggs – cold eggs can cause your meringue mixture to be too runny. We use chicken eggs for this recipe, but duck eggs are absolutely fabulous if you can get your hands on them!
- Sugar – We recommend caster sugar, aka superfine sugar. It dissolves into the egg whites more quickly and will give you that smooth texture you’re looking for. Don’t be tempted to add the sugar into the egg whites too quickly. If added too soon, this can make the meringue runny.
- Vinegar – The acid in vinegar helps the egg whites become fluffy and hold onto all that air that’s beaten in. Regular white vinegar (or white wine vinegar) is the best choice, but you can substitute with apple cider vinegar, cream of tartar, or even lemon juice in a pinch. We don’t recommend strong dark vinegars like balsamic or malt as they’re more likely to add a strong flavour to the meringue.
- Give it Time – Give the egg whites and sugar plenty of time to combine fully. If you don’t, it can lead to a gritty texture and may cause the pavlova to crack or collapse.
- Stop it Cracking or Collapsing – Cooking the pavlova on the lowest rack in the oven can help to stop it cracking. Humidity can have an effect when cooking meringues -for best results, try avoiding super humid days/environments if possible. Both cracking and collapsing could be caused by taking the pavlova out of the oven too soon while it’s still warm. To help the oven cool down quicker, open it just slightly so the hot air can escape faster without allowing the cold air to come in too quickly. If you’re worried, leave the pavlova in the oven overnight with the door shut then top it first thing in the morning.
- Make Mini Pavlovas (aka Eton Mess) – Portion out the mixture into separate circles as big or as small as you like. Once cooked, top with a simple topping of whipped cream, strawberries and a sprig or two of mint leaves.
- Crush it! – Deliberately crack the pavlova into pieces, then add to a bowl and top with whipped cream and fruit. For bonus points, serve in glass for a stunning visual effect.
- Play with Shapes – Make it as a square, a wreath (perfect for Christmas!), or a love heart. Make thinner layers of pavlova, then once cooked, layer them up into stacks with the toppings as ‘fillings’ in the middle.
Nutrition


110 Comments
Natalie
23/12/2018 at 10:29 pmWow, this is so beautiful! Just the meringue alone looks like a work of art.
Such beautiful photos as well! <3 Great job!
Wandercooks
25/12/2018 at 7:12 amThanks so much Natalie!
Kavita Favelle
22/12/2018 at 9:32 pmI’m with you, I’m not too concerned with the origins as long as it tastes so damn good! Like you, I want the meringue crunchy on the outside and soft inside! Perfect!
Wandercooks
25/12/2018 at 7:13 amYes, exactly Kavita! Can not get enough of pavlova at this time of year!
ZAC
21/12/2018 at 3:44 pmHey girls … my man-children have requested a pavlova for Xmas this year. Can this mixture be used to make individual sized pavs?
Wandercooks
25/12/2018 at 7:13 amIt definitely can, just allow ample space around each mini meringue for it to grow while in the oven! Happy cooking! 😀
Shariss
06/12/2018 at 2:31 pmHi there! Just curious, do the egg whites have to be room temperature? Other recipes I’ve read have said so, so just wanted to double check. Love Pavlova!
Wandercooks
06/12/2018 at 3:45 pmHey Shariss – Good question! We used ours straight out of the fridge, but if you’re worried, just pop them out on the bench for 15-20min prior to mixing. 🙂
Shariss
11/12/2018 at 1:23 amOk thank you! I would prefer to use them fridge temp, so I am glad it worked out for you! Making pavlova this morning!
Wandercooks
11/12/2018 at 6:06 pmAmazing! Can’t wait to hear how it goes. We made another one for Laura’s parents on Monday night – it went down a treat! No leftovers unfortunately!
Kae hogan
10/04/2017 at 10:41 amCan the pavlova be made in advance? Lived in Australia for a few years and this was always a hit dessert for my husband, although I’ve never made it. I think I’m going to give it a go for easter. Thank you for your help….looks wonderful.
Wandercooks
10/04/2017 at 1:03 pmHi Kae, thanks for stopping by! Yep, it can definitely be made in advance, up to a few days, and stored in an airtight container or even just wrapped in a clean tea towel. Add your cream and favourite topping combos just before serving and you should be in for a delicious Easter treat! 🙂
Bev
20/02/2017 at 7:14 amI’m giggling at your ‘serving: 1’ !! I too can get stuck into pav but doubt I can finish it… I’ve made these so often and always wondered why the cornflour can’t get added earlier. This is why I will make it again soon.
Wandercooks
23/02/2017 at 8:34 amHahaha oh Bev! I think I was thinking the recipe makes one CAKE haha, but now I totally see what you mean – I think my subconscious is just greedy and doesn’t want to share a crumb of pavlova with anyone! It’s an interesting point you make about the cornflour – you don’t see it in every recipe, but it’s meant to bring that extra little bite of crispiness to the crust – which I think makes it totally worth it. Do you ever made pavlova without cornflour?
Sara
23/01/2017 at 1:41 pmI couldn’t wait the 2 hours because I was so excited to eat! It cracked a little but it was a real success, I loved it!! Thanks for sharing.
PS: you have a Brazilian fan.
Wandercooks
25/01/2017 at 11:25 amAww yay Sara, glad to have you onboard! So happy to hear your pavlova was a success, and completely agree with you there – it’s so hard to be patient with this one! You can almost never resist sneaking a few crumbly pieces here and there while you wait. 😉
Silvia
19/01/2017 at 8:02 pmWOW! That looks really amazing! I’ve never tried pavlova before, only small meringues. I have to give this a try ASAP. And also, I love that you used the tea filter to powder the pavlova. I am not a fan of buying something that I can use only for one thing, like a powder sifter. So, that is a great idea, thanks for sharing 🙂
Wandercooks
25/01/2017 at 11:22 amIt’s sort of similar to meringue when it comes to the crispy crust, but there’s nothing like that soft and marshmallowy centre you get from homemade pavlova. And glad you liked the tea strainer! We always try to think outside the box when it comes to both multipurpose kitchen utensils and props for food photography.
Priya
19/01/2017 at 6:46 pmwow! I have never tried pavlova at home. After seeing these beautiful clicks, Im tempted to try it out..
Wandercooks
25/01/2017 at 11:20 amAwesome, enjoy Priya and let us know how you go! 🙂
Meeta
19/01/2017 at 6:11 pmI adore pavlova and make it quite a bit as it is such a thankful easy dessert using fruit in any season. Now I think the weekend calls for a beautiful pavlova!
Wandercooks
25/01/2017 at 11:19 amYou’re spot on there Meeta, it’s surprising how easy it really is, and all that gorgeous fruit really lightens it up. Enjoy the weekend!
swayam
19/01/2017 at 4:18 pmLooks delicious. I so adore the mini Kitchenaid ..
Wandercooks
25/01/2017 at 11:18 amIt was love at first sight ❤️
jayne
19/01/2017 at 4:06 pmI love using my Kitchenaid to whip egg whites! Your pavlova recipe sounds divine, I am going to try it for my next BBQ!
Wandercooks
25/01/2017 at 11:18 amHaha I know right? It’s so much fun. 😛 Hope your pav is a winner at the BBQ!
Brittany Beacham
18/01/2017 at 1:21 amThis looks amazing! I haven’t made pavlova in so long but you’ve re-inspired me 😀 A question – how long does the pavlova need to cool for, and could it be cooled on top of the oven instead of inside if it’s a commercial oven (that needs to keep being used for other things) and the kitchen in quite warm?
Wandercooks
18/01/2017 at 12:56 pmHey Brittany, glad we could inspire some new pavlova-love. 😀 Yep you can definitely allow it to cool outside of the oven, there’s just a greater chance of cracking the crust if you do. Still, that’s not such a big deal because you can cover it all up with your cream and fruit topping anyway. 🙂 I’d give it at least two hours to cool before topping if you can, the longer the better basically. Good luck and let us know how you go!
Kathryn
13/01/2017 at 3:48 pmMade it and it was a HUGE success…definitely amazing. Well worth the try. This is a WOW dessert!!! 🙂
Wandercooks
13/01/2017 at 3:50 pmOh Kathryn you just MADE our day! So glad it turned out for you, we’ve made this a couple of times again over Christmas and hot damn it’s an addictive dessert haha. 😀 What toppings did you go with?
Emily
23/12/2016 at 9:50 pmHello!
I plan on making this delicious looking pav for Christmas, just wondering when I preheat my oven to 150 degrees is that fan forced or not?
Thanks 🙂
Emily
Wandercooks
24/12/2016 at 6:48 amHey Emily! Yep definitely fan forced, I’ll add that info to the recipe. Great question! 🙂 Hope you have an awesome Christmas and enjoy that pav!