Fluffy and crunchy with a sweet citrus burst, Koulourakia are a beloved family favourite treasured by generations. These Greek Easter cookies are so easy to make, with traditional shapes and modern tweaks to make them your own.
Why We Love This
These amazing Greek cookies are made with everyday baking staples, kid-friendly and so easy to make! Serve with a hot cup of coffee for a sweet treat (or breakfast, like we sometimes like to do!).
We adore Koulourakia for their delicious crumbly texture and not-too-sweet flavour. The refreshing citrus burst of fresh orange zest will have you raiding the cookie jar again and again this Easter.
Make a double batch and freeze (the dough OR the baked biscuits) for later, or make enough to include in a gift hamper for your favourite foodies.
Related: Italian Lemon Ricotta Cake / Galatopita – Greek Milk Pie for Easter
Do I Need Baking Ammonia for Koulourakia?
Traditional koulourakia recipes often call for baking ammonia – the downside of which is a potent smell while baking, up to an hour after the cookies have been baked. This old fashioned ingredient precedes modern leavening agents like baking powder or baking soda. Instead we use self raising flour, which already incorporates these raising agents. It’s an easy pantry staple (with no unpleasant smell) and makes these cookies even easier to make!
What are Koulourakia?
The name κουλουρακια / koulourakia comes from the Greek word kouloura, meaning a loop or twist, just like the traditional braid shape these Greek butter cookies are most known for. They’re sometimes referred to as νηστισιμα κουλουρακια / lenten cookies, since they’re made as part of Easter preparations.
Greek Easter cookies are popular in March or April, usually made on Holy Saturday to be eaten on Easter Sunday. They’re also sometimes baked as a Christmas treat too. They’re similar in essence to Italian cuddura biscuits which are also made at Easter.
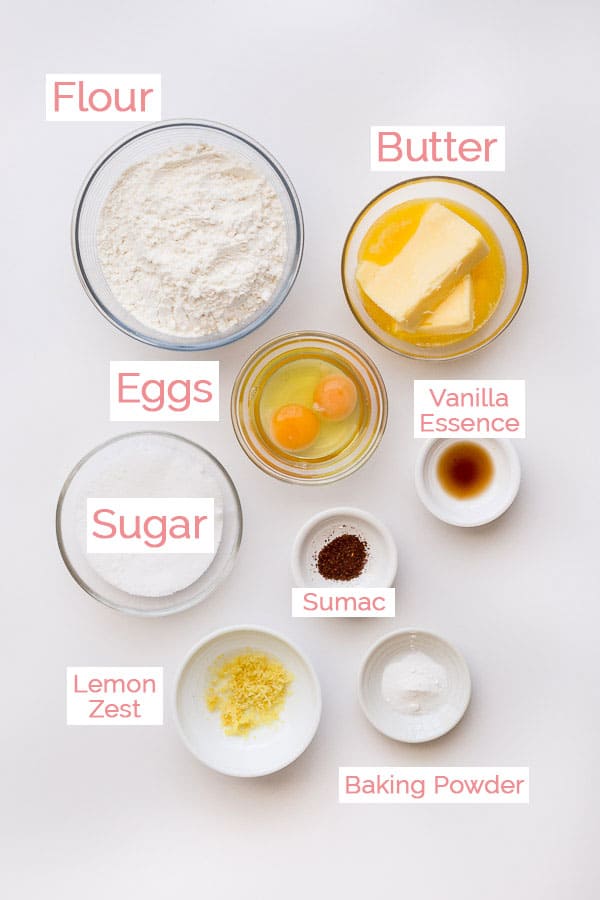
Traditional Greek koulourakia dough is made from a simple base of flour, butter, sugar and eggs, a dash of vanilla essence and a freshly grated orange zest. They’re often brushed with a milk or egg wash before baking, giving them that classic golden brown shine. There are lots of variations when it comes to flavours, garnishes and koulourakia shapes.
Most Koulourakia recipes will yield between 60-80 cookies, however ours is intentionally for a small batch of around 20 cookies.
What You’ll Need
- Self Raising Flour – This is the easiest way to make koulourakia without any extra raising agents like baking powder or baking ammonia. Sub with a 1 to 1 self raising gluten free baking flour if you need to make this recipe gluten free. Or use all purpose flour with 1 tsp of baking powder.
- Softened / Room Temperature Butter – Salted or unsalted both work perfectly, so use whichever you prefer.
- Sugar – Caster sugar / superfine sugar is the best choice as it creams perfectly with the butter and dissolves in the dough. Avoid grainy sugars that will change the texture in the final biscuits and cause them to be too crumbly.
- Eggs – Bring them up to room temperature first, either by taking out of the fridge 30 mins before you begin, or by soaking for a few minutes in warm water.
- Vanilla Essence – Sub with vanilla extract for a stronger vanilla flavour.
- Zest – Koulourakia are traditionally made with fresh orange zest. It’s so fragrant, adding a beautiful citrus flavour to the cookies. Add as much or as little as you like depending on the strength or subtlety of flavour you’re after. Sub with lemon zest (which we like to use), or a couple of tablespoons of lemon or orange juice if you don’t have any fresh zest on hand.
How to Make Greek Easter Cookies:
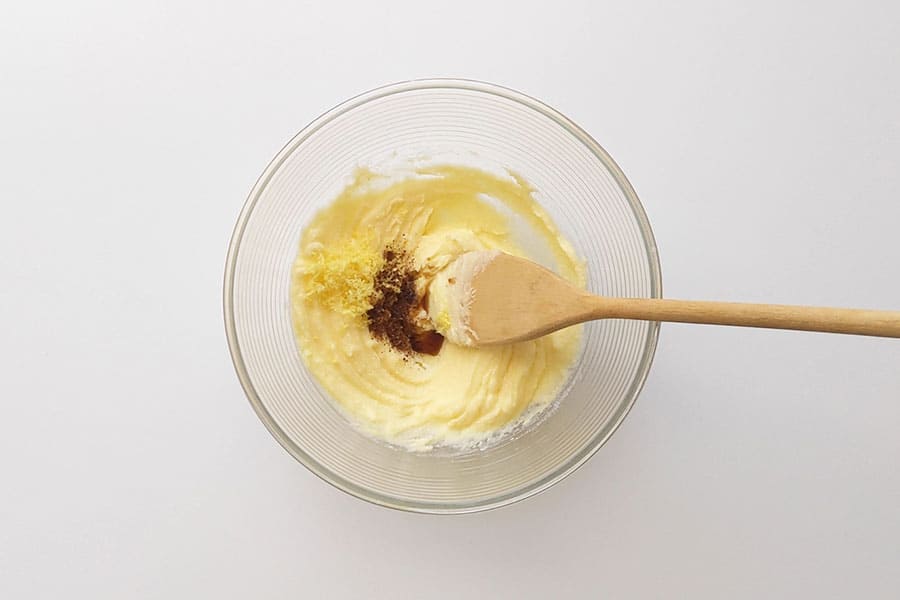


- Cream the softened butter and sugar in a mixing bowl with a wooden spoon, or use an electric beater on medium high until smooth and creamy. Add the orange zest and vanilla essence, stir until combined.
- Crack in the eggs and mix through (or blend on low) until evenly incorporated. Add 1 cup of self raising flour and stir through until evenly mixed. Continue adding the remaining flour a bit at a time until the dough is soft but not too sticky.
- Transfer dough onto to a clean surface and knead with your hands for a few minutes until smooth and even. Cover with cling film and rest in the fridge for 20 mins.
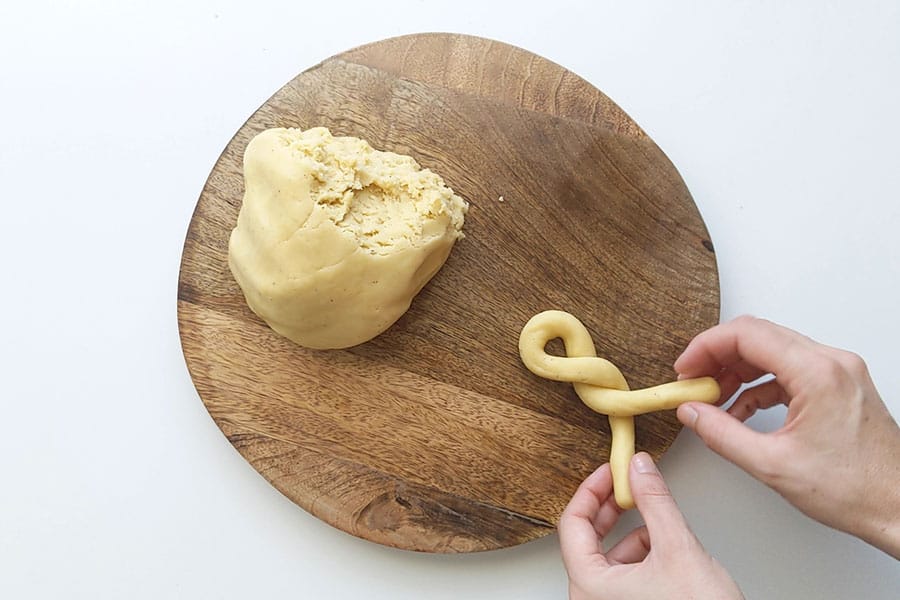
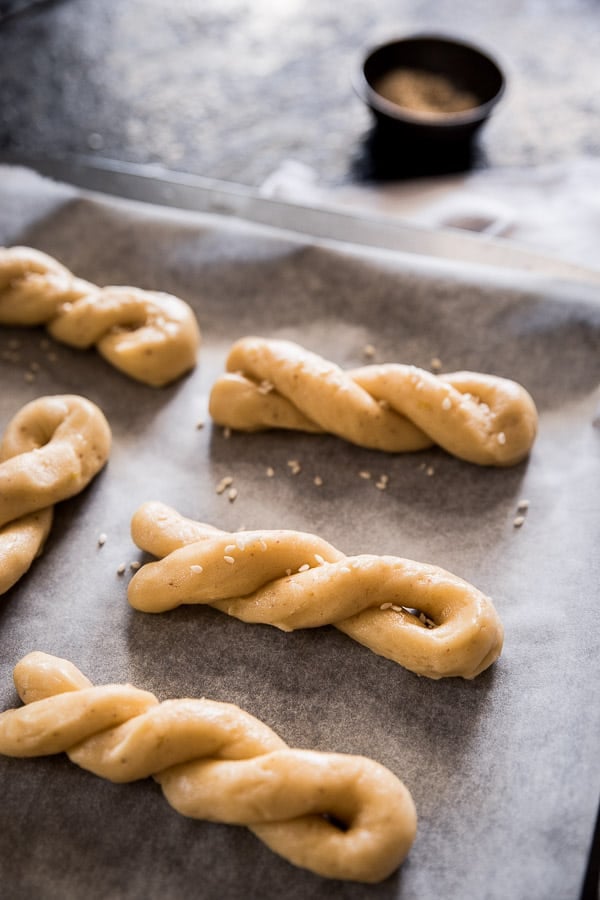
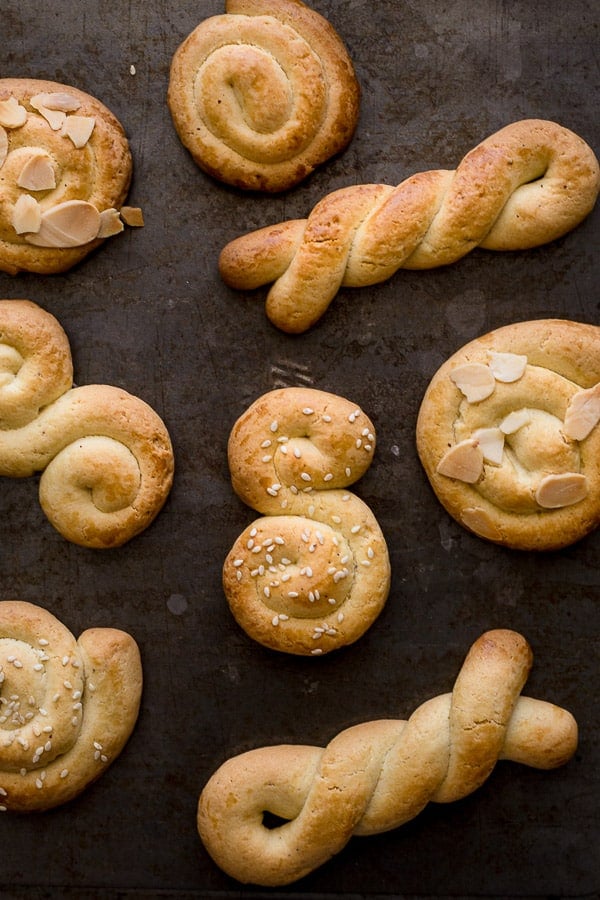
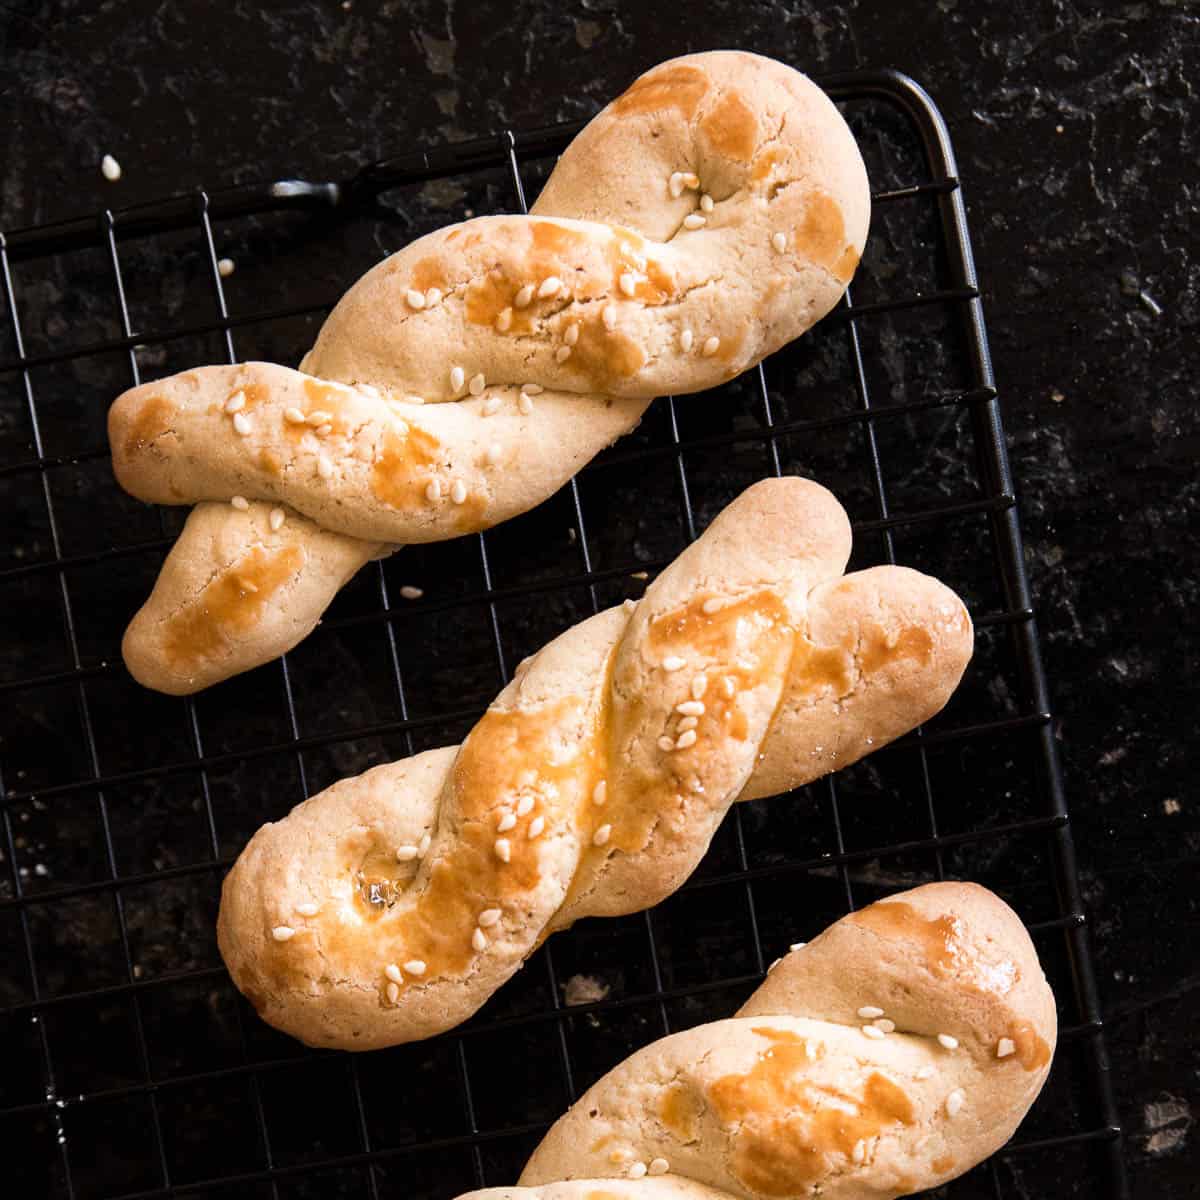
- Preheat your oven to 180˚C / 360˚F. Take a small handful of dough and form into a ball with your hands, then roll out into a thin strip around 15 cm long x 1.5 cm wide. Twist into braids, roll up into spirals or ‘S’ shapes, or form them into any shape your heart desires! See our recipe video for a step by step guide to rolling each shape.
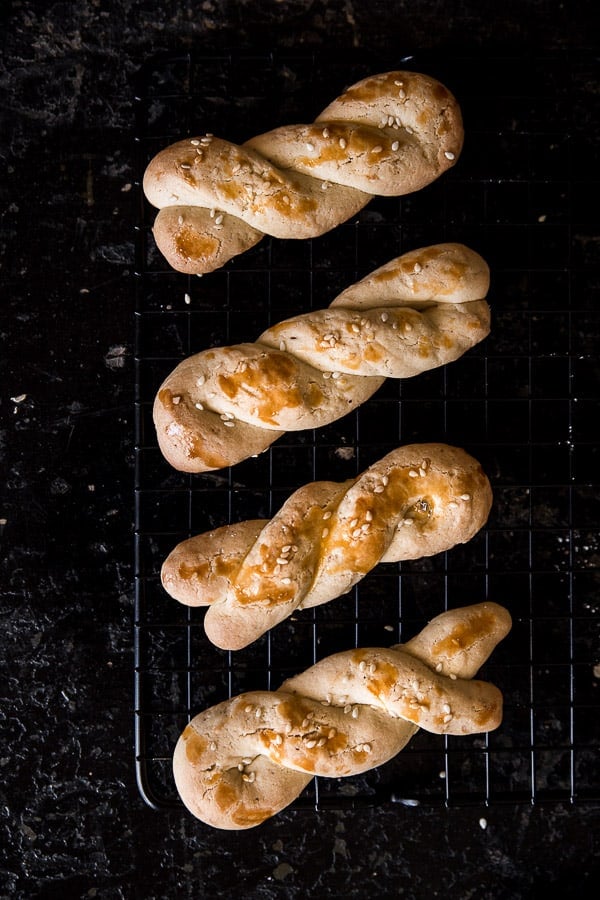
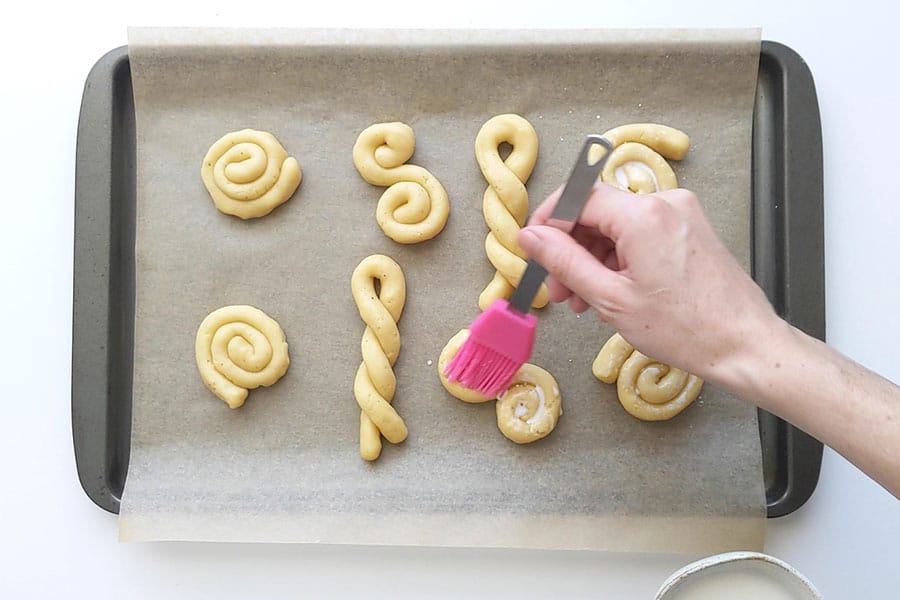
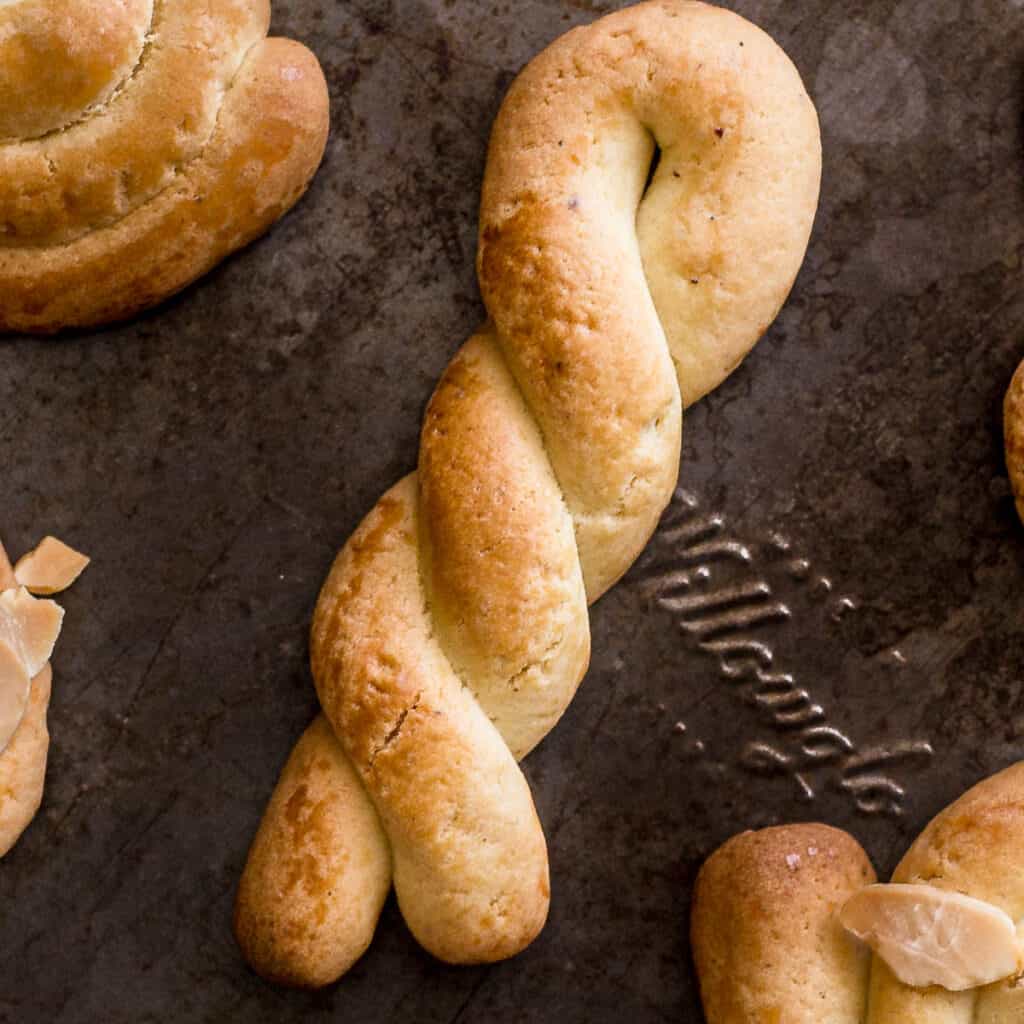
- Transfer cookies on a baking tray lined with baking paper. Brush with milk and garnish with any of the toppings you want to use (see recipe card below for ideas). Bake in the oven for 15-20 minutes until golden brown, then transfer to a cooling rack.
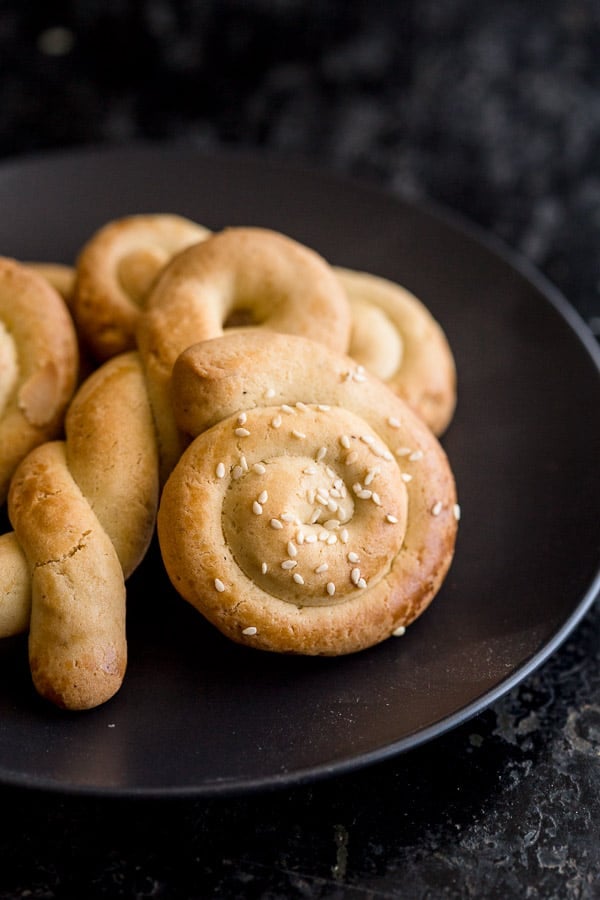
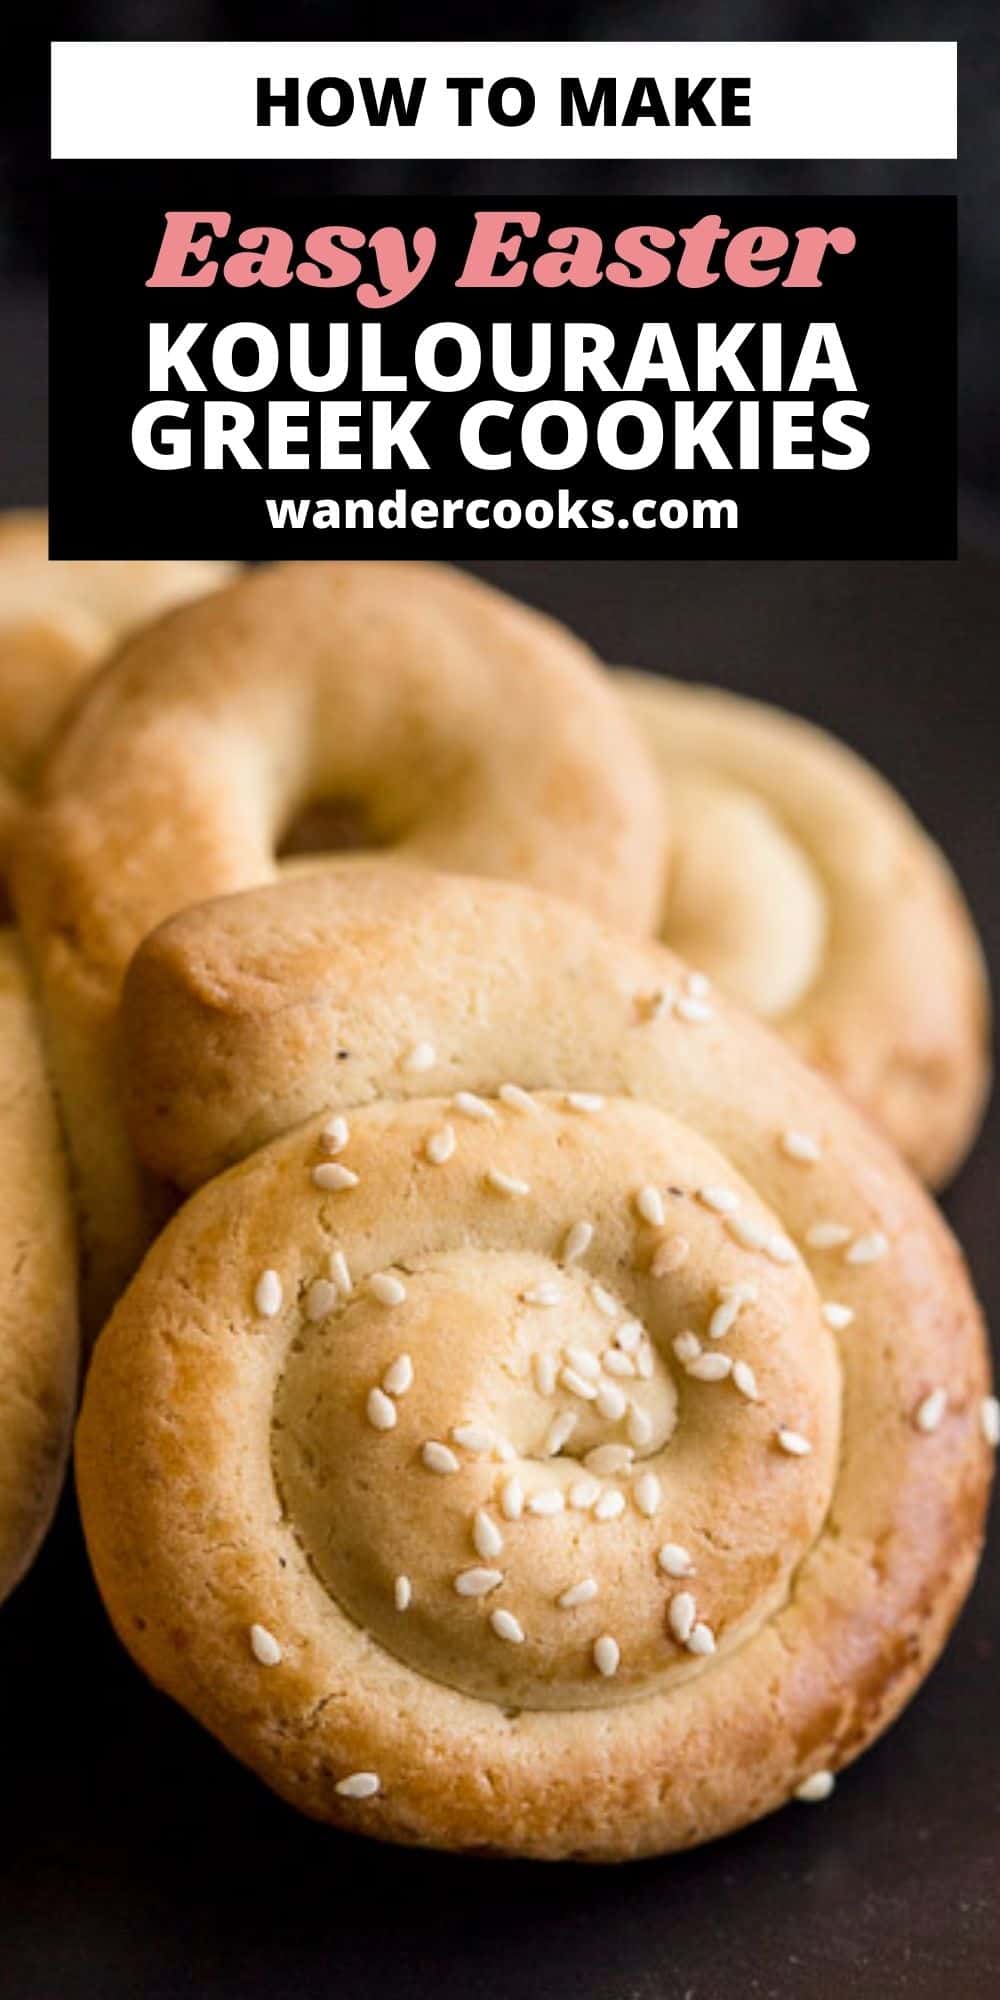
How to Shape Koulourakia
Koulourakia can be made in a variety of different shapes, from the traditional braids to the more creative shapes. They all start from the same basic method, which is to take a small amount of Koulourakia dough in your hands, form it into a ball, and roll it into a strip about 15 cm / 6 in long by 1.5 cm / 0.6 in thick.
Traditional Braids
To master this shape, simply take your dough strip and bend it in half, then give it two to three little twists. You should end up with a cute little braid or “key” shape.

S’s & O’s
The ‘S’ shape is created by rolling both ends of the dough in flat spirals towards the centre, in opposite directions. For the O’s, form a simple circle shape just like a doughnut and you’re done. Easy!
Snails
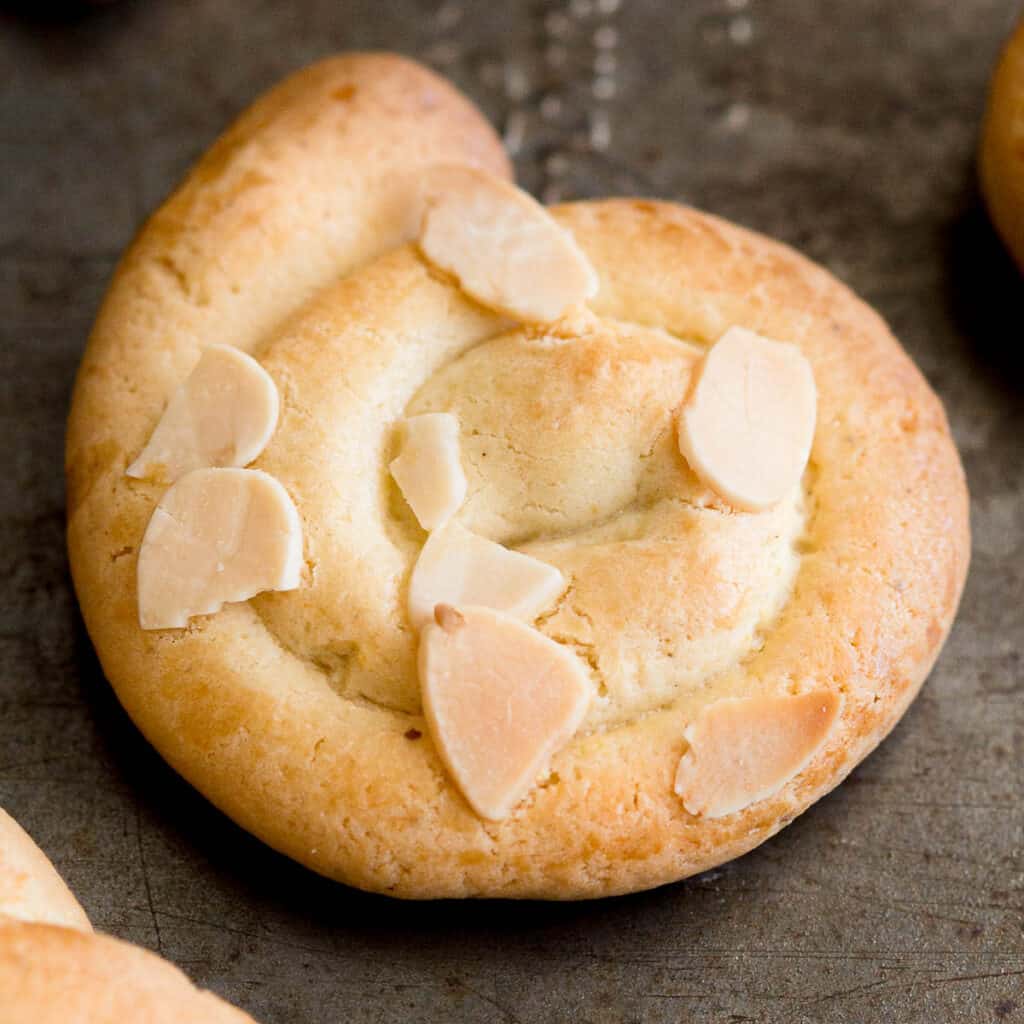
That’s our silly name for this shape – you could probably call these flat spirals, but ‘snails’ sounds more fun. Simply take a strip of dough, and roll it up until you’ve created a flat spirally snail. Adding a snail head or tail is, of course, completely optional.
Wandercook’s Tips
- Dough – If the dough becomes too dry to work with, add a little more softened butter or milk. If it’s too sticky (especially if you’re making them on a hot humid day) add a little more flour. If you’re still unsure, watch the recipe video to see the texture you’re looking for.
- Resting Time – Resting the dough in the fridge will make it easier to work with and form into shapes, and also stop the heat from your hands melting the dough as you work with it.
- Leave Space – Make sure there’s a gap of at least 2-3 cm / 1 inch space around each cookie when placing them on the baking tray, as they will expand while baking.
- Dunk in Tea or Coffee – It’s a match made in heaven!
- Give as Gifts – Make up a big batch to gift to family and friends.
FAQs
Absolutely! Just allow the dough to rest on the counter for 20 mins or so to come up to temperature and make it easier to work with.
You might be trying to make them on a warm day! This can make the dough a little trickier to work with. Add a little more flour to make the dough less sticky, or pop it in the fridge to chill for 20 mins or so before shaping. That should do the trick!
Aim for strips around 1.5 cm / 0.6 in thick and about 15 cm / 6 in long.
They’ll last a few days when stored in an airtight container on the bench. Pop them in the fridge to keep fresher for longer.
Yes, you can freeze the uncooked dough OR the cookies themselves once baked. This recipe is perfect for making as a double batch so you can cook half and freeze the other half, or cook the lot and freeze some of the cookies for later.
Variations
- Lazy Shapes – Plain or ‘Spirals’ – If it’s too hard to shape your koulourakia, just make a regular flat cookie circle. Leave them plain or use two different-sized jars to gently press circles (aka ‘spirals’) on top. Check out our coffee scrolls biscuits to see this in action!
- Citrus Alternatives – Swap the orange zest for lemon or lime. Or add a teaspoon of sumac (a powdered spice made from dried Middle Eastern berries) for even more tart citrus flavour.
- Non-Citrus Flavour – Swap the citrus for cinnamon or pumpkin spice.
- Creative Garnishes – Traditionally, Koulourakia cookies are brushed with beaten egg for a crispy golden shine. But if you’re looking to amp things up, you might like to try adding:
- Icing Sugar – Try just a light sprinkling or dust liberally for extra sweetness.
- Sesame Seeds – a hint of savoury deliciousness.
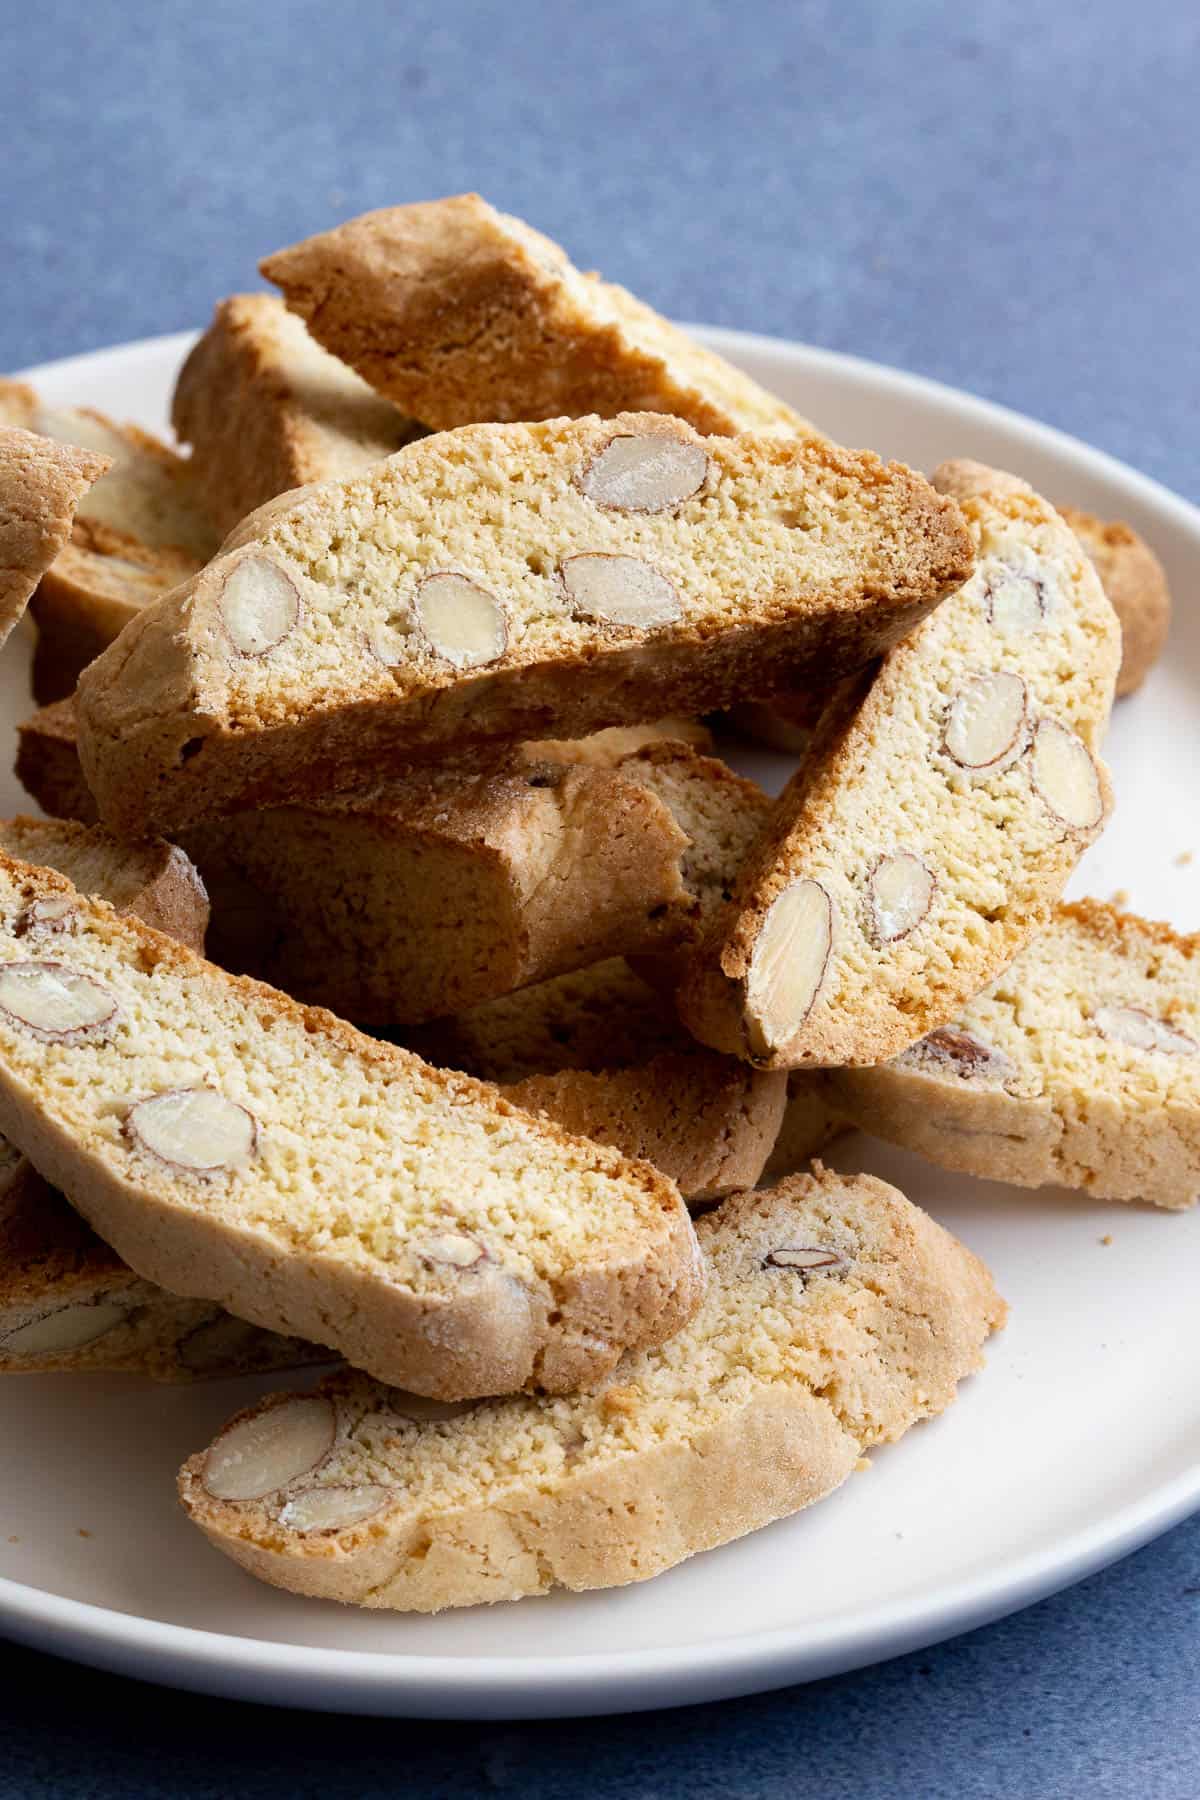
- Sliced Almonds – Nutty goodness and extra crunch.
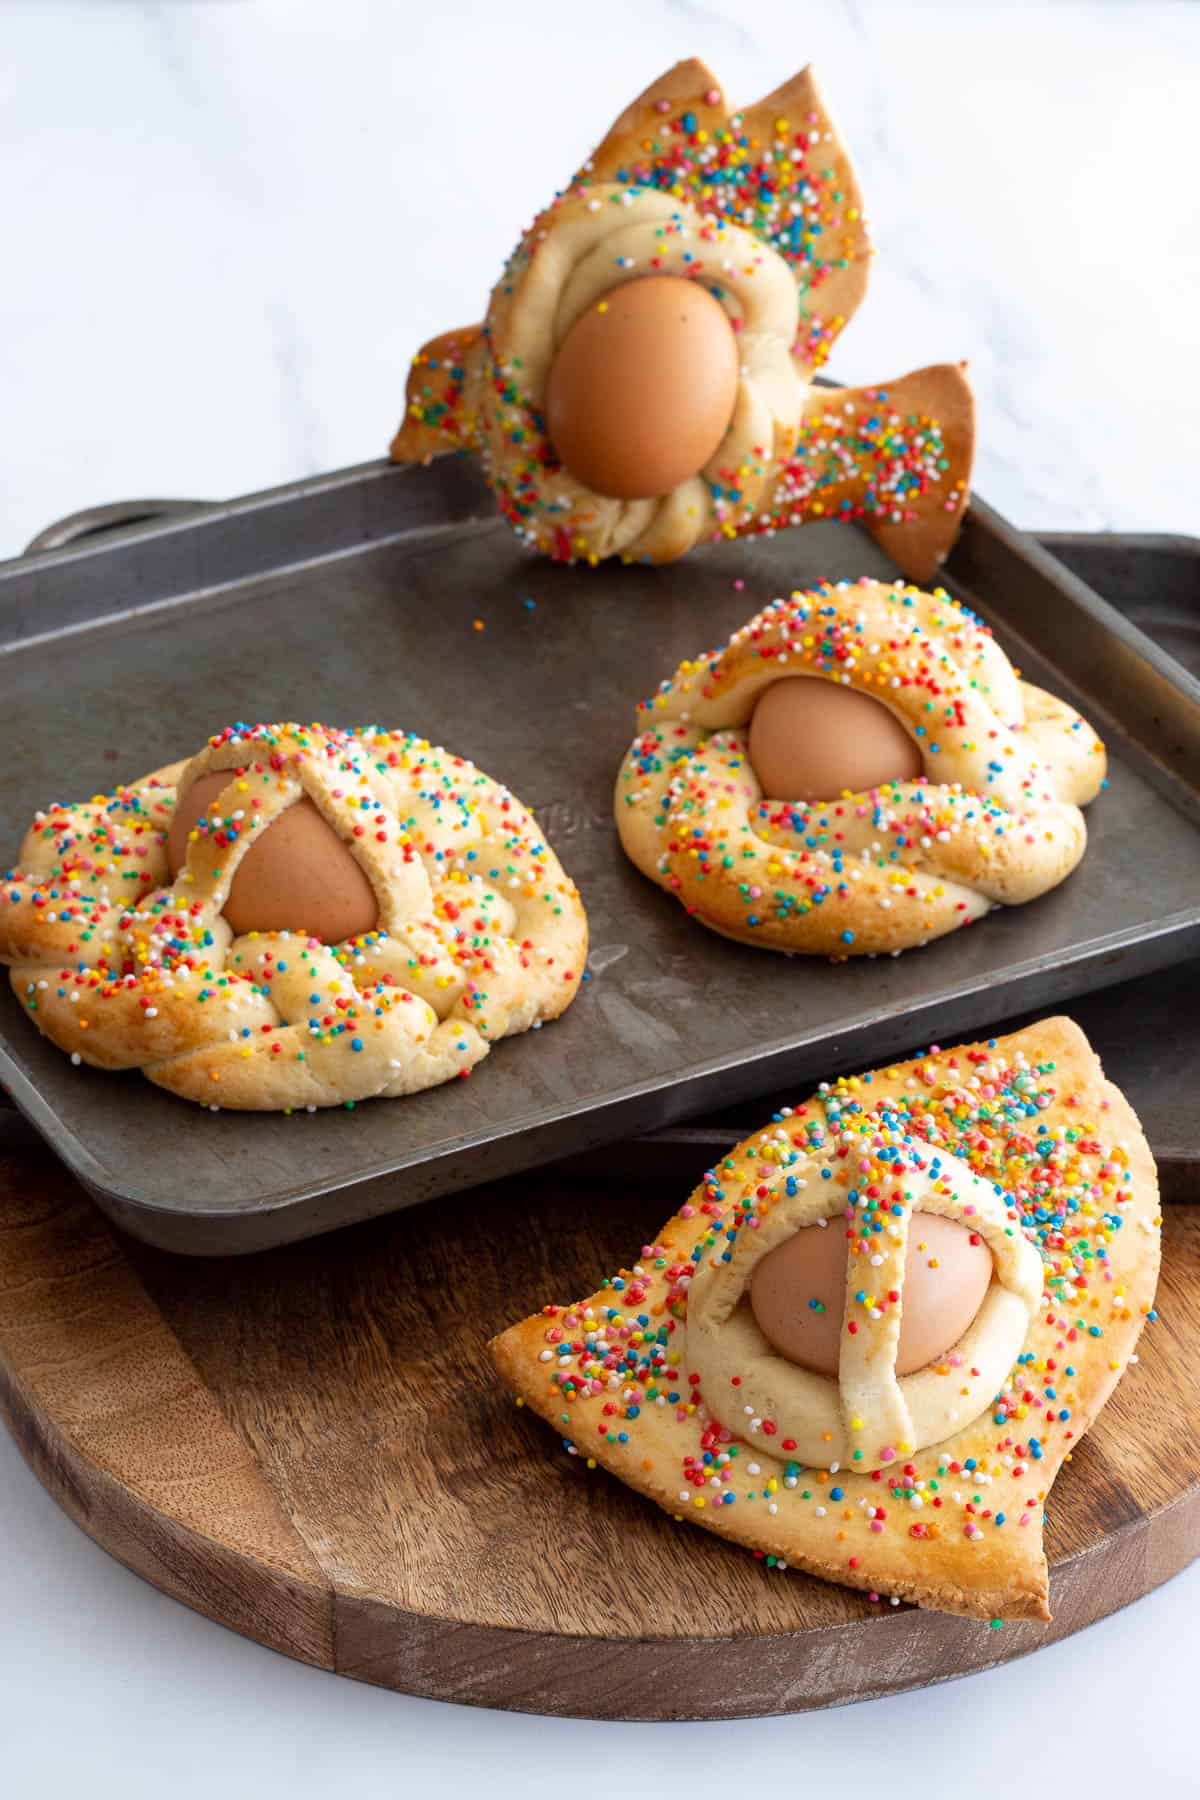
- Sprinkles – Lots of colour and fun, especially for little ones.
- Extra Golden – Brush egg yolk instead of milk.
- Koulourakia Methismena – Add in a shot of ouzo, frangelico or any of your favourite liqueurs for extra flavour.
Try these Easter dessert recipes next:

★ Did you make this recipe? Please leave a comment and star rating below!
Ingredients
- 150 g butter softened
- 150 g sugar 3/4 cup
- 1 tsp vanilla essence
- 1-2 tbsp orange zest sub with lemon zest, orange juice or lemon juice
- 2 eggs
- 450 g self raising flour 3 cups, sub all purpose flour and 1 tsp baking powder
- 1 tsp sumac optional
Optional Toppings:
- 1 tbsp milk to wash, sub with egg or a mix of the two
- 2 tsp icing sugar / powdered sugar
- 2 tsp white sesame seeds
- 2 tsp almond slivers
- 2 tsp sprinkles
Instructions
- Cream the softened butter and sugar in a mixing bowl with a wooden spoon, or use an electric beater on medium high until smooth and creamy. Add the orange zest and vanilla essence and optional sumac, stir until combined.150 g butter, 150 g sugar, 1 tsp vanilla essence, 1-2 tbsp orange zest, 1 tsp sumac
- Crack in the eggs and mix through (or blend on low) until evenly incorporated. Add 1 cup of self raising flour and stir through until evenly mixed. Continue adding the remaining flour a bit at a time until the dough is soft but not too sticky.2 eggs, 450 g self raising flour
- Transfer dough onto to a clean surface and knead with your hands for a few minutes until smooth and even. Cover with cling film and rest in the fridge for 20 mins.
- Preheat your oven to 180˚C / 360˚F.
- Take a small handful of dough and form into a ball with your hands, then roll out into a thin strip around 15 cm long x 1.5 cm wide. Twist into braids, roll up into spirals or 'S' shapes, or form them into any shape your heart desires! See our recipe video for a step by step guide to rolling each shape.
- Transfer cookies on a baking tray lined with baking paper. Brush with milk and garnish with things like sesame seeds, almond slivers, icing sugar and sprinkles you want to use. Bake in the oven for 15-20 minutes until golden brown, then transfer to a cooling rack.1 tbsp milk, 2 tsp icing sugar / powdered sugar, 2 tsp white sesame seeds, 2 tsp almond slivers, 2 tsp sprinkles
Video

Recipe Notes
- Dough – If the dough becomes too dry to work with, add a little more softened butter or milk. If it’s too sticky (especially if you’re making them on a hot humid day) add a little more flour. If you’re still unsure, watch the recipe video to see the texture you’re looking for.
- Resting Time – Resting the dough in the fridge will make it easier to work with and form into shapes, and also stop the heat from your hands melting the dough as you work with it.
- Leave Space – Make sure there’s a gap of at least 2-3 cm / 1 inch space around each cookie when placing them on the baking tray, as they will expand while baking.
- Dunk in Tea or Coffee – It’s a match made in heaven!
- Give as Gifts – Make up a big batch to gift to family and friends.
- Lazy Shapes – Plain or ‘Spirals’ – If it’s too hard to shape your koulourakia, just make a regular flat cookie circle. Leave them plain or use two different-sized jars to gently press circles (aka ‘spirals’) on top. Check out our coffee scrolls biscuits to see this in action!
- Citrus Alternatives – Swap the orange zest for lemon or lime. Or add a teaspoon of sumac (a powdered spice made from dried Middle Eastern berries) for even more tart citrus flavour.
- Non-Citrus Flavour – Swap the citrus for cinnamon or pumpkin spice.
- Creative Garnishes – Traditionally, Koulourakia cookies are brushed with beaten egg for a crispy golden shine. But if you’re looking to amp things up, you might like to try adding:
- Icing Sugar – Try just a light sprinkling or dust liberally for extra sweetness.
- Sesame Seeds – a hint of savoury deliciousness.
- Sliced Almonds – Nutty goodness and extra crunch.
- Sprinkles – Lots of colour and fun, especially for little ones.
- Extra Golden – Brush egg yolk instead of milk.
- Koulourakia Methismena – Add in a shot of ouzo, frangelico or any of your favourite liqueurs for extra flavour.
Nutrition


30 Comments
Mia
24/02/2024 at 9:34 pmJust made this! Delish!!! Super happy with how they turned out and tasted. I did lemon zest and then different toppings (sesame seeds, chopped almonds and cinnamon). Recipe is the best.
Wandercooks
26/02/2024 at 8:14 amAww thanks Mia! Love your toppings, I bet your house would have smelt amazing after that bake! 😀
Nicki
02/04/2023 at 9:53 pmTurned out perfectly!
Wandercooks
03/04/2023 at 11:33 amFantastic, thanks for letting us know Nicki.
Kari Anderson
26/03/2020 at 4:17 amAH! I’m so glad I found this recipe. We were in Greece last year and my husband loved ALL the desserts. These remind me of koulouri as a cookie – not too sweet but just enough to still be a treat!
Wandercooks
26/03/2020 at 9:44 amAmazing Kari! Yes, exactly, we love that they’re not too sweet. They’re such a good snack with a cup of coffee or tea. 🙂
Pam
25/03/2020 at 12:12 amI have never heard of these cookies, but they look like fun to make. I love adding a recipe or two from a different culture to my meals. Thanks!
Wandercooks
26/03/2020 at 9:43 amThey are a bunch of fun. I really enjoyed playing around with all of the shapes. 🙂
Charla @ That Girl Cooks Healthy
24/03/2020 at 8:15 pmThese look amazing and thank you for explaining what koulourakia is because I had never heard of it prior to stumbling upon your recipe.
Wandercooks
26/03/2020 at 9:41 amYou’re welcome – glad you learnt something new Charla!
Kushigalu
24/03/2020 at 7:23 pmLooks so delicious. Would love to try these for Easter.
Wandercooks
26/03/2020 at 9:39 amHope you do! 🙂
Dannii
24/03/2020 at 6:23 pmI was just thinking about what to bake this Easter. Definitely putting this on the list.
Wandercooks
26/03/2020 at 9:38 amPerfect Dannii, I do love experimenting with new seasonal recipes each year – hope you enjoy making these too!
cyndy
24/03/2020 at 3:06 pmThese are so fun and super easy. A big hit with my family. I love these!
Wandercooks
26/03/2020 at 9:37 amGreat Cyndy, so happy your family enjoyed them!
nikki@soulfullymad.ecom
23/02/2017 at 11:41 amThese are beautiful! I love how versatile they are! I want to try these for Easter!
Wandercooks
23/02/2017 at 7:33 pmAbsolutely, you really can mix and match to weave in your own flavour combinations. Hope you enjoy Nikki.
Platter Talk
23/02/2017 at 11:34 amNope, I’ve never had sumac but would be willing to try. These cookies are pretty cool. I love all the different shapes that you used!
Wandercooks
23/02/2017 at 7:33 pmOh my gosh we just adore sumac – you need to try! You’ll be surprised how often it comes in handy! 😀
Ste
23/02/2017 at 10:23 amThese would be great for Easter. Love how you can make different shapes!
Wandercooks
23/02/2017 at 7:31 pmAbsolutely Steph, they make a nice break from all that Easter chocolate. 😛
Luci's Morsels
20/02/2017 at 4:31 pmThese look delicious! I may have to add these to my Easter spread!
Wandercooks
23/02/2017 at 8:29 amYay hope you enjoy them Luci – what shape do you like most?
Swayam
20/02/2017 at 3:45 pmThese look so so good! I can’t wait to make these
Wandercooks
23/02/2017 at 8:30 amHope you enjoy them Swayam, would love to hear how you go. Which flavour do you think you’ll try – orange or lemon zest, or sumac? 🙂
linda spiker
20/02/2017 at 3:05 pmWell those are fun and beautiful! Fun for a family night activity.
Wandercooks
23/02/2017 at 8:31 amThey are seriously so much fun, especially with kids. They can have fun creating all kinds of shapes with them, and then eat them all up afterwards – win win! 😛
Debra C.
20/02/2017 at 1:29 pmSo much yummy goodness in these bites, I think I would top with the nutty goodness – delish!
Wandercooks
23/02/2017 at 8:32 amOooh good plan Debra – my fav is the dusting of icing sugar but the nuts were seriously good too. I think our batch might have lasted 24 hours.. maybe! Haha 😀