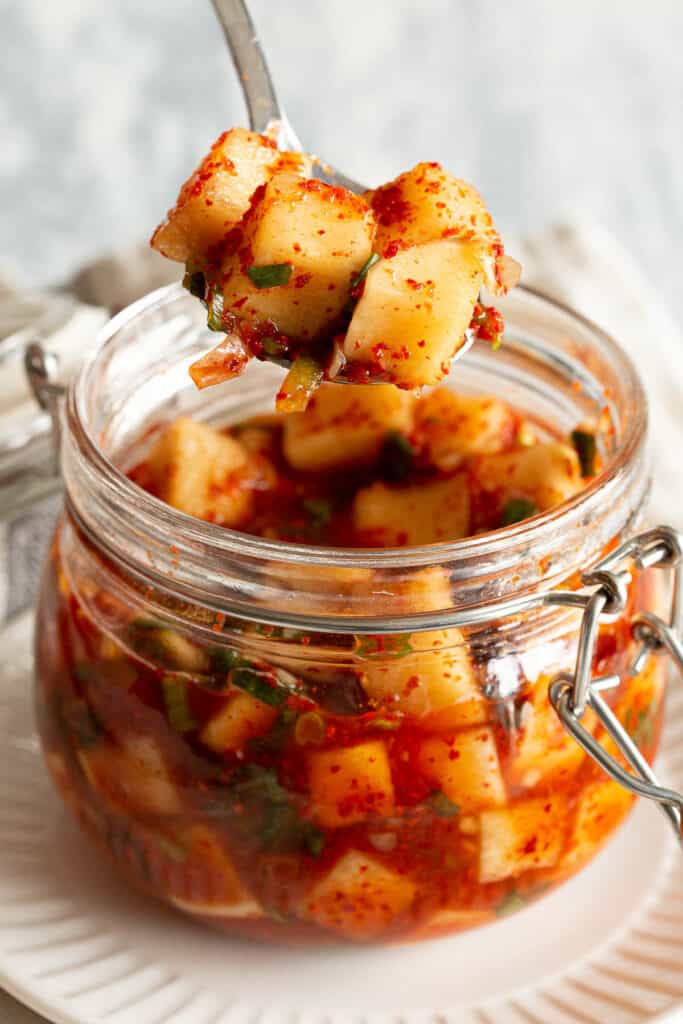
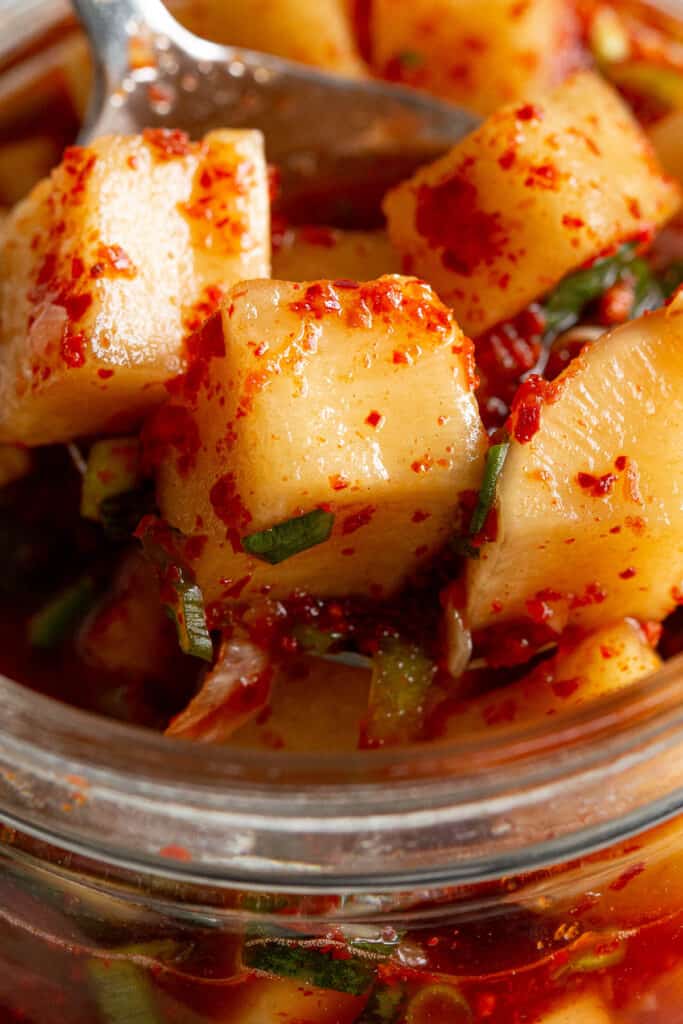
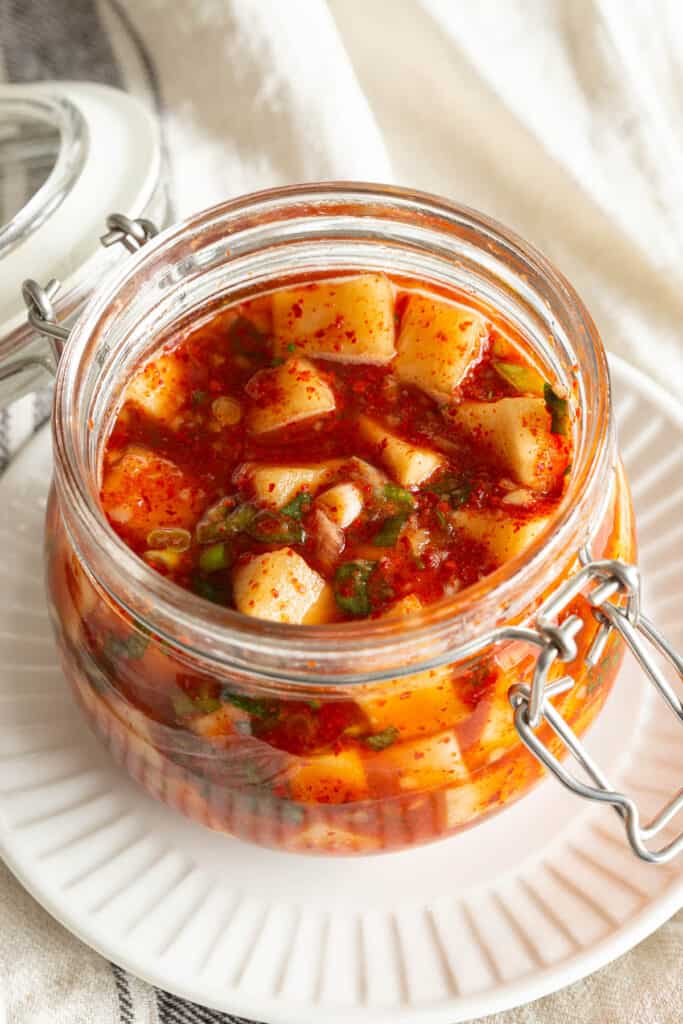
This crunchy, spicy Korean kkakdugi is the perfect side dish or addition to your favourite Korean recipes. Cubed radish kimchi is ready to eat in 15 minutes or savour the rich taste as the flavours develop over time.
In This Post You’ll Learn
Why We Love This
We love the crispy crunch of kkakdugi! It’s the perfect side dish whenever you want a burst of spicy flavour alongside your favourite homemade recipes.
Usually at home, we’ll throw it in soups and stews like gochujang jjigae or Korean Army Stew. It also tastes great when you add it to other dishes like fried rice, tteokbokki or even bibimbap to give you that crunchy texture added umami goodness.
Related: Korean Kimchi Recipe / Pickled Carrots and Daikon
What’s the difference between Korean mu radish and Japanese daikon radish?
Korean mu (or moo) radish and Japanese daikon radish have a couple of physical and flavour differences between them. The good news is, these are only minor, and you can use them as substitutes for each other for any dish that calls for mu or daikon.
Physical Differences – Korean radish will usually have a lot more green around the head, whereas daikon sometimes has no green or just a touch around the very top. Daikon is usually shaped like a very large carrot, whereas mu radishes will often be shorter and fatter, without going skinny at the end.
Flavour Differences – Daikon is sweeter than Mu, while Mu is more peppery than Daikon.
What is Korean Kkakdugi?
Kkakdugi (written in hangul as 깍두기) is a popular Korean banchan or side dish made from fermented Korean radish known as mu / moo.
It’s a type of kimchi, which is a broad term that covers lots of varieties of fermented vegetables in Korean cuisine, though many people are most familiar with Korea’s napa cabbage based kimchi.
Fun fact: The name kkakdugi actually comes from the sound you make as you cube the radish “kkak-duk! kkak-duk!”.
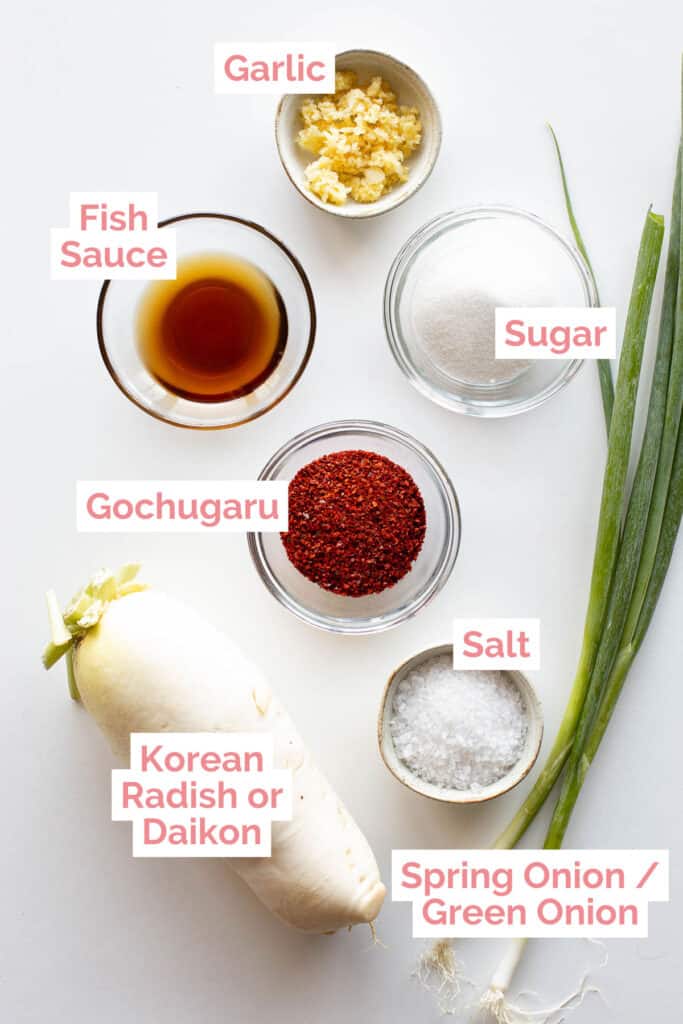
What You’ll Need
- Radish – Korean radish specifically, known as mu or moo. Substitute with Japanese daikon. You should find one of these at most supermarkets these days, or head to your local Korean grocery store if you have one nearby!
- Coarse Sea Salt – Sea salt is great for drawing out the liquid from the radish. If you’re using fine sea salt, start with 1-2 tsp as it will be stronger than using coarse sea salt.
- Gochugaru – Korean red pepper flakes. These add your spice and rich red colour to the dish. For a slightly more flavourful and a little less spicy, substitute with gochujang (Korean red pepper paste).
- Fish Sauce – This is great for the umami punch. You can sub with 1-2 tbsp of Korean salted shrimp (saeujeot) or even 1 tsp of Malaysian / Indonesian terasi or belacan. For a vegan alternative, use vegan fish sauce or kombu dashi.
- Sugar – The sweetness balances out the salt and spice. Brown sugar also works or substitute with Korean plum extract for the most authentic flavour, if you can track it down at your local Asian supermarket.
- Spring Onion / Green Onion – We love adding spring onion / green onions to our kkakdugi! It adds another layer of flavour, and extra veg.
How to Make Cubed Radish Kimchi
First, gather your ingredients: See recipe card below for measurements.
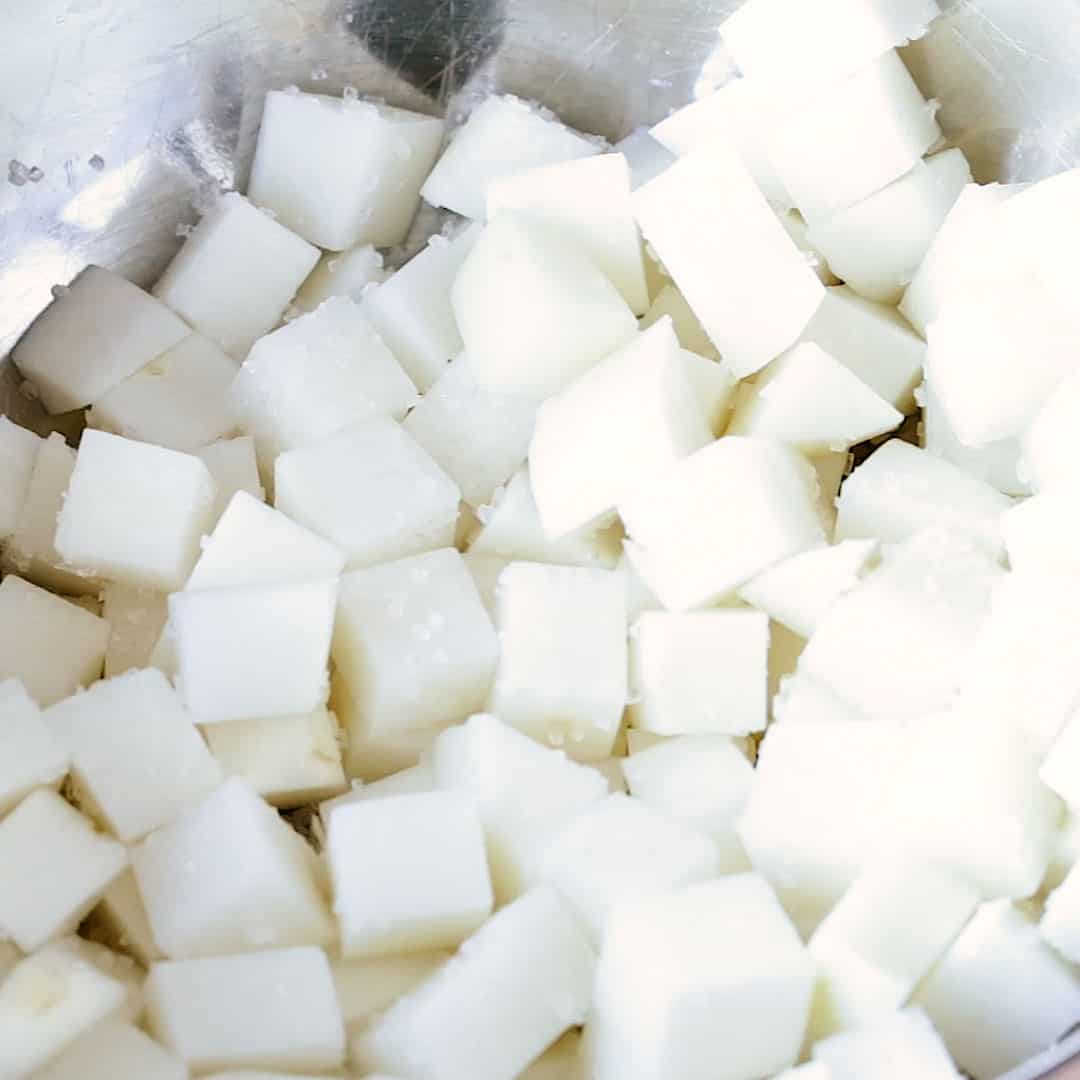
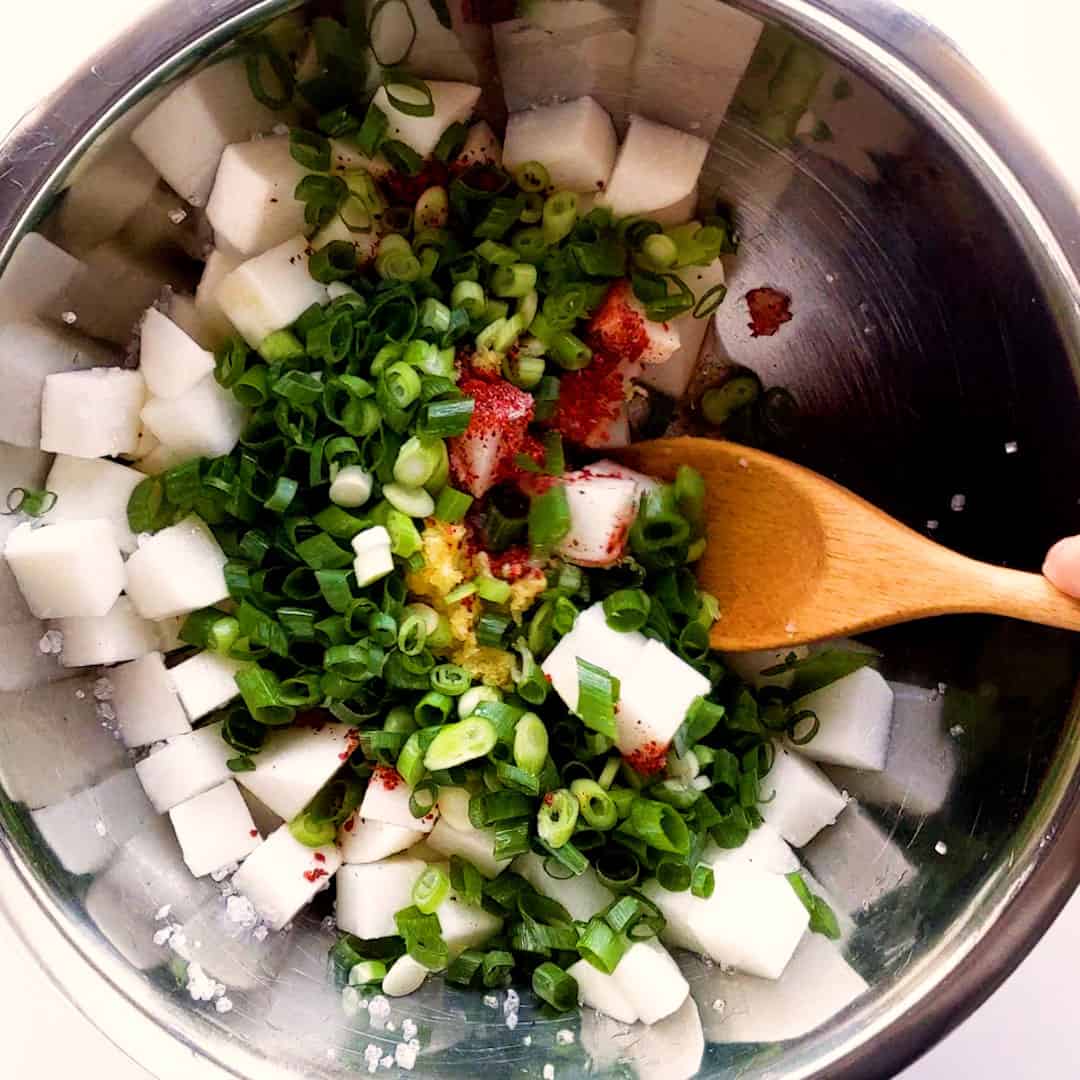
- In a large bowl, add the cubed Korean radish and coarse sea salt. Give it a good mix and optional leave for 10 minutes to bring out a little liquid.
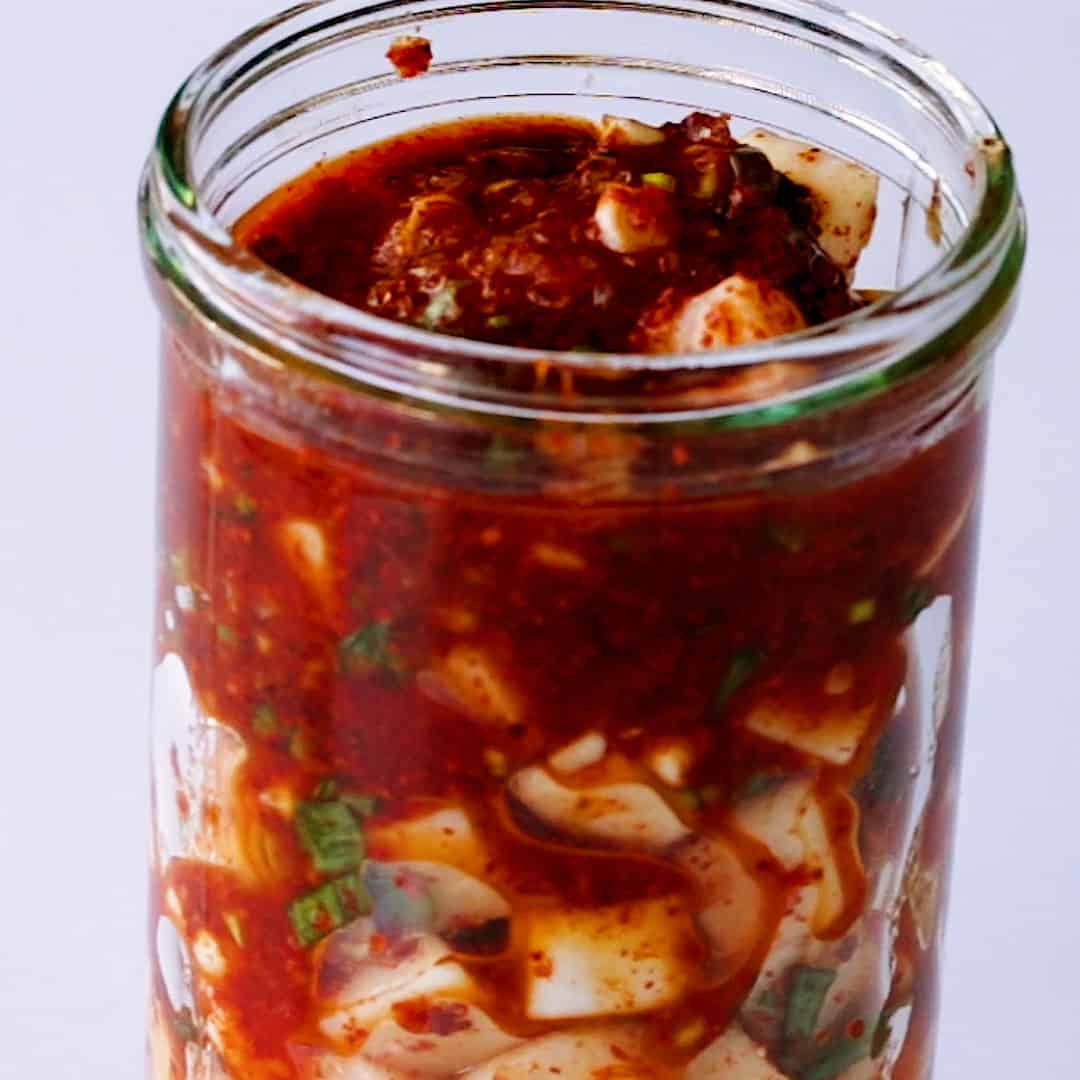
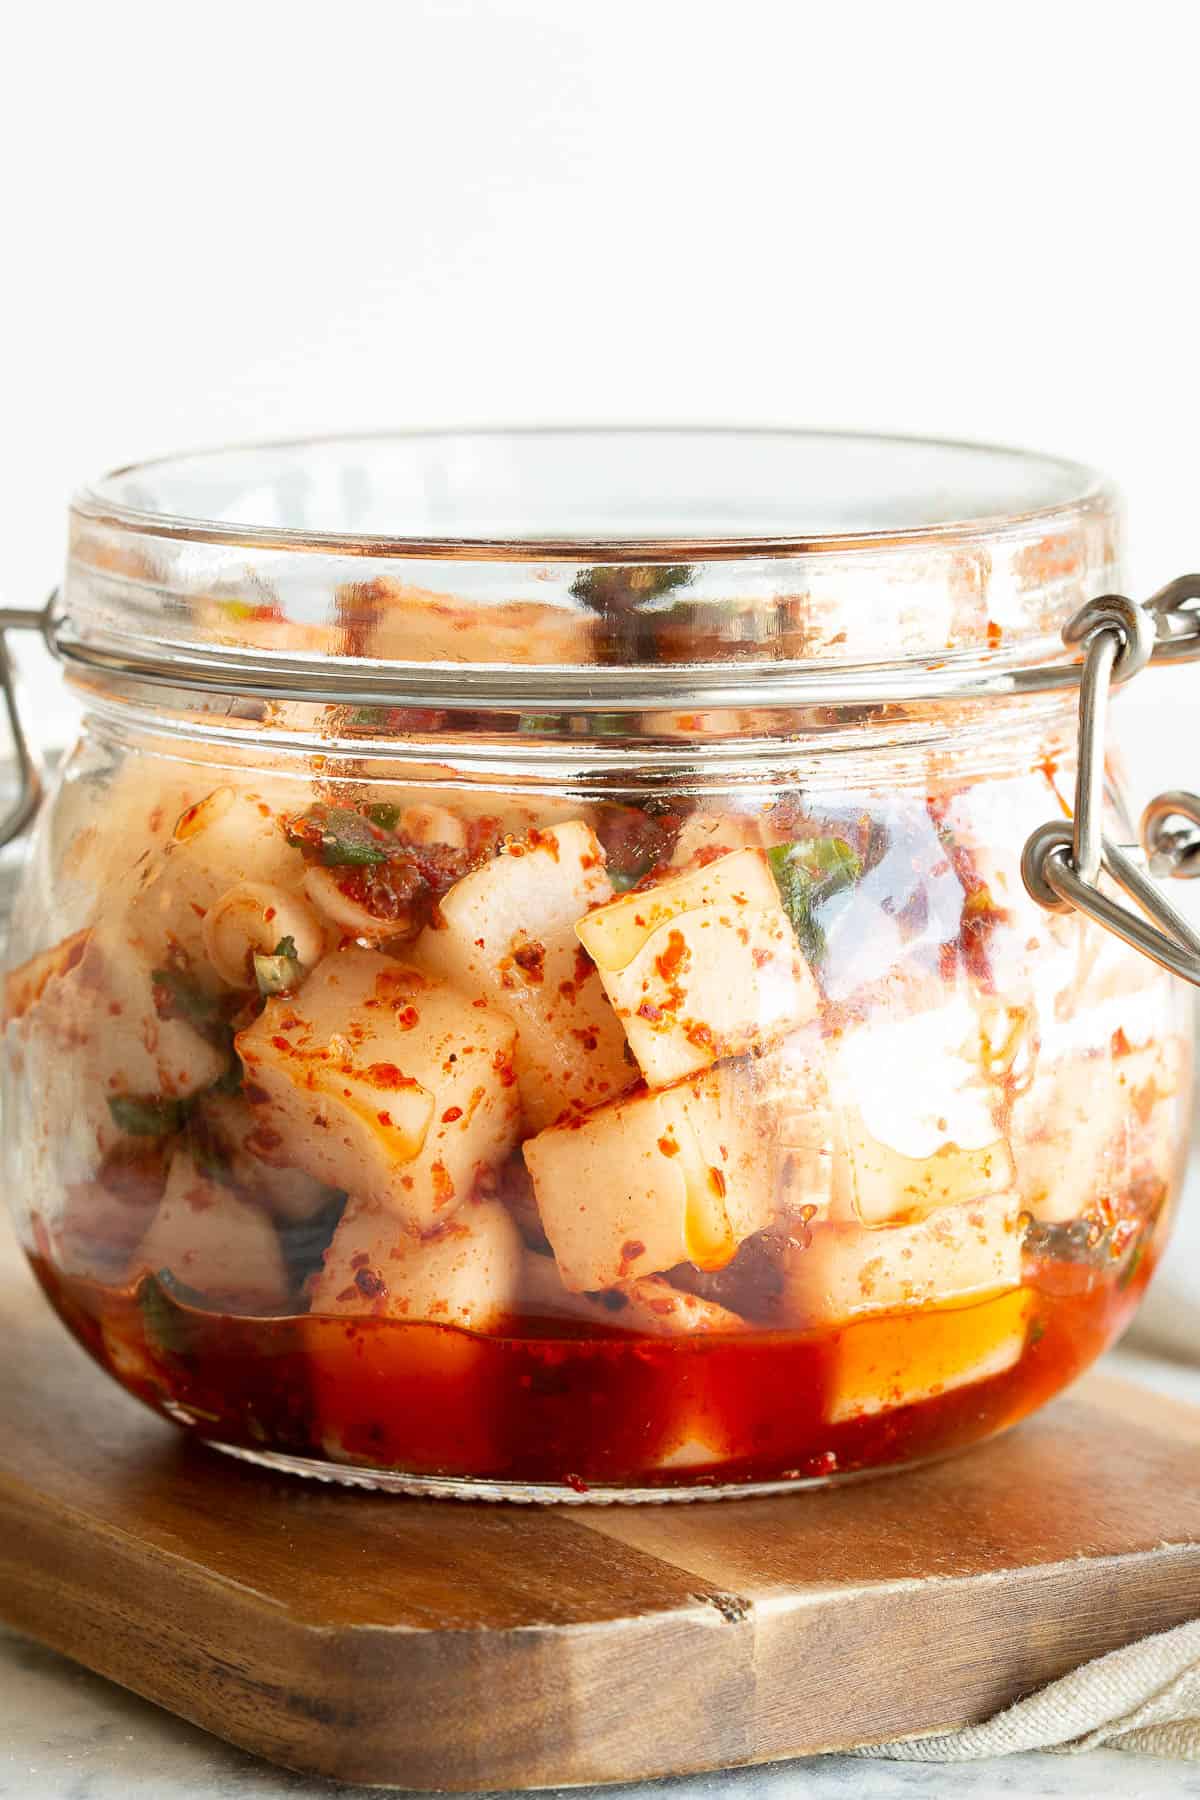
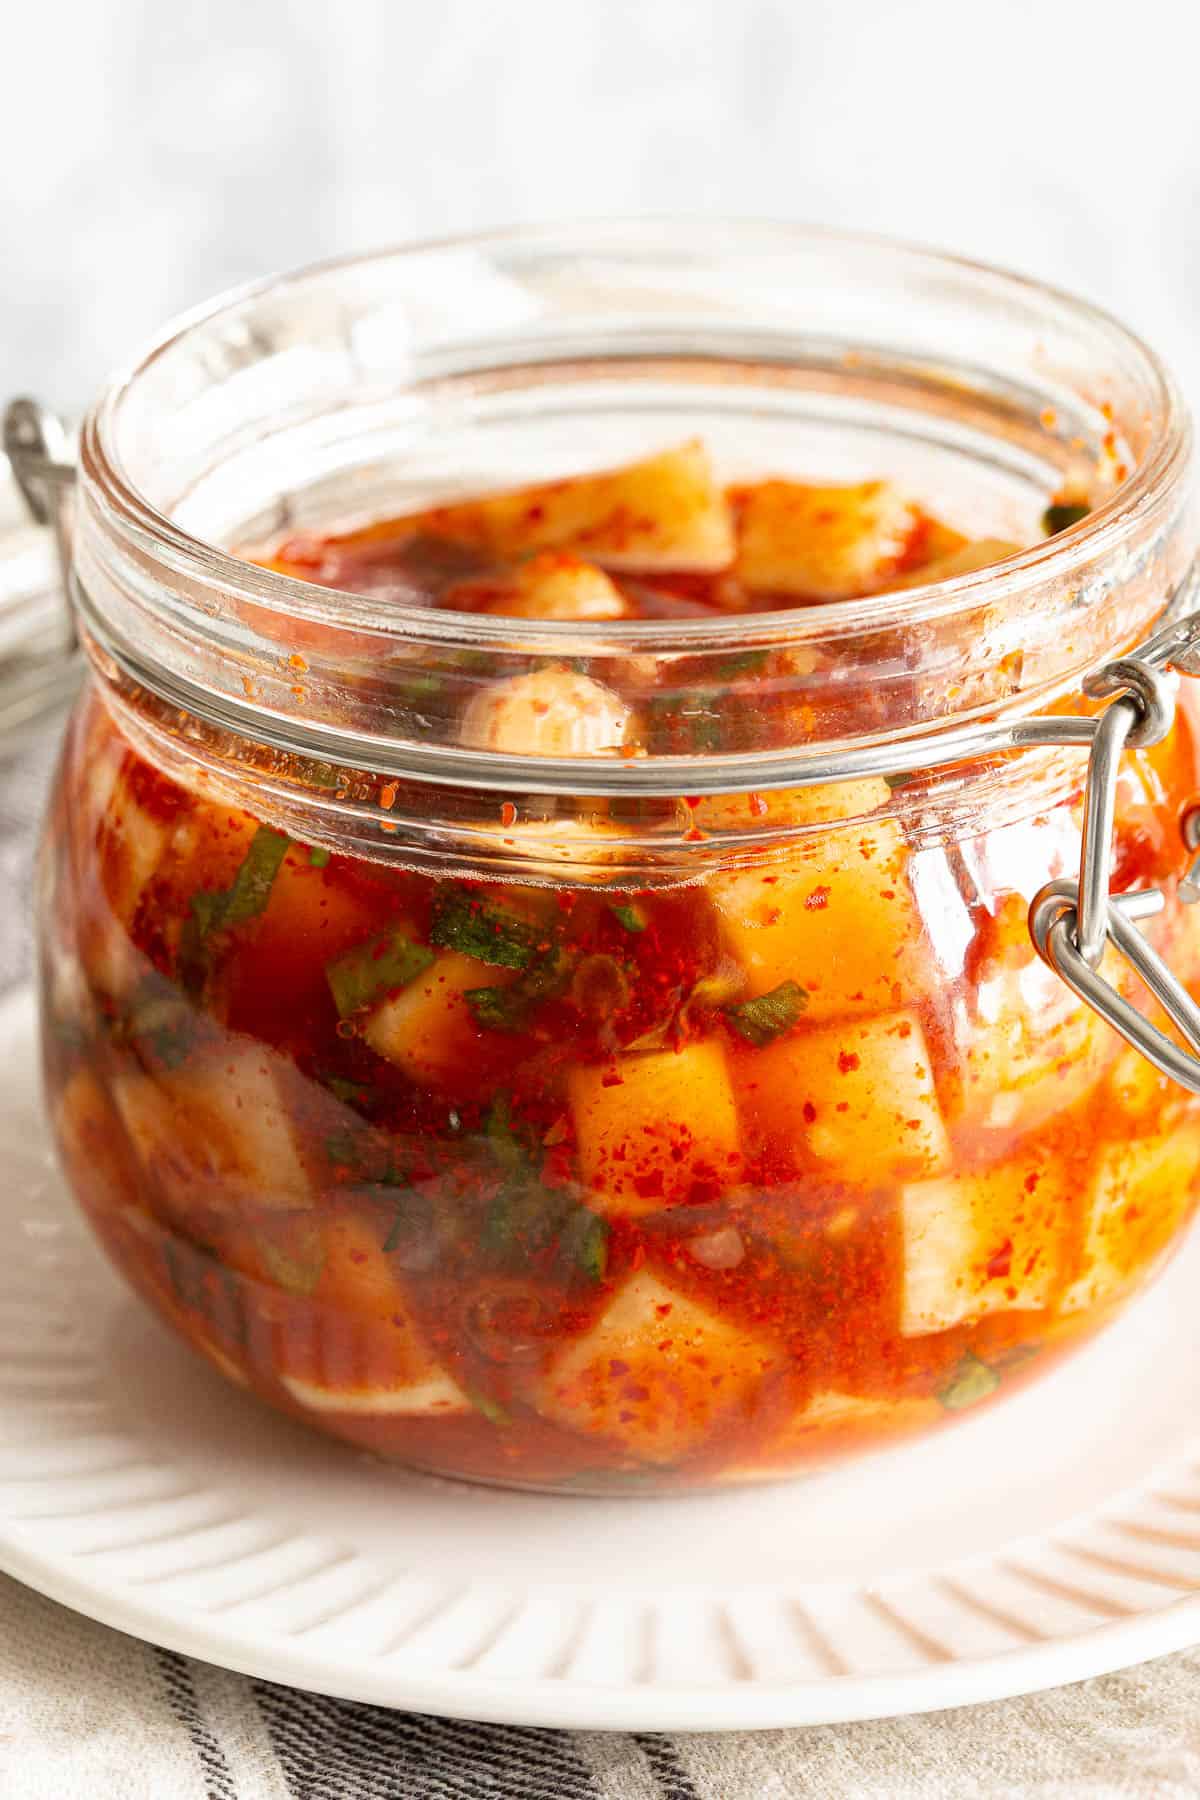
- Next, add the gochugaru, sugar, fish sauce, garlic and spring onion. Give everything a good mix and place in an airtight jar. Tip: Spoon into your jar or use kitchen gloves if using your hands to prevent staining your fingers.
- You can either eat it straight away as a side dish or snack, while the radish cubes are still quite crunchy, or leave out on the bench at room temperature and pop it in the fridge after a day or two to allow for a funkier, fermented radish kimchi. At this stage, it may become slightly bubbly and take on a stronger, more sour note. Enjoy!
Wandercook’s Tips
- Fermentation – This recipe does go through a fermentation process (the development of good bacteria). Please make sure you use clean utensils and jars every step of the way for the best success. If at any point you notice mould or a bad smell (not the good umami stench, but the kind that makes you not feel good), ditch the batch and start again.
- Storage – Sterilised jars are best, or if they’ve been through the dishwasher, that’s fine. Once it’s in the fridge after it’s fermented on the bench for a day or two (and you haven’t eaten the whole batch fresh!), it should keep for at least a month or two. Again, keep an eye on it. Any growth or bad smells and you need to throw it out.
- Cutting the Radish – Try and keep your cubes as uniform as possible. Having them all a similar size will help them to ferment evenly and give you the best all round flavour and texture throughout. It’ll be totally fine if they’re slightly uneven, so don’t stress toooo much about this. It may just mean a large piece is slightly crunchier / absorbs less seasoning for example, but will still be perfectly edible.
FAQs
As long as it’s not too fermented yet, you can add more diced fresh radish (unsalted) to the mix. This will help reduce the saltiness.
Otherwise, you can use the salty kkakdugi to flavour soups and stews rather than eating fresh as a banchan (side dish).
The short answer is – it depends! It’s all about personal preference. If you like bright flavours and high crunch factor, you’ll like eating it straight away. If you’re a fan of rich umami flavours and sour notes, allowing the radish to really take on the flavours of the seasoning, then be patient and wait those couple of days before you start eating it.
If it’s your first time trying it, eat a piece at every stage of the development to see what you like. You may even find you prefer it in dish amongst other flavours rather than as a side dish. It’s entirely up to you!
Yes! Fill your sink with cold / room temperature water out the tap and let it soak for 4-8 hours. It will absorb the water and return to it’s nice hard and crisp state. You can even do this at night, so you can make your recipe first thing in the morning without having to wait.
Variations
- Make it Vegan – Sub out the fish sauce for 1-to-1 vegan fish sauce or kombu dashi (seaweed stock), or use 1 tbsp of red miso paste.
Try these amazing recipes next:
★ Did you make this recipe? Please leave a comment and a star rating below!

Equipment
- 1 Glass jar or bottle for storage large
Ingredients
- 1 Korean radish / mu cubed, approx. 700 g / 25 oz, sub daikon
- ½ tbsp coarse sea salt
- 4 tbsp Korean hot pepper flakes / gochugaru
- 3 tbsp sugar sub Korean plum extract
- 3 tbsp fish sauce
- 2 tbsp garlic
- 2 spring onion chopped finely
Instructions
- In a large bowl, add the cubed Korean radish and coarse sea salt. Give it a good mix and optional leave for 10 minutes to bring out a little liquid.1 Korean radish / mu, ½ tbsp coarse sea salt
- Next, add the gochugaru, sugar, fish sauce, garlic and spring onion. Give everything a good mix and place in an airtight jar. Tip: Spoon into your jar or use kitchen gloves if using your hands to prevent staining your fingers.4 tbsp Korean hot pepper flakes / gochugaru, 3 tbsp sugar, 3 tbsp fish sauce, 2 tbsp garlic, 2 spring onion
- You can either eat it straight away as a side dish or snack, while the radish is still quite crunchy, or leave out on the bench at room temperature and pop it in the fridge after a day or two to allow for a funkier, fermented radish kimchi. At this stage, it may become slightly bubbly and take on a stronger, more sour note. Enjoy!
Video

Recipe Notes
- Fermentation – This recipe does go through a fermentation process (the development of good bacteria). Please make sure you use clean utensils and jars every step of the way for the best success. If at any point you notice mould or a bad smell (not the good umami stench, but the kind that makes you not feel good), ditch the batch and start again.
- Storage – Sterilised jars are best, or if they’ve been through the dishwasher, that’s fine. Once it’s in the fridge after it’s fermented on the bench for a day or two (and you haven’t eaten the whole batch fresh!), it should keep for at least a month or two. Again, keep an eye on it. Any growth or bad smells and you need to throw it out.
- Cutting the Radish – Try and keep your cubes as uniform as possible. Having them all a similar size will help them to ferment evenly and give you the best all round flavour and texture throughout. It’ll be totally fine if they’re slightly uneven, so don’t stress toooo much about this. It may just mean a large piece is slightly crunchier / absorbs less seasoning for example, but will still be perfectly edible.
- Make it Vegan – Sub out the fish sauce for 1-to-1 vegan fish sauce or kombu dashi (seaweed stock), or use 1 tbsp of red miso paste.
Nutrition


4 Comments
Pat
10/12/2023 at 4:39 amMy radish Kim chi is too salty. Can I take it out of the fridge and add more sugar? Thanking you for your response. Otherwise, the recipe is delicious
Wandercooks
12/12/2023 at 12:05 pmHey Pat, if your salt isn’t coarse, this could be the reason it’s too salty. You could try adding a little more sugar and leaving out to ferment for a further day or two to develop the more sour notes. For the next batch if using regular salt, try 3/4 tsp instead.
chelo
06/10/2023 at 2:38 amDo you discard the liquid from the daikon and salt mixture?
Wandercooks
06/10/2023 at 1:30 pmKeep the liquid, that’ll add to help covering your pieces of daikon. 😀