Temaki sushi is the EASIEST way to make hand roll sushi at home, no bamboo mat or rolling skills required. All you need is sushi rice, seaweed wrappers and your favourite fillings, and you’ll be ready to enjoy a sushi party in no time!
Why We Love This
Temaki sushi is so much fun and perfect for entertaining. It’s easy to host a sushi party at home too – get a few ingredients prepped in advance, then sit back, relax and let everyone make their own sushi with their favourite sushi combinations.
There’s no need for a special bamboo mat, and no fuss over perfect rolling or slicing skills.
Depending on your budget, you can upscale or downscale the type and quality of filling ingredients, from high quality sashimi to more budget friendly rotisserie chicken or canned tuna.
P.S. It’s easy to cook sushi rice at home too – check out our guide for how to cook sushi rice (using a rice cooker, instant pot or stovetop).
Related: Takuan Pickles / Japanese Sauces
What is Temaki Sushi?
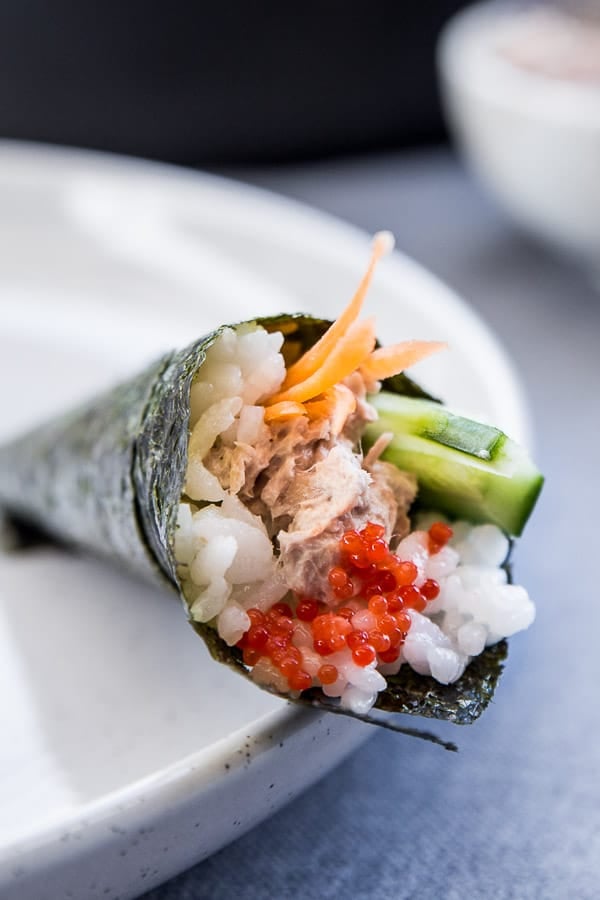
Temaki sushi (手巻き寿司) is made of the words te (hand) and maki (to roll). Hand roll sushi is very similar to regular sushi and even uses the same basic ingredients. The biggest difference is in the final shape and how they are rolled.
Hand roll sushi is made without the use of a bamboo mat. Instead, like the name implies, you roll it into a cone shape using your hands. They’re typically served with classic Japanese condiments like soy sauce, wasabi paste and pickled ginger.
This style of sushi is usually served at parties or gatherings at home, where the various ingredients are spread out in bowls or platters on the table for guests to pick and choose their fillings and flavour combinations.
What You’ll Need
Base Ingredients:
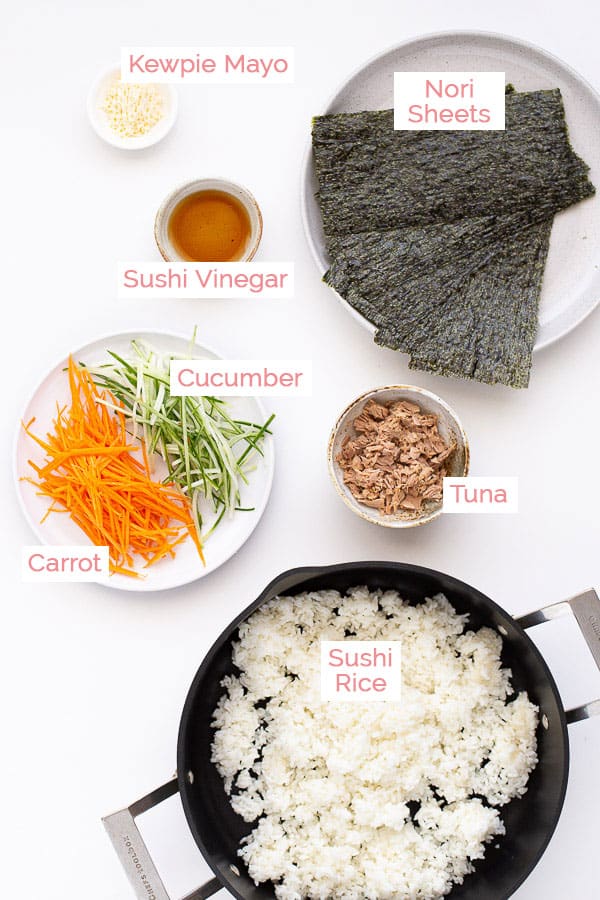
- Cooked Sushi Rice – Short grain sushi rice
 such as nishiki or koshihikari will give your sushi cones the most authentic flavour and texture. See our full guide for how to cook sushi rice using a rice cooker, instant pot or stove-top.
 - Sushi Vinegar – Adds a subtle flavour to the rice. Substitute with 2 tbsp rice wine vinegar, 1 tsp sugar and a pinch of salt if you need, or just leave it out.
- Nori Seaweed Sheets – Can be labelled as nori, yakinori or roasted seaweed sheets. They’re becoming more widely available in supermarkets as well as import stores, or you can buy yakinori online. If you can’t source them (or don’t like the taste) sub with large lettuce leave, spinach leaves or rice paper.
- Fillings – No need to source sashimi-grade fish (unless you want to, of course!). We’ve put together our favourite list of super simple temaki sushi ingredients, so you can pick and choose the ones you like best.
Filling Ideas (Easy and/or Budget Friendly):
- Canned tuna mixed with homemade kewpie mayo – add shichimi togarashi to make it spicy tuna
- Shredded roast chicken (great with or without kewpie mayo) or sliced teriyaki chicken
- Thinly sliced cucumber and carrot – use this style of grater to achieve super thin strips, or slice in thin julienne slices
- Fried fofu – cut into sticks rather than cubes
- Takuan – yellow pickled daikon
- Beni shoga – red pickled ginger
- Wasabi paste – check the Asian aisle at your local supermarket, or sub with a small dab of horseradish
- Shichimi togarashi – Japanese chilli powder, sub with regular chilli powder
Filling Ideas (High Quality):
- Sashimi grade raw fish (tuna, salmon, kingfish are all good places to start)
- Japanese sliced omelette
- Shiso leaves (also known as perilla leaves)
- Avocado – sliced into long thin strips
- Cooked prawns / shrimp – amazing when crumbed or battered!
- Smoked salmon + cream cheese
- Fish roe – may also be labelled as caviar
How to Make Temaki Sushi
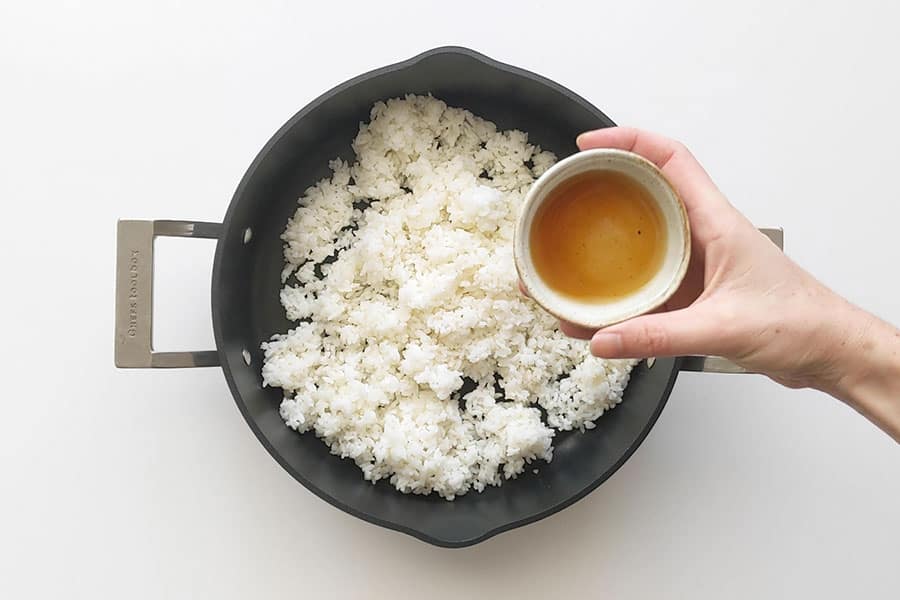
- Transfer cooked sushi rice to a wide, flat-bottomed pan or dish. Pour the sushi vinegar over the cooked rice and mix gently with a flat rice paddle to avoid breaking any of the grains. Allow the rice to cool completely before serving. Optional: Stir through some Japanese rice seasoning / nori komi furikake for extra flavour.
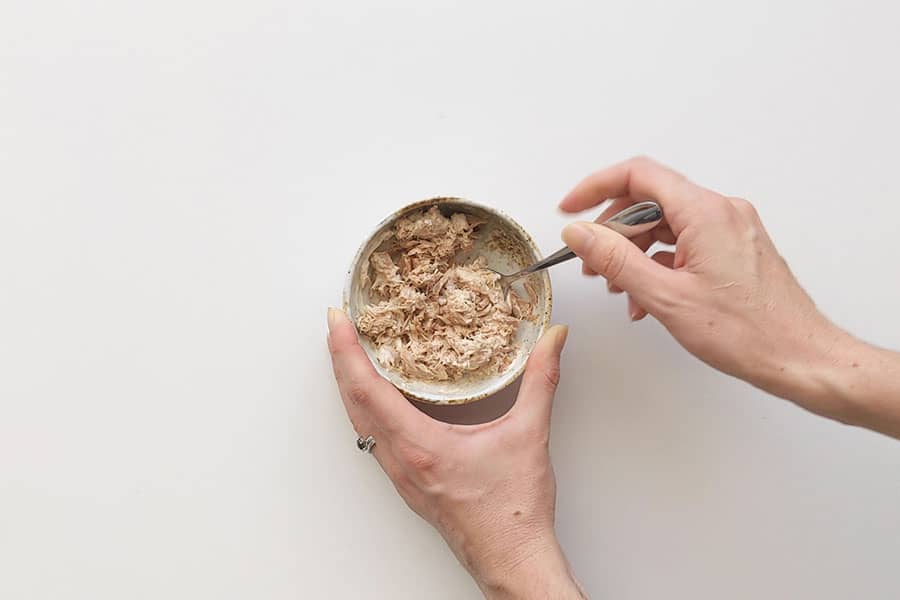
- Mix tuna and kewpie mayo in a small bowl until well combined. Add more kewpie mayo as required until you have a smooth texture and delicious flavour.
To Assemble Your Temaki Sushi:
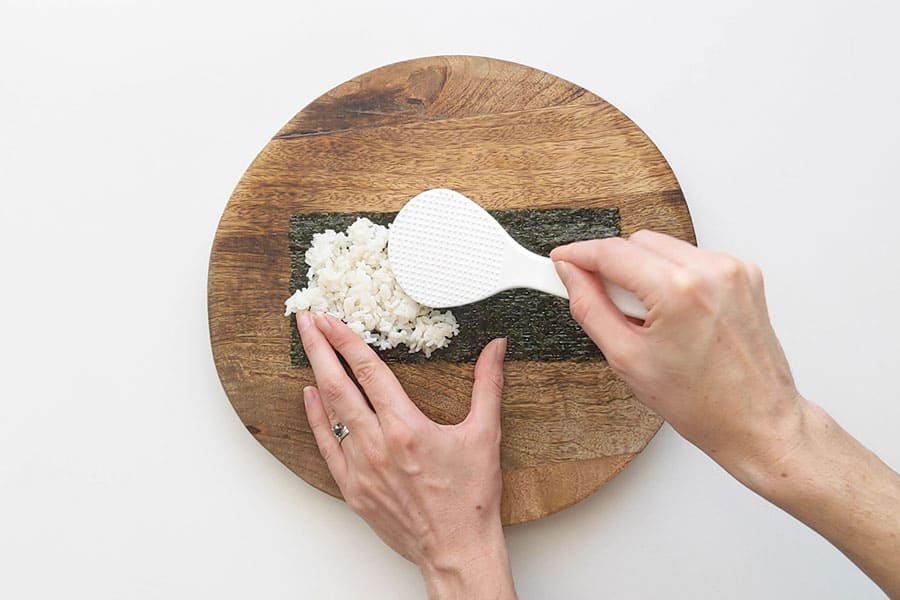

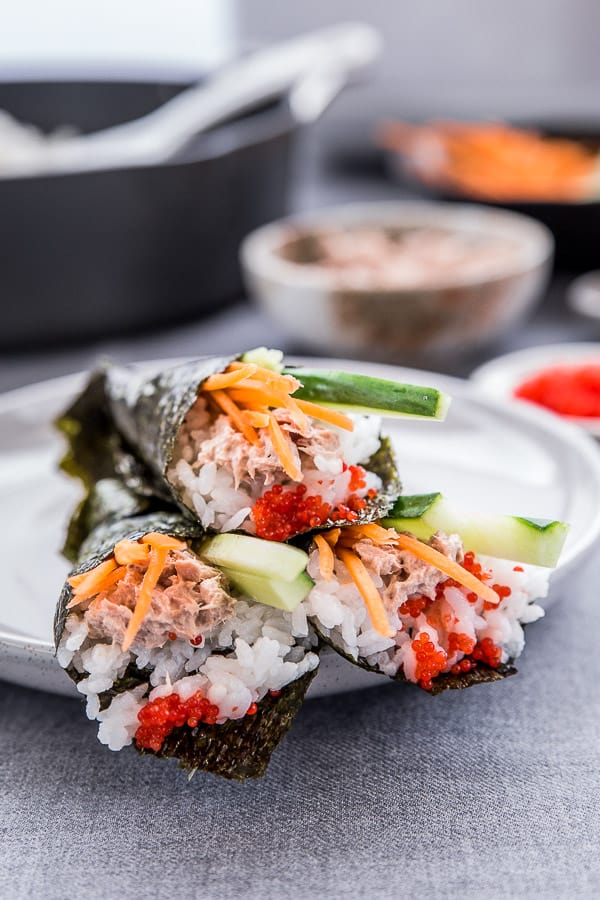
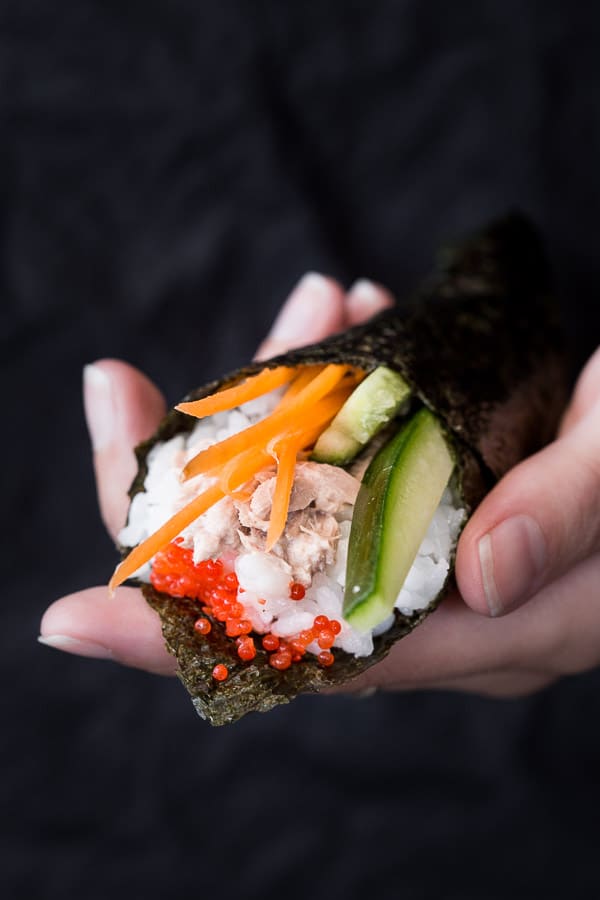
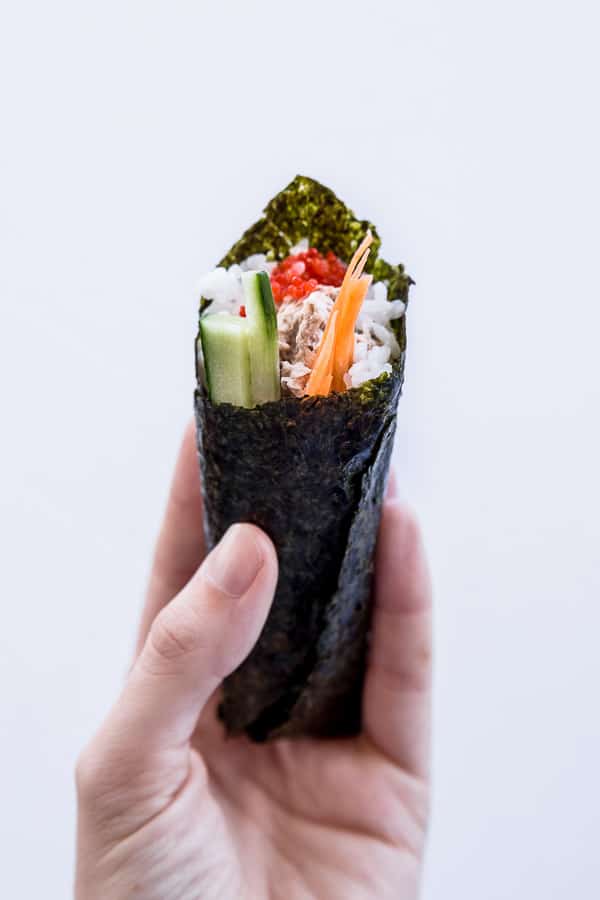
- Take up a sheet of nori (sliced or broken it in half into a rectangle shape) and place it in your hand or on a plate. Top with a scoop of rice in the top left corner in a roughly triangular shape.
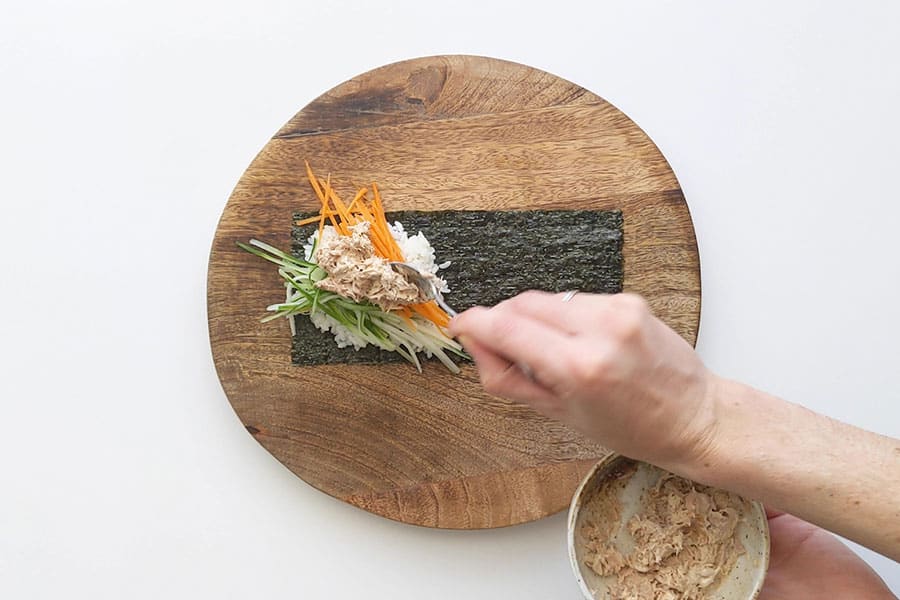
- Layer on your chosen fillings (such as the tuna with kewpie mayo, carrot and cucumber). Fold the bottom left corner up and over the fillings, then continue to roll into a cone shape. If you’re unsure how to do this, see out our temaki sushi video tutorial.
Wandercook’s Tips
- Rice – Rinse the rice a few times before cooking to remove excess starch. This will give you the best and fluffiest texture once cooked. Never use a metal spoon when handling the rice. It could damage the rice grains (not to mention the rice cooker bowl) and it could react with the rice vinegar. Don’t be tempted to cool the rice in the fridge to save time – it can damage the rice texture and change the flavour.
- Seasoning – Feel free to experiment with the amount of rice vinegar. Add it in gradually and taste test the rice until you’re happy with the strength of flavour.
- Shape – Roll up into the traditional temaki cone shape, or just roll up into regular sushi rolls by hand.
- Storage – These sushi rolls are best enjoyed immediately while fresh. You could possibly make them a few hours in advance and keep them in the fridge until you’re ready to serve, but the textures of the rice and seaweed wrapper will change.
- Condiments – Some people like to serve condiments like soy sauce and kewpie in small dipping bowls per person. Others like to pour a little of each in the sushi rolls before wrapping them up. It’s completely up to you!
FAQs
Temaki sushi is rolled by hand (no bamboo mat), usually into the shape of a cone or sometimes into a regular roll shape. Maki sushi is always made using a bamboo mat, and then usually cut and served in bite size pieces.
Maki sushi is more likely to be found in restaurants and supermarkets, whereas temaki is much more homestyle and usually served at sushi parties or gatherings with friends or family.
We love to serve temaki sushi with small dipping bowls filled with soy sauce and a dab of wasabi paste. They’re also great with pickled ginger or yellow pickled daikon, kewpie mayo or goma dare sesame sauce and shichimi togarashi chilli powder.
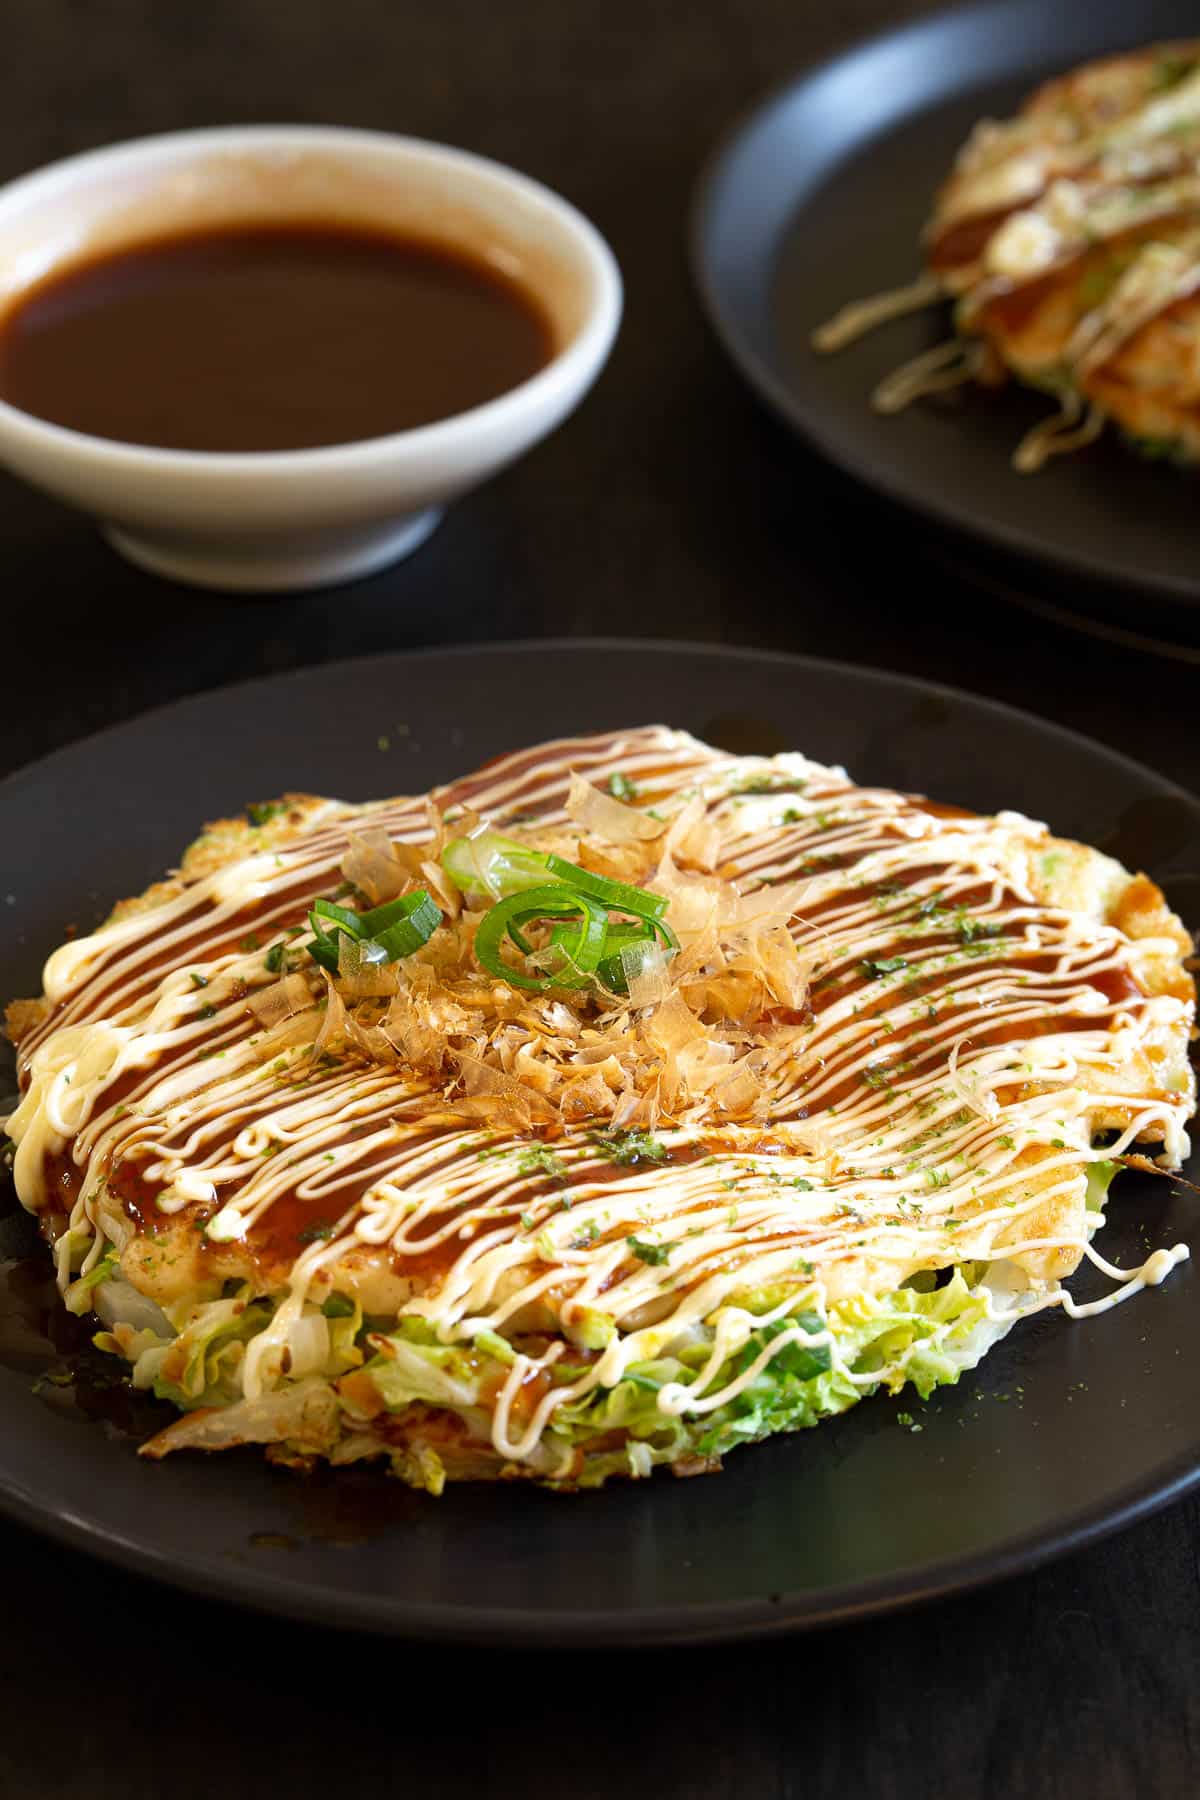
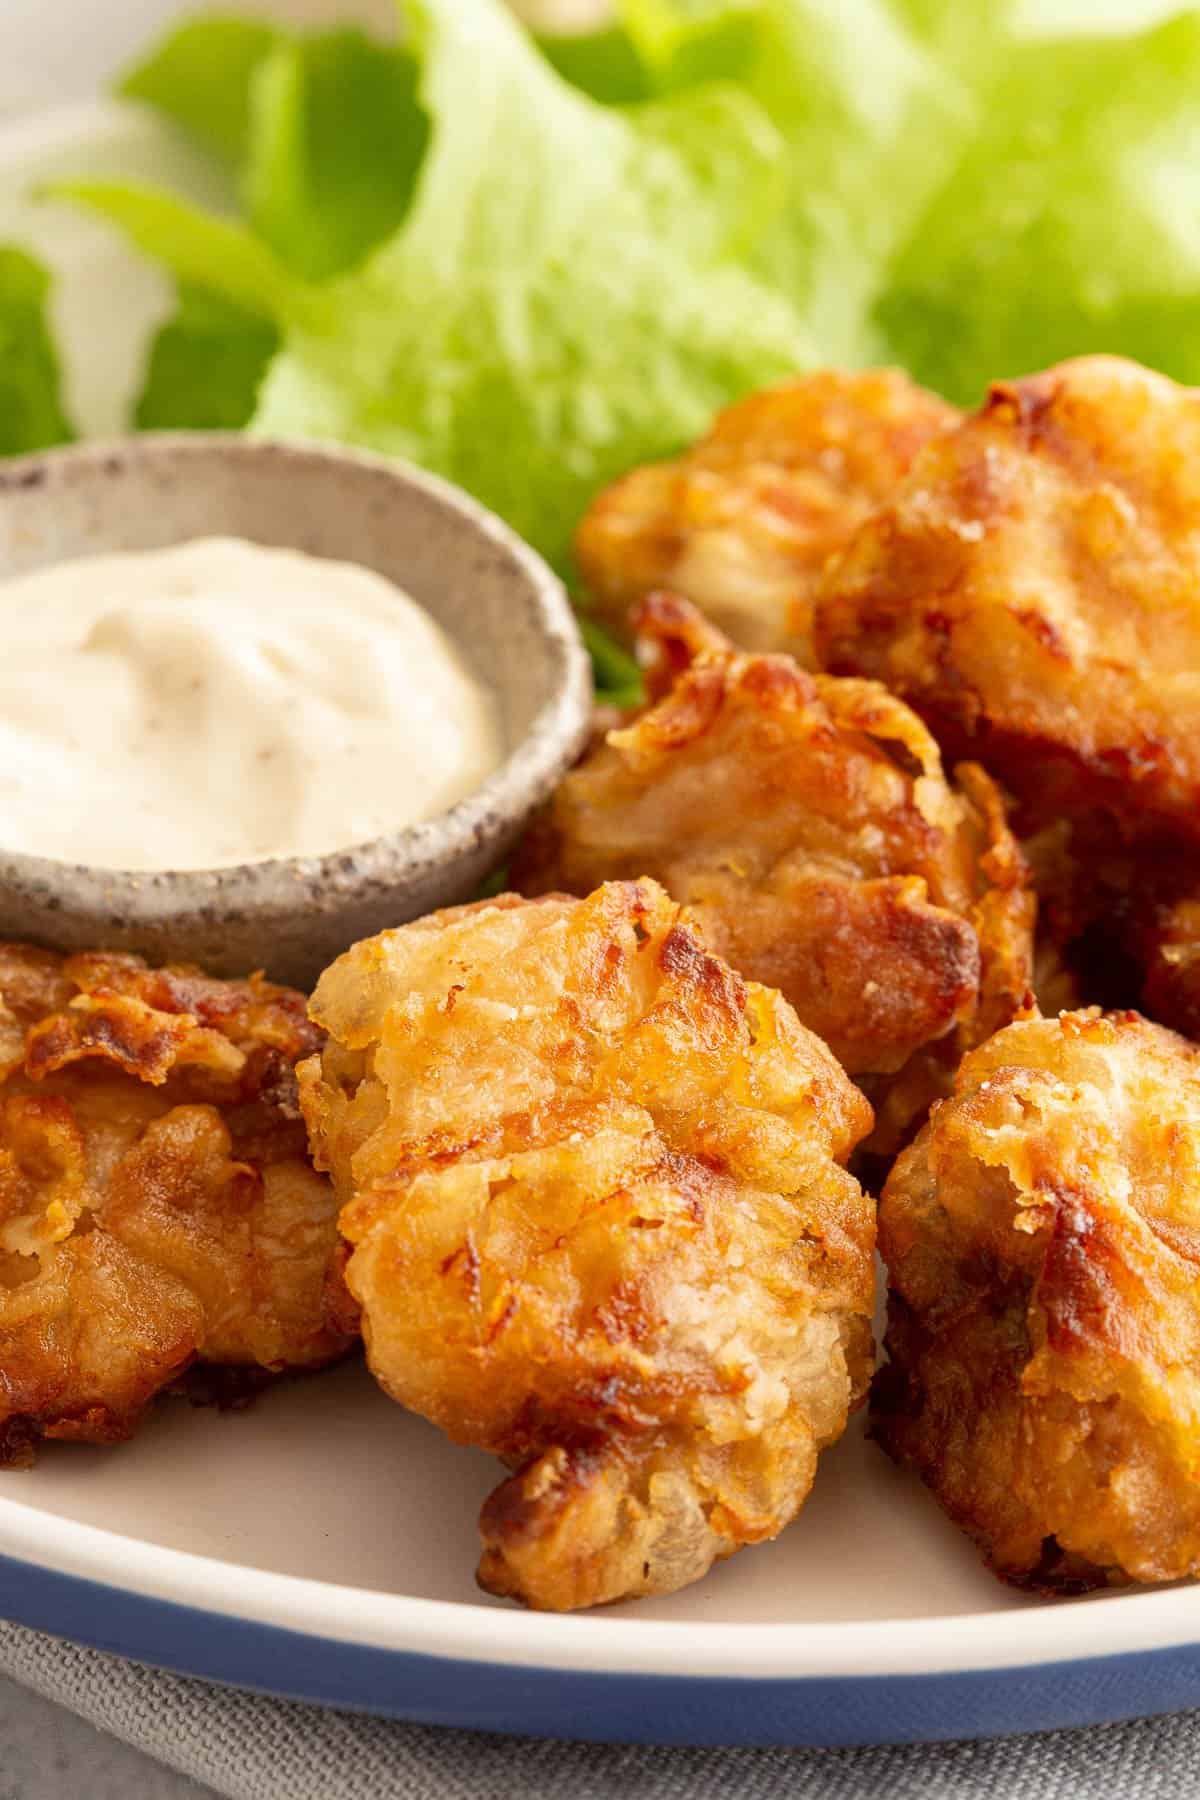
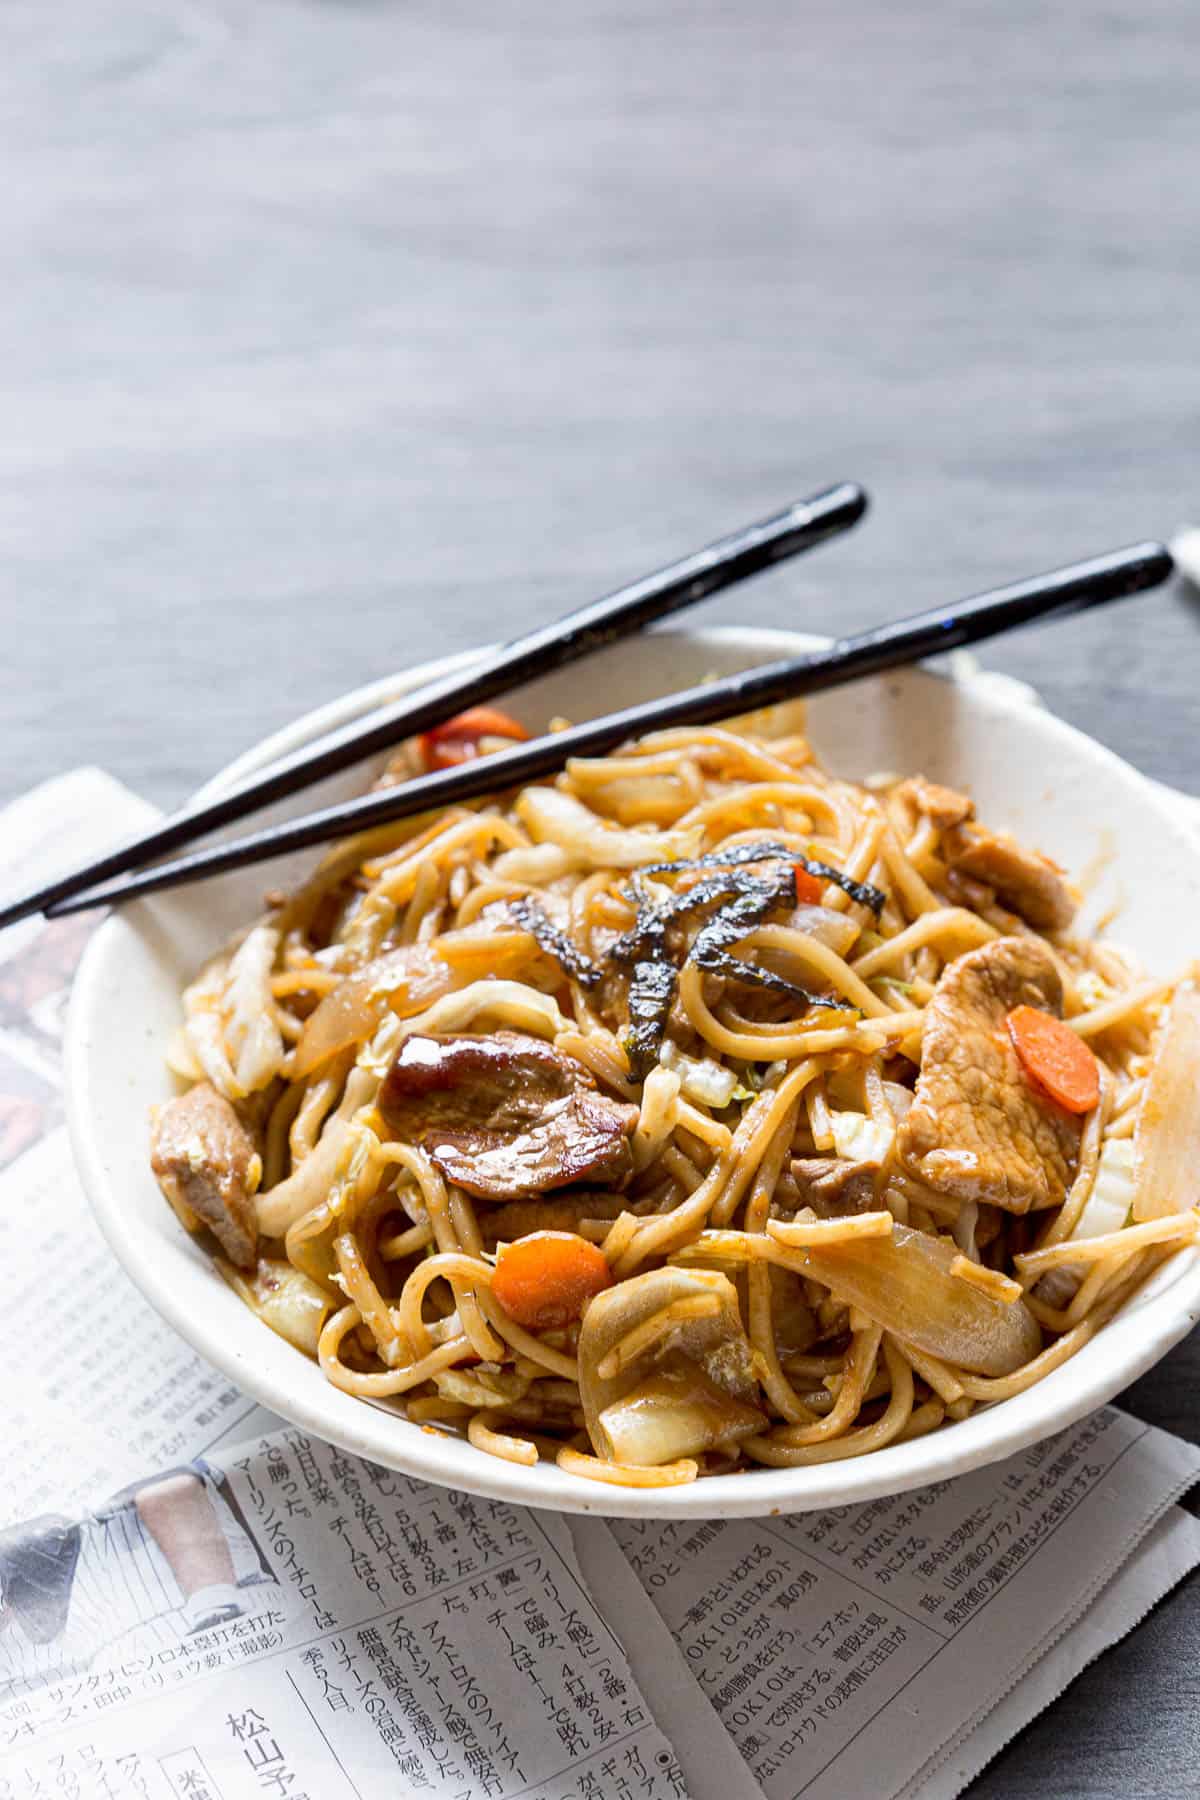
If you’re entertaining and want a few other Japanese dishes to serve alongside your homemade sushi, we recommend crispy fried gyoza dumplings, miso soup, udon noodles, or Japanese potato salad to share. Finish it off with a batch of sweet daifuku mochi or matcha ice cream.
For best results, we recommend using short grain Japanese rice such as koshihikari![]() . It becomes sticky (but not gluggy) when cooked, making it the best choice of rice to make sushi that won’t fall apart.
. It becomes sticky (but not gluggy) when cooked, making it the best choice of rice to make sushi that won’t fall apart.
It’s technically possible to use jasmine rice, although the flavour isn’t the same and it won’t hold together quite as well. But it can work just fine if that’s all you have on hand.
If you’re cooking rice from scratch, remember that 1 cup of uncooked rice will yield around 3 cups of cooked rice.
We use six cups of cooked rice in this recipe (2 cups of uncooked rice) which should leave you with approximately 12 sushi rolls.
We like to allow 2-3 rolls per person if you’re serving them as a light dinner without sides. Cook more rice if you’ll be serving more people.
The easiest way to cook sushi rice for regular sushi or temaki sushi is in a rice cooker![]() . All you need to do is pop in the rice, fill with water to the line, set to rice mode and press start. Simple! Perfectly cooked, fluffy sushi rice with no sticky, overcooked rice stuck to the bottom. You can also cook the rice in an instant pot, pressure cooker or manually on the stove. See our full guide on how to cook sushi rice for more detailed instructions.
. All you need to do is pop in the rice, fill with water to the line, set to rice mode and press start. Simple! Perfectly cooked, fluffy sushi rice with no sticky, overcooked rice stuck to the bottom. You can also cook the rice in an instant pot, pressure cooker or manually on the stove. See our full guide on how to cook sushi rice for more detailed instructions.

Variations
- Fillings – Feel free to experiment as much as you like with different filling combinations. Temaki sushi is a great way to use up leftover fresh veggies, stir fried veggies like kinpira gobo, tofu, fish or chicken, not to mention rice!
- Lazy Version – Don’t feel like making sushi hand rolls? Just layer all the ingredients in a bowl and serve as sushi rice bowls instead. You can even top with shredded nori sheets.
- Leftover Rice? – Make onigiri rice balls or zosui rice soup.
- Don’t Like Nori? – Make rice paper rolls instead.
Make it a feast with these Japanese recipes:
★ Did you make this recipe? Please leave a comment and a star rating below!
Ingredients
For the rice:
- 6 cups cooked sushi rice this equals 2 cups of uncooked sushi rice if you need to cook a fresh batch
- 2 tbsp sushi vinegar Sub with 1½ tbsp rice wine vinegar, 1 tsp sugar and a pinch of salt
For the wrapper:
- 2 nori sheets / seaweed sheets per person, sliced in half
For the fillings:
- 200 g tuna canned, in brine
- 2-3 tbsp kewpie mayonnaise
- 1 carrot finely sliced
- 1 cucumber sliced into strips
Instructions
- Transfer cooked sushi rice to a wide, flat-bottomed pan or dish.6 cups cooked sushi rice
- Pour the sushi vinegar over the cooked rice and mix gently with a flat rice paddle to avoid breaking any of the grains. Allow the rice to cool completely before serving. Optional: Stir through some Japanese rice seasoning / nori komi furikake for extra flavour.2 tbsp sushi vinegar
- Mix tuna and kewpie mayo in a small bowl until well combined. Add more kewpie mayo as required until you have a smooth texture and delicious flavour.200 g tuna, 2-3 tbsp kewpie mayonnaise
To Assemble Your Temaki Sushi:
- Take up a sheet of nori (sliced or broken it in half into a rectangle shape) and place it in your hand or on a plate. Top with a scoop of rice in the top left corner in a roughly triangular shape.2 nori sheets / seaweed sheets
- Layer on your chosen fillings (such as the tuna with kewpie mayo, carrot and cucumber). Fold the bottom left corner up and over the fillings, then continue to roll into a cone shape. If you’re unsure how to do this, see out our temaki sushi video tutorial. Optional: Serve with soy sauce and wasabi.1 carrot, 1 cucumber, soy sauce, wasabi
Video

Recipe Notes
- Cooked Sushi Rice – Short grain sushi rice such as nishiki or koshihikari will give your sushi cones the most authentic flavour and texture. See our full guide for how to cook sushi rice using a rice cooker, instant pot or stove-top. Rinse the rice a few times before cooking to remove excess starch. This will give you the best and fluffiest texture once cooked. Never use a metal spoon when handling the rice. It could damage the rice grains (not to mention the rice cooker bowl) and it could react with the rice vinegar. Don’t be tempted to cool the rice in the fridge to save time – it can damage the rice texture and change the flavour.
- Sushi Vinegar – Adds a subtle flavour to the rice. Feel free to experiment with the amount of rice vinegar. Add it in gradually and taste test the rice until you’re happy with the strength of flavour. Substitute with 2 tbsp rice wine vinegar, 1 tsp sugar and a pinch of salt if you need, or just leave it out.
- Nori Seaweed Sheets – Can be labelled as nori, yakinori or roasted seaweed sheets. They’re becoming more widely available in supermarkets as well as import stores, or you can buy yakinori online. If you can’t source them (or don’t like the taste) sub with large lettuce leaves or spinach leaves.
- Fillings – No need to source sashimi-grade fish (unless you want to, of course!). We’ve put together our favourite list of super simple temaki sushi ingredients, so you can pick and choose the ones you like best.
- Shape – Roll up into the traditional temaki cone shape, or just roll up into regular sushi rolls by hand.
- Storage – These sushi rolls are best enjoyed immediately while fresh. You could possibly make them a few hours in advance and keep them in the fridge until you’re ready to serve, but the textures of the rice and seaweed wrapper will change.
- Condiments – Some people like to serve condiments like soy sauce and kewpie in small dipping bowls per person. Others like to pour a little of each in the sushi rolls before wrapping them up. It’s completely up to you!
Nutrition


32 Comments
Danielle Wolter
16/07/2019 at 8:16 pmWhat a great idea! I love the idea of making my own sushi at home. It’s fancy 🙂 you make it seem so easy, can’t wait to try it!
Wandercooks
17/07/2019 at 4:26 pmThanks Danielle. It’s definitely easier than you think when hand-rolled. We’ve got the whole family in on it! 😀
Dannii
16/07/2019 at 8:02 pmWe love making our own sushi. It saves us a fortune and we can put whatever we want in them.
Wandercooks
17/07/2019 at 4:25 pmExactly. Couldn’t agree more. It’s always fun when you make them yourself.
Bintu | Recipes From A Pantry
16/07/2019 at 6:28 pmI love making sushi at home, this looks SO good! Will definitely give it a go.
Wandercooks
17/07/2019 at 4:25 pmYay, awesome to hear. Thanks for stopping by Bintu.
Suzy
16/07/2019 at 3:39 pmI am loving all of the tips on how to make sushi! From cooking the rice to rolling it! can’t wait to try it out!
Wandercooks
17/07/2019 at 4:36 pmWoot, woot! Thanks Suzy!
Diana
10/04/2017 at 10:10 pmLove the idea of hand rolling these sushi rolls. I’m planning to make a sushi bowl next week and share it on my blog, much easier than the traditional sushi rolls that I find too time consuming (to make not eat! haha).
Wandercooks
11/04/2017 at 9:53 amOoh that sounds delish, can’t wait to see what you create Diana! 😀
sara | belly rumbles
10/04/2017 at 9:54 pmTemaki is always such a great family meal. Less stress on me, and let the family assemble and make their own. Making the rice in a rice cooker just makes it all the more easier.
Wandercooks
11/04/2017 at 9:53 amAbsolutely Sara, everyone can use their favourite fillings and have fun rolling them up, just like when making Vietnamese Cold Rolls or Summer Rolls. Definitely a fun way to eat together! 😀
Tara
10/04/2017 at 9:08 pmI love how you broke down the ingredients and steps! The Temaki Sushi looks perfect! Such a colorful snack. I will need to check out that rice cooker.
Wandercooks
11/04/2017 at 9:52 amThanks, so glad you enjoyed and I hope they’re helpful for you when you make your own Temaki Sushi. We’re loving the rice cooker, it does a really great job but even better it’s totally hands off until the rice is cooked and fluffy. Apparently we can use it to make rice cooker cheesecake too, so that’s on the list for another experiment!
Dahn
10/04/2017 at 8:38 pmThis looks so good and what a fast and easy way to make sushi. Wouldn’t this be fun to have guests do at a casual party!?!
Wandercooks
11/04/2017 at 9:50 amYep! Also I may have just planned a little sushi party with family for Sarah’s birthday… but shh! 😀
Dannii @ Hungry Healthy Happy
10/04/2017 at 6:38 pmI love making sushi, but we usually just make maki. I like the idea of making individual rolls like this.
Wandercooks
11/04/2017 at 9:49 amIt’s so much fun isn’t it Dannii! You can pretty much roll these however you want, as a cone shape like we did or the more standard cylindrical maki shape… you could even make sushi sandwiches with them if you want!
Luci's Morsels
10/04/2017 at 3:17 pmThis looks so good! I am having some serious dinner envy!
Wandercooks
11/04/2017 at 9:45 amTee hee, grab your nori and jump right in! 🙂
Cassie @ Be Forever Healthier
31/03/2017 at 3:28 pmI’ve never tried to make my own sushi! I think I might give it a go though because this is a really helpful guide! Thanks 🙂
Wandercooks
03/04/2017 at 4:19 pmOh you’re in for so much fun Cassie! 😀
Becca @ Amuse Your Bouche
30/03/2017 at 6:40 pmLove the look of this type of sushi roll! I’ve made sushi once or twice, but I often find the seaweed quite tough to cut through once I’ve rolled it – so making individual little rolls like this looks much easier!
Wandercooks
03/04/2017 at 4:17 pmYesss! Us too! Unless you wet the knife each time before slicing it (and have a really sharp knife) it can be hard to get that perfect clean cut. No need to worry about that here though! 😀
jane @ littlesugarsnaps
30/03/2017 at 6:38 pmThese rolls look so colourful and appetising. The step by step pictures are a great help to a novice like me too – thanks.
Wandercooks
03/04/2017 at 4:16 pmOh that’s awesome so glad we could help 😀 Thanks for stopping by Jane!
Lisa Bryan | Downshiftology
30/03/2017 at 12:20 pmLove this! I’ve always wanted to roll my own sushi but always thought it was difficult. Definitely going to give this a try!
Wandercooks
30/03/2017 at 12:23 pmAgreed! We often found ourselves going out for sushi or just grabbing some from the convenience stores, but Temaki Sushi is turning out to be even easier than that haha.
Lisa | Garlic & Zest
30/03/2017 at 11:16 amYou make this look so do-able! I am such a huge sushi fan — I may have to give this a try! Your photos are beautiful, too!
Wandercooks
30/03/2017 at 11:19 amAww thanks Lisa, high-fives to another sushi fan! We’re a bit obsessed after discovering this hand-roll method – we’ve had them three times this last week already!